Categories
Kitchen

Oven buying guide

When buying an oven, you need to consider a few things. Should you go with an electric or gas oven? Should you pick one that looks great and stays in one place? There are lots of features to consider and designs to choose from, so hopefully this guide will help you work out what type of oven is best for you.

Electric vs gas ovens

Historically, people have gone for gas ovens because of their heat control. However, electric ovens can heat up and cool down quickly now as well, meaning that there is little difference between the two. Often, people choose electric ovens due to their versatility and multifunctional uses.

Gas ovens, however, are more energy efficient and better for the environment, which is becoming increasingly important to many people. They also help remove moisture from food better, making them more popular amongst chefs.

Source: Nick de Lorenzo Photography

Oven features to look out for

Beyond the appearance of an oven, there are a number of features that you need to consider. Safety features include:

  • Having a door that holds itself open, rather than one that can only be open or closed all the way
  • Safety stops to prevent shelves sliding out
  • Shelves that don’t drop down and sag when taken out this can make cooking heavier dishes more difficult
  • Grill trays shouldn’t sag either, but must extend out enough so that foods at the back can be turned and worked on
  • The grill’s heating element should be safe, eliminating the possibility of having your hands touch the heat source by accident.

Other features include:

  • Having a number of racks
  • Having many rack positioning options at least three
  • Having a smokeless grill tray
  • Having a grill tray with at least two positions

Additional features to look for

After these main features have been considered, other optional features can be looked at, such as:

  • Fan assisted ovens with at least one fan. These are more expensive, but distribute heat better.
  • Quick preheating
  • Defrost functions are also handy for cooking frozen foods.
  • Self-cleaning ovens Catalytic liners will absorb fat, whilst pyrolitic cleaners burn off fat and convert then to ash by heating the oven to extreme heats.
  • Electronic controls make the cooking process more simple, but are an unnecessary and costly extra. Automatic timers, however, are handy options for both cooking and safety.

Types of ovens: Built-in or freestanding?

Freestanding ovens

As you might have guessed from the name, a freestanding oven is installed straight onto the floor. Generally, freestanding ovens combine the oven part with the cooktop to create one all-encompassing unit. They’re very easy to install since they can fit into most spaces. All you’ll need to do is hire an electrician to set the wiring.

As far as style goes, freestanding ovens fit better with traditional designs, but will certainly look fine in just about any kitchen. You can also easily move them out of the way for repairs if something breaks. The only downside to freestanding ovens is that they make the area around them quite hard to clean – the gaps between the benchtop and the oven can be narrow, and will attract plenty of dirt and grime. Also, freestanding ovens might be hard on your back – since you’ll be constantly bending over to check on food and move it out of the way. Take that into consideration before you install one. 

Freestanding ovens come in a variety of options and can be easier to repair / Source: Unitek Constructions

Built-in ovens

Built-in ovens are installed right into your kitchen cabinetry; this design allows for much greater flexibility. You don’t necessarily need to have the oven and the range in one unit. Instead, you can move them to wherever is better in your kitchen. Since the layout is so flexible, you can install the unit higher up – meaning you’ll save a lot of time and pain from constantly bending over. You can have the units installed higher up in the kitchen. They’re designed to flow and fit into whatever different layout you have. 

There are some drawbacks to built-in ovens, though. Since the two different parts of the oven are separate, the oven might take up more space. Also, since they’re built straight into the cabinetry, it can be a very arduous process if you ever want to upgrade the oven. Built-in ovens are also much harder to clean and require a professional to install.

When to replace your oven

In many cases, ovens can last for many years. Nevertheless, from time to time, it will become necessary to replace the old oven with a new one. Knowing when you will need to do this can take some time, though. You will want to make the right decision so you are not wasting time or money on the process. Consider the following factors when it comes to replacing your oven:

  • Is repairing an option?

Talk to a professional about the options available to you for replacing your current oven or if you can repair the existing one. If it is possible to cost effectively repair your old oven, doing so may be a good idea. However, if you will need to make regular repairs to keep it running, this may no longer be the right option for you.

  • Are you renovating?

In some cases, you can hold off a bit if you are planning to do some renovating in your kitchen in the coming months. You may want to hold off so that you can be sure that you are investing in an appliance that will fit well into your overall new layout. It is a good idea to choose a new oven that will last for many more years when the time comes.

  • Is it working okay?

In some cases, there is no need to replace your current oven if it is serving your needs just fine. However, if it is not heating properly or inconsistently, it could be costing you money on wasted food. In some cases, it may not be large enough or it may not have the features you need.

Contact local home appliance experts

When it’s time to replace

There are some circumstances in which you will need to replace your oven no matter what. If your oven has any of the following, replace it now rather than waiting.

  • Does it need frequent repairs?
  • Are your energy bills very high as a result of the oven?
  • Do you plan to renovate your kitchen right now?
  • Is there a concern when it comes to safety?

If it is time to make these changes, putting it off will not make the process any easier to do.

Categories
Real estate & moving

Top tips on moving a fridge the right way

Moving a fridge isn’t as simple as it may seem, special precautions need to be taken to ensure the move is made safely and securely. If possible, we recommend hiring a professional moving company to avoid potential damages. However, this isn’t always an option, so here are our tips on how to move a fridge safely.

If you’re determined to move with a hired truck, follow this easy step-by-step guide for you to overcome the following common problems:

  • moving a fridge without food waste
  • moving a fridge without scratching the floor
  • moving a fridge up and down stairs
  • transporting a fridge to a hired truck
Care needs to be taken when moving your fridge to ensure no damage / Source: Mindful Boutique Builders & Renovators Perth

Start preparing the day before moving the fridge 

Before the heavy lifting begins, the refrigerator needs to be ready. The day before you’ll need to empty, defrost and clean the fridge in preparation to be moved. Take an ice scraper and a spray to clean the fridge freezer and ensure it is completely dry before proceeding, this will prevent any avoidable damages during the move. The fridge will need to be switched off the night before.

Avoiding food waste

In the weeks leading up to your move, take a quick inventory of your refrigerator’s contents. Organise your meals to use up everything in the fridge to avoid throwing anything away. Note that some non-perishable food can be kept for a few days at room temperature (mustard, jam, etc.) You can safely store them in cupboards.

Moving a fridge downstairs

Moving the refrigerator downstairs can be very tricky, so knowing how to move without hurting your back is essential. Here are some critical tools to assist you with the move:

  • A dolly
  • Ropes and/or ratchet straps
  • Packing material
  • Duct tape

Make the fridge as light as possible before trying to move it. Clean the inside and remove the shelves. Wrap the shelves in bubble wrap or packing paper and store them safely. Another option is to leave the shelves in the refrigerator and tape them. Be sure that the tape you use does not leave marks to save on extra cleaning at your final destination.

Secure the doors with straps so that they don’t open up during transport. Tape the power cord so that it doesn’t get caught up during transportation.

Many hands make light work, so recruit friends to help – it’s at least 3-person job to move a fridge downstairs. Tip the refrigerator away from the wall then slide the dolly underneath. Go downstairs slowly, moving the fridge taking it one step at a time bottom first.

It’s essential to keep the fridge standing upright. The refrigerator has a cooling element in the back that is designed to work standing upright. If the fridge is laid flat, the fluid in the element can travel against the grain, causing permanent damage to the fridge.

Transporting your fridge onto the moving truck 

After securing the doors, wrap the fridge with two layers of bubble wrap and tape it from top to bottom like you are taping a cardboard box. Safe taping is essential to keep the bubble wrap on the fridge during the transportation. Your fridge is now ready to be moved!

Prepare a dolly or hand-truck; we recommend you to move your fridge using these two handy tools. Place the dolly underneath the fridge and fasten it to the fridge using a rope or ratchet strap with a width of 6-8cm. It is ideal to have someone supporting the dolly and someone else pushing from the back side of the fridge to get it on safely.

Bear in mind that you should keep the fridge vertical while carrying and moving it. The question has been debated for a long time. Is it better to carry your fridge horizontally or vertically? It is difficult to definitively decide without studying the specific design of the fridge and without information on the refrigerant used during the cooling cycle. One thing is sure: the risk of damaging your fridge will be lower by transporting it vertically or at an angle greater than 45°.

Be very careful while carrying the fridge up or down the stairs, communicate well with each other and don’t rush.

Should you hire professional fridge removal services 

Just like moving a washing machine, keep in mind that a fridge is a heavy household appliance that can weigh up to 120kg. Fridges do not have handles for you to get a grip on while lifting and moving.

To avoid all the difficulties of moving your fridge on your own, you can hire professional removal services to help you out. Oneflare professional removalists are covered by insurances and experienced enough to know what to do from the get-go.

Others safety tips on moving a fridge

Take care to keep the refrigerator as vertical as possible during transport. Do not tilt the refrigerator on its side as this can cause permanent damage to the cooling mechanisms. Wait 2-3 hours before restarting your fridge to allow the liquid to flow back into the compressor.

Read the refrigerator’s manual for important safety tips and warnings before moving to avoid potential problems – remember every fridge is different.

All fridges have moving instruction visuals on their cardboard packages. These explain the do’s and don’ts very well so pay attention to those instructions.

Categories
Kitchen

9 small kitchen ideas

We cook, eat, drink, and socialise in this space. Kitchens are more than just a place to make a meal, and they are a design statement within homes. Whether you live in a high rise city apartment, or a classic, narrow terrace house, you might be dealing with a kitchen on the smaller side. But that doesn’t have to be negative! There are certainly ways to accentuate and embrace your cosy kitchen.

Here, we’ll take you through 9 small kitchens all with unique qualities that make them stand out from the rest.

Timeless style: Industrial

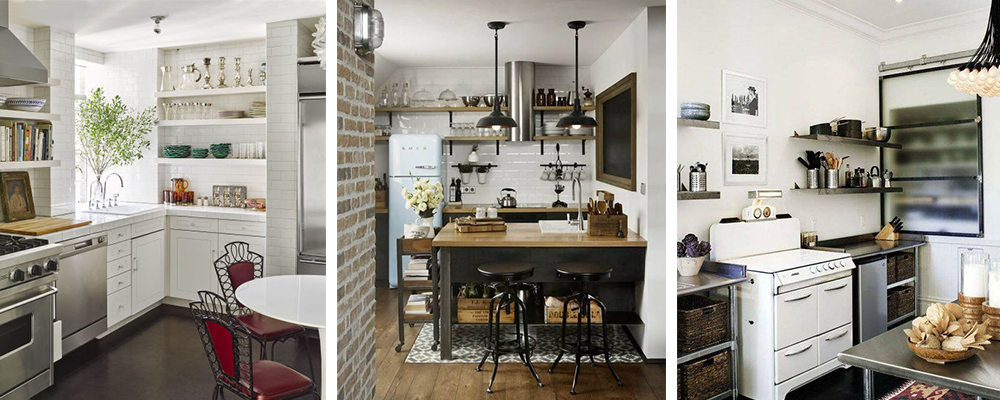
Small kitchens in industrial style decor
Source: Pinterest

An industrial-style kitchen is a timeless trend that never phases out. While this style is predominantly found in larger spaces, these three cooking areas use just the right amount of stainless steel appliances and fixtures, wooden block surfaces and rustic metal accents.

Classic rule of thumb: White

Small kitchens with white decor
Source: Pinterest

It’s a basic rule of thumb that lighter colours and plentiful natural light can make a room feel larger than it actually is. The far left kitchen challenges this notion and uses a light grey hue – and it works!

Uprising trend: Accent walls

Small kitchens with bold, accent walls
Source: Pinterest

While white can make a small room look larger, it also works on the other end of the spectrum. Accent walls using dark colours create a sense of boldness and edginess that doesn’t come with a stark white colour scheme. A bold-coloured wall can accentuate the frame of a kitchen and it gives more dimension.

Dare to go all out: Accent appliances

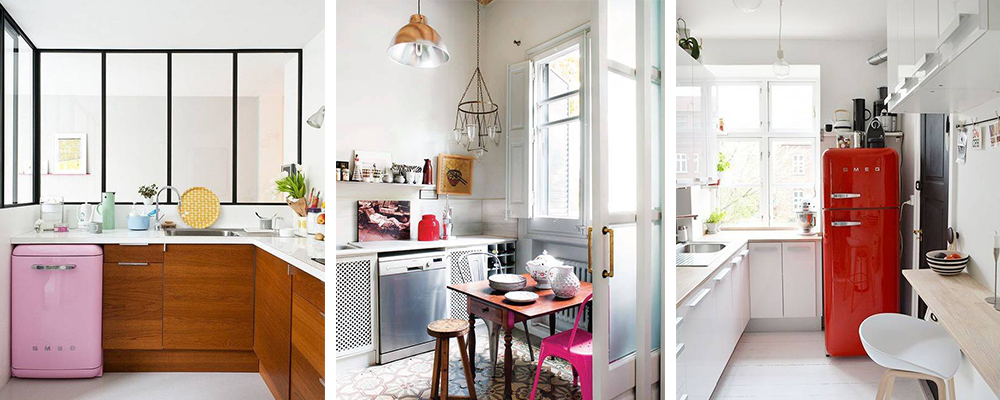
Small kitchen with bold appliances

These tiny kitchens all have one thing in common – and it’s pretty hard not to miss – the brightly coloured objects in the room. The bright pink fridge as well as the bold classic red fridge pair perfectly with the otherwise dull setting. If you opt to use an accent colour as bold as this, make sure there are no other conflicting bold colours within the space.

Categories
Kitchen

Modern kitchen trends: Introducing the galley sink

Everyone desires to own a kitchen that offers them the utmost ease and comfort while preparing meals or hosting guests. You, too, can be in the same league as them. You must be looking for ways to make it more functional and attractive. If that is the case, then you don’t need to scurry here and there for ideas. As per the latest trends, one of the must-have features of any modern kitchen is the workstation sink (or galley sink). Why? A typical sink allows you to wash fresh produce and dishes. However, workstation sinks offer you much more than these necessary conveniences.

With the newly curated galley sinks, you usually get a variety of accessories, including drying racks, cutting boards, bottom grids, and serving boards. Due to these accompaniments, these multi-purpose sinks become an exemplary functional piece no matter whether the size of the kitchen is small or big. You can use them to accomplish your cleaning tasks as well as to prepare meals. Alongside this, you can also take advantage of their extension as the countertop when it comes to entertaining or serving guests. So, it will not be wrong to say that the first thing that you can think of adding to your kitchen is the workstation sink.

Modern kitchen with black cabinetry and fittings with stainless steel appliances and a white benchtop.
Galley sinks allow for convenient preparation of meals and cleaning / Source: Precise Kitchens

There are several galley style kitchen sinks available, from stainless steel to composite. If you intend to give your kitchen a fresh look within a limited budget, then stainless steel can be an ideal choice. However, when it comes to increasing the overall interior aesthetics, choosing composite granite sinks can be a better idea. With this, you can decide on the mounting options, such as drop-in, under-mount, and farmhouse. Every installation type has its purpose. You can go through the pros and cons of each of them to understand what suits your kitchen habits the best.

Now, let’s see what else you can select for your kitchen to make it friendly, stylish, and more productive.

Countertops

Integrating the sink with your benchtop will create a beautiful continuous surface and allow for easy cleanup. If you are looking for a sophisticated look, then this seamless design is a good choice.

Earlier, granite used to be the ubiquitous choice everywhere. But maintenance and cleaning challenges cropping out of its porous characteristic made people watch out for some alternative. This situation gave rise to composite granite. A mix of natural stone and resin, this surface turned out to be far more durable and more reliable than the granite slabs. And the best part was it retained the charm of the natural stone as well. For your kitchen, you can also go with this option. If you still want to explore more, then porcelain can be another choice. Porcelain worktops have been trendy in Europe, and now, American homes are also embracing this joyfully.

Modern kitchen with black cabinetry, marble island benchtop and splashback.
Integration of benchtop with sink / Source: Handy Kitchens Pty Ltd

Porcelain surfaces can match the elegance and appearance of wooden, granite, marble, and other materials effortlessly. Plus, it can provide excellent resistance to stain, bacterial growth, and heat.

With this countertop, your choice of the workstation kitchen sink will mingle well. It is just that you have to take a call on the type of installation and surface available in the market.

Flooring

The open floor is the new-age choice. It overflows into your living space, creating an illusion of spaciousness so that you don’t feel the pinch. For continuity, designers usually extend wood flooring of the living area into the kitchen. Wood tends to be susceptible to water damage. However, it doesn’t feel as hard as a tile surface. Plus, it can remain moderately cold and warm, unlike other materials. A lot of kitchens these days showcase this style. Hence, if you desire, you, too, can benefit from this popular choice. A combination of porcelain or granite worktop, wooden flooring, and workstation sink can prove wondrous.

Brown hardwood flooring in a bright kitchen with white cabinetry and island bench.
Hardwood flooring is a popular choice for kitchen renovations / Source: Aspect Cabinetmakers

Kitchen Taps

There is an incredible number of choices for kitchen taps. Design and function are the two elements to be pondered when making a selection. Single levers are a great choice in an open-plan kitchen. A two-handle lever looks wonderful in a more traditional kitchen.

Gooseneck spouts are a popular choice, as they can add a sleek and polished look or a more vintage look. Consider spouts with pull-down sprays or with sensors that let you turn the water on or off with the touch of a hand.

Marble kitchen benchtop with dark grey sink and tap.
Gooseneck kitchen taps are becoming increasingly popular / Source: Focus Building & Renovations

Cabinets

White has dominated the choices for far too long until people faced maintenance challenges. It is still everyone’s favourite, but many homeowners are now inclining towards other colours. Even today, white cabinets can be visible in many homes. To break the monotony of the tone, interior designers use wooden materials on shelves, pullouts, and drawers where white is the leading theme. If you want to add vibrant colours instead of white, then choosing from greens and blues can be the right thing. From the family of blues, navy colour emerges as the classic choice. Other than this, hues like teal, spring green, and deep forest green can also look exciting in the kitchen cabinetry.

Small kitchen with dark brown and white cabinets
Be sure to match the choice of cabinetry with your workstation sink / Source: Hudson Construction & Renovations

Anyway, whatever cabinet you choose, make sure that it supports the choice of workstation sink and installation type you select. Some materials tend to be heavy and hence, require full support from cabinets where they are installed.

Kitchen appliances

The sink is a small plumbing fixture. Still, it magnificently contributes to the overall look of the cooking area. So, when it comes to tools that occupy ample visual space in the kitchen, you can imagine the kind of responsibility you have to shoulder while selecting them. Stainless steel surfaces continue to be a prominent part of any modern kitchen. But the challenge with them is that they leave behind the fingerprints. To avoid this, you can switch to shades like black, blue, yellow, red, and orange. The more colourful choices you make, the stronger the personality your kitchen will acquire. Then, you can keep modifying colours to deal with the boredom of seeing the same thing.

Bright kitchen with white cabinetry, marble benchtop and splashback and stainless steel oven/cooktop.
Stainless steel appliances continue to be the main feature of modern kitchens / Source: Focus Building & Renovations

What are your plans now? If you desire to transform your kitchen, you can buy a workstation sink, and with that, work around other areas too. A blend of all these changes can elevate the overall appeal of your kitchen while taking care of practical aspects. No matter whoever comes to this part of your house, he or she will surely gush about the way you planned and executed the entire thing. And yes, even if you thought nobody is going to notice your workstation sink, you will get a reality check when guests appreciate this choice for being thoughtful and smart. Even when you get acclimatized to your new kitchen, you would still be praising your decision to buy a workstation sink for it.

Categories
Cleaning

How to clean your oven

All kitchen appliances need cleaning and regular maintenance in order to function properly. An oven is no exception to this rule. In fact, you might need to clean your oven more often than you clean your refrigerator or other kitchen appliance if you use it regularly. Oven cleaning might seem like an arduous and time-consuming task, but if you have the right technique and the right tools, you can get it done. Though, it’s still advisable to hire a professional cleaner to perform a deep clean every once in a while.

DIY oven cleaning does not have to be complicated. You can use natural cleaning agents available in your kitchen to get the job done. Oven cleaning just requires time, effort, and the right tools.

Source: Shutterstock

What do you need?

  • A pair of rubber gloves to protect your hands
  • Warm water
  • Baking soda (enough to make a paste)
  • White vinegar
  • Spray bottle
  • A brush
  • Dishwashing liquid for the racks
  • Damp dishcloth to wipe down surfaces
  • Scraper (to remove carbon)

How to clean an oven: self-cleaning ovens

Self-cleaning ovens are easy to clean and maintain. Here is what you need to do:

  1. Lock the oven door securely and turn on the “self-clean” setting on your oven. The oven will self-clean for around 2 to 6 hours, depending on the configuration and model of the appliance. During this time, the intense heat in the oven will turn grease, food particles, and other debris into ash. Once it’s completed, let the appliance cool for 2 hours.
  2. Open the door after the oven is cool and sweep out the collected ash with the help of a brush and dustpan. You can wipe down any lingering ash with a damp dishcloth to ensure the oven’s interior is completely clean.
  3. Use a combination of vinegar and water, or an ordinary kitchen cleaning solution, to clean the oven door. Spray the solution on the door and gently scrub away any lingering debris until the door glass and the surrounding rim is completely free of stains.
  4. Remove the oven racks and wash them with dishwashing liquid and warm water. Any lingering traces of ash and food particles will come off easily at this stage. Allow the racks to air dry before you place them back in the oven.

How to clean an oven: regular ovens

Self-cleaning ovens are convenient, but not everyone has one. Ordinary ovens require a little more time and effort to clean, but you can carry out this task with the household products listed at the start. Here is what you need to do:

  1. Remove all racks from the oven before you begin the cleaning process. Place these racks in a kitchen sink full of warm water and a few drops of dishwashing liquid. This will loosen the grease, burnt food particles, and other debris. Proceed with the next step while the racks soak in the water.
  2. For mildly dirty ovens, mix 4 tablespoons of baking soda with 1 litre of water in a spray bottle. Spray this solution generously into a cold oven until it soaks all the charred and carbon-coated areas on the inside. You need to allow the solution to soak into and loosen the burnt debris for at least an hour before you take the next step.
  3. If the charred areas are too stiff and need something stronger to come loose, you can mix more baking soda with water to form a paste. Spread this paste evenly on all the charred areas and allow the solution to soak into the debris. After an hour you can scratch the area gently with the scraper to see if the debris is loose.
  4. If the carbon comes off easily, you can use the scraper to gently remove all of the soaked and lingering carbon. Be sure to spray the area with the remaining baking soda solution to aid this process.
  5. Once you have removed the most stubborn stains and wiped away the debris, spray the oven with the baking soda and water solution once again and allow it to soak for another hour. After the hour has passed, use a brush or a scrubber to remove the lingering traces of carbon. This will ensure your oven is free of all accumulated carbon and burnt food particles.
  6. Mix equal parts of vinegar and water in a bowl and dip a cleaning rag into it. Use the wet rag to wipe the interior of your oven and remove all traces of baking soda, oils, grease, etc. This should eliminate all traces of dirt and debris from your oven. You should use the same solution to clean the oven door as well.
  7. The final step is to clean the soaking oven racks. The hours of soaking will have loosened all of the burnt food particles, allowing you to easily scrub them clean. Use a combination of water and dishwashing liquid to clean the racks and let them air dry for a while. Once the racks are dry, place them in the oven.
Source: Shutterstock

How to clean an oven: textured ovens

Textured ovens are also self-cleaning and are designed to burn off all debris over time. The interiors are coated with a special ceramic layer that burns and removes all the debris as you continue to use your oven. You do not need to do much to clean these ovens. Wipe the interior surface with a damp cloth when your oven is cool. Do not use any abrasive cleaning solutions as they will damage the textured finish.

You will still have to clean the oven racks regularly. You can use the same combination of dishwashing liquid and water to remove the grease and food particles. Soak the racks in warm water and dishwashing liquid for a few hours to loosen all the dirt and scrub the surface clean gently. Once you have removed all collected carbon, wipe the rack down and let it air dry before you place it back in the oven.

How often should you clean the oven?

You should perform surface cleaning every time you intend to use the oven. Bacteria and germs can develop at the slightest incentive, especially in the warm dark environment inside the oven. If you do not clean the trays and grills before or after every use, you can place your health at risk. You can use water and some mild dishwashing liquid for everyday surface cleaning.

If you do not have the time or the inclination to clean your oven before or after every use, we recommend you schedule a weekly or bi-weekly cleaning. This will ensure your oven stays hygienic and is easier to clean over time. If you allow the grease, debris, and food particles to remain for too long, you will have to work harder to clean the oven. Regular cleaning minimizes the effort required to get the job done.

Categories
Plumbing

DIY plumbing hacks

With many professional trades services such as plumbing, there are restrictions in place to determine what you can and cannot do yourself. What you can and can’t do is more than a recommendation; it’s bound by the law and Australian Regulations. In fact, most household plumbing work, including sink, toilet, gas, and charged stormwater system repairs need to be handled by a licensed tradesperson.

It is useful to be more informed to benefit the safety of your plumbing and gas system. It is also likely to save you dollars – the cost of getting something repaired after you’ve tried to DIY will outweigh the cost of calling a plumber in the first place.

Here, we’ll take you through the DIY plumbing options you could attempt, as well as the DIY-don’ts.

While some plumbing jobs can be done yourself, some require a licensed professional / Source: David Frith Quality Plumbing Services

DIY Plumbing Tips: What you can do yourself

DIY Plumbing guide for water plumbing

When it comes to water plumbing, you can do the following tasks on your own:

  • Replacing a jumper valve or washer in a tap
  • Changing showerheads
  • Installing or maintaining irrigation systems downstream from an isolating valve, tap or backflow prevention device on the supply pipe for the irrigation system

For sanitary plumbing, you are allowed to:

  • Clean or maintain ground level grates to traps on sanitary drains
  • Replace caps to ground level inspection openings on sanitary drains
  • Maintain an above or below ground irrigation system for the disposal of effluent from an on-site sewerage facility

Now that you know what DIY Plumbing is allowed, here is what you can’t attempt yourself.

DIY Plumbing Tips: What you can’t do yourself

Any work that interacts directly with the installation of your drinking water system or sewerage requires a licensed plumber. This is Australian Law. If your problem or project involves gas, hot water or sewer systems, you are also not allowed to intervene yourself, it is time to call a professional plumber.

DIY Plumbing in Australia

To avoid aggravating the situation in the event of leakage or water damage, it is often necessary to call a plumber instead of attempting a DIY method. This professional intervenes on all the problems in connection with the circuit of distribution of water, but also of gas and compressed air.

If you are installing a stormwater tank, professional plumbers can advise you on the minimum depth of stormwater pipes. Many individuals are reluctant to hire a professional plumber because of the cost of the services, however, a simple mistake during a DIY project may cost a lot more than the plumber service itself.

Your plumber can also intervene in the event of a heating failure, to find the cause of the breakdown, to repair your installation and to make the necessary modifications to assure him optimal performances.

Even if you feel confident in your trades skills, attempting to DIY any of these jobs can be dangerous. Costs will include paying the plumber to fix the problems you created in the first place, and potentially a hefty fine. The relevant regulations for plumbing for NSW fall under the Plumbing and Drainage Act NSW 2011. Section 4 states that the only work you should be undertaking yourself is repairing taps or showerheads; everything else should be left to the professionals. Section 6 notes that the only people that can complete plumbing and drainage work are the ones authorised under the Home Building Act 1989.

Source: Peter Taylor Plumbing

How to hire the right professional plumber service?

When you choose to hire a plumber, here are a few tips on hiring the best plumber for you:

  • Are they licensed?
  • Do they have the relevant qualifications?
  • Do they have the relevant insurance?
  • Check their Oneflare profile. How many reviews do they have? What do they say?

Checking these four things will make sure you make the right connection to the best plumber in your area.

Categories
Plumbing

What can’t go down the drain?

Improper waste disposal, whether by flushing or pouring waste down drains, can have serious consequences for both households and the environment. According to recent trends, waste generation in Australia has increased by 20% over the last 15 years, which includes the waste contributing to sewer blockages and water pollution if not properly managed. 

Knowing what can and can’t go down your kitchen sink is key to keeping your drain in good shape. Pouring fats, oils, and other thick fluids down the drain can cause blockages that are costly to fix. Luckily for you, this blog post will help guide you through what should and shouldn’t go down your drains, resulting in fewer plumbing issues in the long run. Save yourself the trouble and dispose of the below elsewhere.

Food scraps 

Can milk go down the drain?

fresh milk being poured down the kitchen sink
Small amounts of milk are okay; too much could cause drainage issues. | Source: iStock

Milk has proteins and sugars that decompose and can produce unpleasant odours if left in the pipes. It also creates a conducive environment for bacterial growth, which can further worsen odour problems and potentially lead to pipe blockages.

While small amounts of milk won’t cause big harm, regularly disposing of larger quantities can increase the risk of drainage issues and unpleasant smells in your plumbing system.

Is it okay to throw orange peels down the drain?

No, orange peels should not be thrown down the kitchen drain since their tough and fibrous texture can be difficult for plumbing systems to handle. The peels can become entangled in the garbage disposal blades, which may clog or damage your home’s disposal unit. 

Over time, these can build up and result in slow drainage or even complete blockages, leading to more significant plumbing issues. To prevent these problems, it’s better to dispose of orange peels in a general waste bin.

Can I put coffee grounds down the sink?

a man emptying the contents of a coffee capsule in the drain
Coffee grounds could build up in your pipes. | Source: iStock

No, you shouldn’t be flushing coffee grounds down your sink. Unlike other organic waste, coffee grounds don’t break down in water and tend to clump together, forming dense, gritty deposits that can build up in pipes.

Small amounts of natural oils in coffee grounds can mix with grease and fats already existing in your drainage system, solidifying and creating sticky residues that further trap debris. The chemical reactions between coffee grounds and certain cleaning agents can also result in sludge-like substances that are difficult to flush out.

Can dry ice go down the drain?

Dry ice is solid carbon dioxide, and when it comes into contact with water or warm surfaces, it sublimates rapidly, turning directly into carbon dioxide gas. This process creates a lot of pressure and can cause bubbling and foaming. 

If dry ice is drained into your plumbing system, it can result in a sudden release of gas that may lead to dangerous pressure build-ups or even damage to your pipes and fixtures. Additionally, the extreme cold of dry ice can cause thermal shock to your plumbing, potentially leading to cracks or fractures in the pipes.

Can eggshells go down the drain?

No, you are not. On the other hand, it is very common to leave some eggshells in the sink and then open the faucet to let the smaller pieces run down the drain. However, they are another of the most harmful things for the useful life of the drain because the membrane of the shells can adhere to the walls of the pipes.

Are tea leaves allowed down the drain?

Tea may be good for us, but not so much for the drain. If you use loose leaf tea, make sure that as few leaves as possible make it down the drain as they can build up and create a large problem.

Cooking oils and fats

Can you dump grease down the sink?

a used pan and scrubber in the kitchen sink
Pouring oil in your sink could clog your pipes. Source: iStock

When grease is poured down the sink, it initially flows with the water but quickly begins to cool as it moves through the plumbing system. As it cools, grease solidifies and forms a thick, sticky residue that clings to the pipe’s interior walls, narrowing the canal and restricting water flow.

Over time, this solidified fluid can mix with other substances like soap scum, food residues, and hair, forming larger and more stubborn blockages. These blockages, often referred to as “grease clogs,” can cause slow drainage and eventually result in complete pipe obstructions. In severe cases, the accumulation of grease can lead to plumbing backups and expensive repairs.

Can oil go down the drain?

Similar to grease, you shouldn’t pour cooking oil down your kitchen sink, since it cools and solidifies after it cools. As it hardens, it sticks to the interior walls of pipes, creating a residue that can gradually accumulate and narrow the pipe’s interior, leading to identical blockages attributed to throwing grease down the kitchen drain.

Can you pour butter down the sink?

Pouring butter down the sink is not advisable. Butter hardens when it cools, which can clog your drains. Not only that, but butter mixing with dirt and debris already in the drain can lead to more headaches, since they can prove to be more stubborn to manually remove than others. 

Instead of tossing butter in your kitchen drain, you can dispose of it in the trash or let it cool and harden, then scrape it into a compost bin if applicable. By doing this, you can prevent potential clogged drains.

Cleaning products and other chemicals

Can you pour chemicals down the sink?

a woman cleaning the kitchen sink
Throwing chemicals down the drain could damage it in the long run | Source: iStock

Avoid pouring large quantities of chemicals like drain cleaners or toilet cleaners down the sink. Doing this regularly can damage your pipes, cause leaks, and potentially contaminate your home’s water supply. Over time, this can also compromise the integrity of your plumbing system and affect the safety of your immediate living environment.

Can you pour boiling water down the sink?

It’s generally safe to pour boiling water down the sink if your pipes are made of metal or high-quality PVC. If your pipes are old, made of plastic, or have a PVC system, boiling water can potentially cause damage by softening or warping the material over time.

If you are pouring boiling water down the drain to try and clean away a blockage you may need additional products to help it along. Grease or food scraps may require manual unclogging, instead of just boiling water.

Can you wash acrylic paint down the sink?

a person washing their hands in a sink
It’s always better to check how to clean your hands properly after painting. | Source: iStock

No, you shouldn’t wash acrylic paint down your sink because it can cause long-term damage to your plumbing, even if you don’t notice it in the beginning. Acrylic paint contains plastic particles that can stick to the inside of pipes or impact it negatively, leading to buildup that can interfere with water flow and potentially lead to blockages. 

Can you pour bleach down the drain?

Bleach is a strong, corrosive chemical product that can damage certain types of pipes, especially if they are older or made of materials like PVC. Repeated exposure to bleach can cause the pipes to deteriorate or weaken, increasing the risk of leaks.

Additionally, exposing bleach to other substances in your drain can result in heat and gases which could put stress on your drain system. Without proper care or attention, this can lead to cracks, leaks, and other damages. 

Tips to prevent clogging your drain

a woman using a large sponge to clean the sink
Clean your drain or sink regularly for proper maintenance. | Source: iStock

Keeping your kitchen drains clean and in their best shape is important for a healthy plumbing system in the long term. Practising regular maintenance and understanding how to detect potential issues early are just some of the plumbing tips and tricks you can do to avoid costly repairs in the future.

1. Clean your drains regularly

Use a mixture of hot water and baking soda or vinegar once a month to flush out minor build-up. This natural solution helps dissolve grease, soap scum, and other residues that can clog your pipes over time. 

2. Use drain screens or drain filters

You can install drain screens to prevent hair, food particles, and other large debris from entering the pipes. Not only are these cost-effective, but they also get the job done really well, and can significantly reduce the risk of clogs in your plumbing system.

3. Research tell-tale signs of issues

Slow-draining sinks, gurgling sounds from drains, or water backing up in unusual places are common indicators of a developing blockage. Unpleasant odours emanating from drains can also signal a buildup of debris or trapped gases in your pipes.

4. Properly dispose of grease and oils

Instead of pouring leftover grease, oils, and fats down your drains, you can collect them in a container and dispose of them properly after they’ve cooled and hardened. 

5. Schedule professional checkups and cleaning

To make sure your pipes are in good condition, be sure to have regular inspections and cleanings. A licensed plumber can identify potential issues, like hidden leaks, corrosion, or early signs of blockages before they become major problems. 

Professional cleaning can remove stubborn build-up that household methods might miss. It’s advisable to schedule annual or bi-annual checks so your plumbing system is operating at its best.

Keep your drains flowing

Proper drain care is a must for a healthy plumbing system in your home. While it’s not common for things to find their way into your drains, you should be able to recognise what can and can’t go down the pipes to avoid inconveniences and financial headaches in the future.

Already committed these sink sins? It’s always best to consult a professional who can help you solve your drain problems to keep them in top condition.


FAQs on drain safety

Does ammonia damage PVC pipes?

Most household plumbing systems can handle occasional exposure to ammonia without immediate harm. However, the issue arises when ammonia mixes with other chemicals, particularly those containing chlorine, as this can create toxic fumes and potentially corrosive compounds.

Can you pour flour down the sink?

Pouring flour down the sink is not recommended. When mixed with water, flour forms a sticky, paste-like substance that can easily cling to the inside of your pipes. Over time, this paste can build up and create blockages, especially when combined with other debris or grease. These clogs can be difficult to remove and may lead to costly plumbing repairs.

Is bleach or vinegar better for drains?

When it comes to cleaning drains, vinegar is generally a better choice than bleach. Vinegar, especially when combined with baking soda, is effective at breaking down grease, soap scum, and other organic build-up in your pipes, and it also helps neutralise odours. It’s non-toxic, environmentally friendly, and safe for regular use without damaging your pipes.