Categories
Bathroom & laundry

How to waterproof a bathroom

If you’re undertaking a bathroom renovation, it’s absolutely essential you know how to waterproof a bathroom correctly.  While it isn’t the most glamourous part of building your new bathroom, an incorrectly or inadequately waterproofed bathroom can cause serious damage to the structure of your home and can be extremely costly to fix.

Waterproofing is needed to protect the concrete base of the bathroom from the adverse effects of dampness. The waterproofing layer is a guarantee of the safety of walls, ceiling and floor in case of emergency situations associated with leaks, flooding and pipe breakthroughs.

All bathrooms require waterproofing / Source: Start2Finish Interiors Design Management

Increased humidity, temperature changes, the periodic formation of steam and condensate – all of this has an adverse effect on the finish, the decor of the bathroom, on the floor. Moisture penetrates through the seams under the tile, accumulates under the tile, in places of laying and joints of pipes and communications, creating comfortable conditions for the appearance and reproduction of mould, fungi and harmful bacteria.

While there are parts of a bathroom renovation you can DIY, it is imperative that waterproofing is undertaken by a licensed professional. In short, it is simply too important that waterproofing is done correctly – even a tiny gap may cause serious damage to the internal structures of your home causing heartache and costing money down the track.

In Victoria, the work must be done by a qualified and licensed waterproofing tradesperson who can provide a written guarantee of workmanship and a warranty.

What are Australia’s waterproofing standards

Waterproofing must comply with regulations as set out by the Building Code of Australia and Australian Standards (AS 3740-1994).

To briefly summarise the requirements of the standard are:

Shower floorShower waterproofing is essential and the entire shower floor must be waterproofed
Shower wallsShower walls should be waterproofed up to 1800mm high
Bathroom floorIf the bathroom floor is made of wood or contains wood OR if the bathroom is on the second story or higher, the entire floor must be waterproofed
Bathroom wallsBathroom walls must be waterproofed up to 150mm high
Step downOver the hob or step down onto the bathroom floor should be waterproofed to 100mm high

These are the minimum requirements, however depending on how the bathroom is intended to be used, the areas around the bath, toilet and vanity may also need to be waterproofed.

Tools needed for this job:

  • Cleaning equipment (Dust pan and brush / broom / vacuum cleaner)
  • Safety equipment
  • Caulking gun
  • Paint roller and tray
  • Rubber hammer
  • Silicone gun
  • Masking tape
  • Paint scraper
  • Paint mixer
  • Spirit level
  • Utility knife

Materials

  • Primer
  • Silicone
  • Waterproofing agent
  • Waterproofing membrane

How a bathroom floor is waterproofed

This is a step-by-step guide to how a bathroom is professionally waterproofed, it is written for waterproofing preparation rather than a DIY guide.

Step 1 – Prepare the area

After the old bathroom has been removed, the area must be completely clean and free of dust and other particles before waterproofing can start.  The area is cleaned using a broom and a dustpan and dried in all wet areas.

Both the walls and the floors should be perfectly smooth. If the floor is uneven, you can use a levelling compound to smooth it.

Tip! To obtain perfectly smooth vertical surfaces, the walls treated with waterproofing can be sheathed with moisture-resistant gypsum plasterboard.

Step 2 – Apply the primer

Using a paint roller and roller tray, the primer is applied starting from the back corner of the bathroom.  The primer is applied to 150mm up the bathroom walls and the entire bathroom floor is covered.  Primer is allowed to dry.

Step 3 – Fill the cracks with silicone

Using the silicone gun, the silicone is applied to the gaps between the wall and floor and any other gaps or cracks.  Silicone is allowed to dry over 24 hours.

Step 4 – Apply masking tape

Masking tape is used to mark the level to which the waterproofing agent must be applied according to the Australian Standards.

Source: Esteem Building & Renovations

Step 5 – Apply waterproofing agent

The waterproofing agent is painted on to the height of the masking tape starting from the back corner. The waterproofing product must be applied with a trowel in 1mm thickness.

The seal obtained by a coating reliably prevents the ingress of moisture and destruction, while the material cost is much lower than with the use of liquid compounds and plates, and the work can be performed qualitatively with one’s own hands.

Important: The room in which the work goes, you need to constantly ventilate. To avoid poisoning by vapours of the mixture, it is desirable to use a protective mask.

Step 6 – Apply waterproofing membrane

Roll out the membrane and cut to the lengths of the floor.  The membrane is applied, making sure that it covers the cracks and the joints in the floor.  The entire area is covered with membrane and painted over with waterproofing agent to make sure it sticks down.  When the entire area is covered with membrane and waterproofing agent, it is left to dry for 24 hours.

Step 7 – Apply second coat of waterproofing agent

A second coat of waterproofing to the entire area and left to dry for 24 hours.

The area is now waterproofed and ready for your new bathroom to be installed.

How to waterproof timber floors in the bathroom

Waterproofing timber floors in the bathroom is crucial to ensure they remain in good condition. Bathrooms are high-traffic areas, subjected to moisture, and susceptible to wood rot and damage. Waterproofing the timber floor adds an extra layer of protection against water, dampness, and mould that can cause havoc in your bathroom. Here are some benefits of waterproofing timber floors in the bathroom.

Benefits of Waterproofing Timber Floor in the Bathroom:

  1. Increases Durability: A waterproofed timber floor will last longer since it’s made water-resistant and less susceptible to moisture damage and rot. This means you will save money on repairs and replacements over time.
  2. Enhances Safety: Damp, mouldy, and slippery floors pose a considerable risk, especially in a bathroom where water is frequently used. Waterproofing your timber floor reduces the health hazards and potential injuries caused by slipping.
  3. Easy Maintenance: Waterproof treated timber floors are easy to clean, and you do not have to worry about water damage, mould, and mildew buildup. Regular cleaning with a mild detergent is enough to keep the floor clean.
  4. Improves Aesthetics: A waterproofed timber floor adds an extra layer of aesthetic value to your bathroom. You can choose different waterproofing finishes that enhance the look of the timber floor, such as clear finishes that bring out the natural timber allure or a tinted finish that matches the bathroom’s interior colour schemes.

Methods of Waterproofing Timber Floor in the Bathroom:

Sealers: Sealers create a barrier over timber that fills gaps and cracks, repels water, and increases the timber’s lifespan. Look for sealers designed explicitly for bathroom floors and ensure it’s compatible with your timber floor type.

  1. Membrane Systems: Membrane systems are more effective in preventing water damage since they cover the whole floor area and provide an unbroken barrier. This layer is then covered with tiles or vinyl flooring, making it a permanent solution.
  2. When considering waterproofing your timber floor in the bathroom, there are various factors to consider, including the type of timber, bathroom’s traffic flow, and the extent of damage. Hire a professional for expert advice and to ensure that the waterproofing process is done correctly.

In conclusion, waterproofing your timber floor in the bathroom is a smart investment. It will keep your bathroom floor looking great and prevent water damage to the subfloor and the expansion of mould and mildew. As with any home project, seek advice if in doubt, and always ensure safety measures are put in place.

DIY vs Contractors

We strongly recommend that a qualified and licensed professional is hired to do the work.  Even if in certain areas the laws allow you to do it yourself, the consequences of incorrect waterproofing can be very expensive, and not worth the risk.

Waterproofing when done correctly will penetrate beneath the surface and actually treat the masonry.  This precaution will save you much heartache should there ever be a burst pipe, flooding or any other event that could cause water damage to your home, investing in an expert to waterproof your bathroom is a must.

A professional waterproofer will guarantee the work for up to 15 years, often much longer than that, and the job when done professionally can last 25 years or more.  Make sure you ask to see their license and insurance associated with the work before you sign them up for the job.

Categories
Cleaning

How to clean grout

If you have tiled walls or floors, you will have grout lines across the surface. Grout keeps tiles in place and fills in the gap between every individual piece. Grouting is made from a porous material; so dirt, mould and stains can sink into the lines. These stains make your floor or wall look dirty even after you clean the surfaces well. Tiles are baked and have a glass-like surface that’s easier to clean, so people don’t spend much time trying to clean them.

Grout requires special attention to appear clean, and ordinary floor cleaners just won’t work. You need to put in some time and effort if you want your grouting to appear clean and unstained. Thankfully, the process isn’t that complicated, and you can use homemade natural materials available in your home to clean grout. Grout cleaning is one of the most overlooked services when it comes to house cleaning.

A before and after shot of a tiled bathroom / Source: Dolphin Blue Mackay

What kind of materials do you need to grout clean?

  1. Gloves
  2. A bucket of water
  3. Baking soda
  4. Vinegar
  5. Scrubbing brush (or another grout cleaning tool, like a toothbrush)
  6. A floor-cleaning mop
  7. Tile cleaning agent

You can also use bleach or hydrogen peroxide along with baking soda if you want stronger cleaning solutions. You will require protective glasses and a breathing mask if you intend to work with these materials, as they can cause trouble with breathing and the fumes can smart your eyes.

The baking soda and vinegar method

Grout cleaning is relatively easy if you have the right tools and some time on your hands. You should mop the floor thoroughly before you begin, as that will make it easier to clean the grout. Here’s what you can do:

  1. Mix baking soda and some warm water to form a paste. You can use three parts of baking soda to one part of water to get the right consistency. Ensure you make this solution in small batches if you want to clean larger surface areas. This is because the mixture can lose its potency and effectiveness quickly.
  2. Mix a solution with equal parts of water and vinegar and pour it into a spray bottle. Shake the solution well to ensure ingredients mix properly.
  3. Apply the baking soda mixture to stained grout lines liberally with your finger. Make sure the soda is pressed into the grout lines and not just sitting on top of the surface. It’s a good idea to work in sections instead of trying to cover the entire floor or wall surface at once.
  4. Once the baking soda paste is applied, spray the vinegar solution on the lines. You should see the baking soda immediately start to bubble. This means that the soda is reacting to the dirt and debris present and has started to clean the grout lines. Wait until the solution stops to bubble before you move onto the next step. This shouldn’t take more than a few minutes.
  5. Once the solution stops bubbling, scrub the grout lines with a nylon bristled brush carefully. You can use a toothbrush or any grout-cleaning brushes available in your local hardware store. Don’t apply too much pressure as that will weaken the grout and remove any sealant applied to it.
  6. Once you’ve completed one action, repeat the process on the next section until the entire floor or wall surface is completely clean.
  7. Wipe away the baking soda, water, and vinegar residue with a damp cloth and mop the entire floor once again. Your grouting should be clean and white.
Most bathrooms and laundry’s will have grout that requires regular cleaning / Source: Sam Bathroom Renovations

How to clean grout in the shower with bleach

If your grout lines are deeply stained and require a more thorough cleaning, you should try using oxygenated bleach for the task.  This is the easiest and most effective way to clean grout without scrubbing. Here’s what you need to do:

  1. Combine two tablespoons of oxygenated bleach with two cups of warm water and mix well. Make this solution immediately before you intend to apply it on the ground as bleach won’t be as effective if you store it for too long.
  2. Bleach can leave a white cast on the tiles, so it’s a good idea to test it before you apply it to the entire floor or wall surface. Apply a small amount of it onto a less visible section of the surface to see if it causes any damage to the tiles and grout. If you don’t see a white cast, use the solution on the entire surface.
  3. Cover all the grout liberally with the bleach solution and allow it to sink into the material for a while. You can work in sections, especially if you need to clean a large surface area.
  4. Rub the bleach solution into the grout lines with the help of a toothbrush or a grout cleaning brush. Pay special attention to the corners. You shouldn’t apply too much pressure on the grout lines as that can strip away some of the seal and weaken the grout.
  5. If you still see stains, dip your brush in the bleach solution and scrub the grout lines gently once again. The stronger concentration of bleach will help remove the stubborn stains.
  6. After you’ve cleaned all of the grout, clean the floor thoroughly. You can’t allow the bleach to linger for too long as it will damage the tiles eventually. Wash the floor with clean water to remove all traces of bleach and wipe the surface dry.

How to clean floor tile grout with hydrogen peroxide

  1. Mix one tablespoon of dishwashing soap with ¼ cup of hydrogen peroxide and ¾ cup of baking soda.
  2. Apply this paste directly to the grout lines with the help of an old toothbrush or a nylon bristled brush. Make sure you apply the paste evenly over the grout.
  3. Let the solution sit for around 15 to 20 minutes. You will see the chemical reaction between the hydrogen peroxide and baking soda. It will clean the grout lines and eliminate all stains.
  4. After the solution has had time to complete its work, pour hot water on the floor and wipe it. This will remove all traces of the hydrogen peroxide and baking soda.

How often should you clean grout?

You should clean the grout in the kitchen, bathroom and laundry every day. This doesn’t have to be a thorough clean, but be sure to wipe the grout lines carefully when you wipe down the kitchen surfaces at the end of the day. This ensures that food particles don’t have time to settle into the grouting and stain it. Regular cleaning will also keep problems like mould and bacteria at bay.

You can do a thorough grout cleaning once a month or once every two months. Some people clean grout once or twice a year, which is acceptable if your surfaces are kept clean and the grout is sealed regularly. Always clean the grouting when it appears dirty or seems to have developed mould. If you keep delaying the task, the stains will sink in deeper and you will have to call in professionals to replace and reseal your grouting.

Categories
Pets

All you need to know about animal portrait paintings

As they say, memories last forever and hanging photographs and portraits in your space are one of the best ways to live those memories forever. We all love to hang pictures of our family, friends, and loved ones around us, but has anyone ever thought of capturing memories of their pets and hanging them.

Our pets become an integral part of our family. Their love for their masters is incomparable. So, it’s essential to acknowledge that love and affection and love them back. One such unique and heartwarming way of showing your love for pets is through animal oil painting.

Source: Carlita Sari Photo

Easy hassle-free process

The process of getting customized animal paintings is quite easy. You have to select the best artist in your vicinity, sign up for their program, and send a digital photograph of your pet to them. The photo should be clear enough so that the artist can capture all the minute details on the canvas.

Once the sketch is ready, the artist paints it according to the likes of your pet. These days there are programs available, where you can paint these animal prints under the guidance of a trained professional. Once the painting is ready, you can hang it in your home, office, or anywhere you want to feel the presence of your favourite furry friend.

Why get a pet portrait painting?

Many of us think that it’s convenient to take pictures on phones and professional cameras, then why to spend money and time getting paintings customized. Well, a digital photograph cannot replace a beautiful hand-painted portrait. Let’s have a look at a few advantages of getting animal portrait paintings.

  1. Token of love: We all know pets become the most favourite member of the family, and their love of the family that they live with is selfless. So, getting animal portraits is probably the best way of showing gratitude to these furballs.
  2. Customization options available: At first, a couple of photographs of the pets are shared with the artists, but customizations are done further to the sketch to give it a more personal effect. Artist draws the final portrait considering the expressions of your pet from various pictures, his or her favourite activities, and then your favourite activity with your pet.
  3. Timeless paintings: These paintings by experienced artists, are painted using professional pens, brushes, and colours and due to which the pictures remain new for many years.
  4. Best gift for pet lovers: The struggle of looking for a gift for a loved one is real. Dog canvas paintings can be the best gift for all dog lovers. These paintings might be the gift that they will cherish for their lifetime.
  5. Immortal memories: Unfortunately, the life span of animals is shorter than that of humans. These sketches are a way to immortalize your memories with your pets forever.

Shop around as there are lots of companies offering pet portraits – like everything it’s important to check out the reviews and paper quality before purchasing. Keep in mind there is often a range of products to choose from, for example Paint My Pooch offer regular prints as well as digital & box mount options. Remember to get your pet freshly groomed before any photograph or painting.

Categories
Heating & cooling

5 maintenance tips for home water heater systems

Maintaining your home water heater routinely is a great way to save money. If your water heater already has problems, then it is best to hire a professional plumber, but basic maintenance is something you can do yourself. Basic maintenance is a great way to keep your water heater running for longer and catch potential problems early on.

Learning a new skill always takes a bit of practice. It’s hard to mess up too much with basic water heater maintenance, but not impossible. Before you do anything, make sure you know what you are touching and what will happen if you break it. Messing with machinery with no idea what you are doing is a terrible idea.

Here, we’ll take you a few ideas on how to maintain your own water heater. Before you do your own maintenance, you should watch a video to make sure you are looking at the right parts and fixing the right thing. It is not hard to maintain your water heater once you see what you are supposed to be doing.

Source: South Adelaide Plumbing and Gas

1. Check the TPR valve

Starting by testing the temperature-pressure-release valve is a great jumping-off point. The first thing you want to do is put a bucket underneath the pipe connected to the TPR valve that you will find on the top or side of the tank. This will prevent a possible mess and catch all the water you are about to let out.

Then you are going to need to turn off the cold-water supply valve. That way you know that no new water is running through. Finally, you are going to lift the top off of the TPR valve and let some of the water drain out into the bucket.

If the water continues to flow out after you have let go of the TPR valve, then there is a problem. It is likely that you need to drain the tank about halfway and then install a new TPR valve. Make sure you are looking at the right valve and that you turned off the cold-water before you replace anything.

2. Wash out your water heater’s tank

Depending on how hard your water is and how much calcium and sediment is in your tank, you should be cleaning out your water tank about every six months. It is not a complicated process so much as it is inconvenient. It is much more affordable to clean your own hot water system than it is to hire someone else.

The first thing you’ll need to do is completely drain out your water system. There will be a layer of sediment on the bottom of your heater that you will need to move a bit by letting some more water pour in from the cold-water valve. That will allow you to wash up the sediment with new water that is not already full of leftover calcium.

Drain the new water and repeat until all or most of the sediment, is emptied from your water heater. Once your tank is as clean as you can make it clean the drain cock and refill the tank. Once you are certain everything is back in its proper place, you can turn the power back onto your hot water system.

3. Change the temperature

If your water is running a bit too cold or hot, there is a way to change the temperature yourself. There should be a temperature dial on the side of your tank with a cover that you can unscrew easily. Once the cover is off, you are going to need a flat head screwdriver to adjust the temperature.

Every ten degrees you lower the temperature should save you about five per cent of energy costs. If you plan to leave the house for more than a weekend, you should turn the water heater off completely and turn the thermostat down to save money and energy.

Changing the temperature on your water heater is not something that you need to do often. You probably don’t need to do it at all unless you are very serious about saving energy and money. It does not help enough for most people to consider it worthwhile, but it can be helpful if you are leaving town or running low on funds.

4. Check the anode rod

Find the drain cock on the top of your water heater and stick a hose it in. Allow a few gallons of water to drain out of the hose into a bucket or drain. Then find a socket wrench that will allow you to unscrew the rod.

The rod should have a hexagon shape, and an 11/16 inch socket wrench should fit over it nicely. If the rod you pull out is on the thin side or covered in calcium, then you need to purchase a new anode rod. Your anode rod should be more than half an inch thick and have a minimal amount of calcium on it.

At the very least you should be able to see the metal under the calcium without scraping. If your anode rod is less than half an inch thick or covered in calcium, then you need to buy a new rod for your water heater.

5. Insulate your water heater tank

Newer water heater models will probably have their own insulation. If you have an older tank than you can likely benefit from insulating it yourself. It is a simple project that saves you money the same way insulating your floors or walls would.

All you really need is an insulation blanket. It just looks like silver bubble wrap and is very easy to wrap around your whole water tank. Make sure you also carefully cover all the piped up in insulation too so that none of the heat escapes that way.

Once you have your insulation blanket all tapes to your tank, then you should be ready to go. It is an incredibly easy way to help you save money and energy with only a couple of cheap materials. If you have an older water tank insulation is definitely a project you should look into.

6. Maintain annealed copper pipes 

Regular maintenance ensures the optimal performance of continuous-flow electric hot water systems. One important aspect is the inspection of the annealed copper pipes used in these systems. Annealed copper is known for its durability and resistance to corrosion. Check for any signs of leakage, corrosion, or damage in the copper pipes regularly.

Wrap up

Our water tank is an incredibly important machine that you have in your home. It is important you keep up on some of the basic maintenance it requires so that you can save money and catch any forming problems. Luckily, there are a few basic bits of maintenance anyone can do.

Washing out the tank once every year or less is so important to make your tank last. It would be best if you got all the extra sediment and calcium out of there, so it does not build up and damage the tank. Changing the temperature on your tank and insulating it are both ways to help you save money and energy.

All of these are simple ways to maintain your own water tank. Not everything can be DIY, but small projects like these can absolutely be done without hiring anyone. Make sure you talk to a professional before you do anything more complicated.

Categories
Wellbeing

Health benefits of a soundproof & quiet home

Studies have shown consistently that stress levels can cause health problems. Noise is one of the biggest factors which contributes to increased stress levels. We live in a busy and hectic life in which silence has become a rare thing. If you are subjected to such high noise levels regularly, then soundproofing your home is a good idea. It can reduce your stress levels and help you to lead a healthier life. Keep reading to learn about the key health benefits of living in a quiet home.

Stress reduction

One of the biggest health benefits of living in a quiet home is it helps to reduce your stress levels. If you live in a noisy house, you can be subjected to high levels of stress, without you even realizing it. Noise increases the stress hormones in your body.  If left ignored, it can lead to chronic stress and cause health problems like hypertension, hearing impairment and cardiovascular diseases. A soundproof home which is noiseless will help you to relax and communicate better with the family members. Reduced stress levels can also cause significant improvements in your body’s immunity levels.

Better brain functioning

Your brain is bombarded with numerous stimuli every day. You come across many visuals, sounds, and other forms of stimuli which are processed by your brain. The greater the number of stimuli, the lesser time your brain has to recover. Your brain can recover effectively in a quiet environment. You will be amazed to know that experiencing just 2 hours of silence every single day can create new hippocampus cells. These cells are core to regulating your motivation levels, emotion, learning and memory.

In addition to helping your brain to recover and function better, silence can help you focus better and improve your problem-solving and decision-making skills. People are also known to be more productive in silent settings compared to loud and noisy places.

Sound sleep

Lack of sound sleep is becoming a significant problem in today’s world. Common sleeping disorders such as insomnia and are triggered by stress which is a direct result of a highly hectic and busy lifestyle.

Insomnia can cause other health disorders and can reduce your ability to complete your daily duties effectively. You can overcome insomnia by spending some time daily in a quiet setting. You can use techniques like mindfulness and meditation in a calm environment, which will reduce your fatigue and help you get sound sleep. You should spend at least 30 minutes of downtime in a noise-free environment before going to sleep. Also, adding noiseless bed frames and having a soundproof room can considerably reduce your stress levels and ensure that you get a sound and peaceful sleep.

Improved creativity

Living in a less noisy and peaceful home can lead to improved creativity and enhanced self-awareness. When the noise reduces, the stress levels automatically go down. When high-stress levels do not plague you, your mind can express its creativity to the fullest. You can come up with new and more innovative solutions which were otherwise not possible in a loud and noisy environment. You can also work on executing those ideas while working in a quiet setting.

In addition to increasing your creative juices, a soundproof home can also make you more aware and appreciative of your surroundings. Becoming more open and receptive to self-reflections can bring about a positive change in your lifestyle.

Reduction in headaches & migraines

A noisy environment is linked to triggering consistent headaches and migraines. While some people may experience short-term headaches, which can disappear after some time, others may experience more pesky headaches. A headache or migraine, which is long-lasting, is very irritating and it can be symptoms of other health disorders. Headaches and migraines are generally caused by stress. Stress levels are higher in a noisy house as noise stimulates the body’s stress signals. Taking regular medication for such headaches and migraines can also have other side-effects. Living in a noise-free professionally soundproofed home can reduce stress levels and reduce future headaches. Even in case of the occasional headache, you will notice that you won’t need medication to treat it and it will disappear on its own.

Prevents cardiovascular diseases

When you live in a soundproof home, you experience greater peace. This can lead to regulation and maintenance of your blood pressure, heart rate, and respiration rate and ensure that they are maintained at healthy levels. Living in a less noisy home is known to be better for stress control. You will experience lower stress levels in such an environment. It will also reduce harmful habits like uncontrolled and unhealthy binge eating, smoking, drinking, and a sedentary lifestyle. When you start controlling your unhealthy habits, you can improve and maintain a much healthier lifestyle. Reduced stress and less noise are crucial for a healthy heart.

Categories
Cleaning

5 reasons cleanliness can affect workplace productivity

The employees are the most important component of any company. Luckily, there are various ways to make a positive impact on your employees’ lives and boost their productivity. This includes maintaining a clean workplace. Mind you, 89% of Australians believe that a restroom’s condition indicates how a company values its workforce.

If you’re not convinced of the connection between cleanliness and productivity, read on.

1. Reduces overwhelm

A cluttered desk can make an employee feel overwhelmed with tasks even if they are ahead of schedule. On the other hand, a clean and organized desk allows an employee to feel that they are under control. As a result they are inspired get their work done.

That said, you can boost your employees’ productivity by encouraging them to clean their work desk. Here’s some ideas of ways to keep things tidy around the office:

  1. Make a “No Eating on Your Desk” policy
  2. Host a work desk decluttering hour
  3. Have designated waste bins and recycling bins
  4. Organize a “Clear Desk” challenge
  5. Go paperless!

Surprisingly, a clean and organized workspace can boost an employee’s mood, and it can affect his productivity in a profound way. So think of encouraging your employees to clean your desk as one way to make them contribute to your company’s success.

2. Drives determination

In a study conducted by Jeffrey Campbell, Ph.D., chair of facilities management program at Brigham Young University, it was revealed that cleanliness has a direct impact on a student’s ability to learn.

As for the case of employees, clutter can heighten their levels of stress. And when they are stressed, they are less likely to focus at work. They are not determined to do their jobs, which means that it can negatively affect their productivity. On the other hand, a clean workplace drives your employees’ determination to work.

Maid Sailors, an Office Cleaning Service NYC, says that ensuring the cleanliness of your office creates a positive first impression and improves employee morale and work ethic. And when your employees are determined, the more productive they can be.

3. Improves health

Cleanliness is connected to hygiene. Therefore, a clean workplace promotes good health among employees. That’s because you prevent germs and illnesses from propagating in the workplace.

According to a 2014 study, bacteria found in office doorknobs and tabletops spread to 40% – 60% of employees within 2 – 4 hours. This can lead to employees getting sick often and an increase in absenteeism, and this could be detrimental to the company. That’s because it can also affect the company’s bottom line.

Here’s the thing: An absent employee cannot fulfil his work. More so if he needs to meet a deadline.

Absenteeism can impede an employee’s ability to complete projects, which can ripple to other people in the department. The rest will be unable to begin their work because the project is still incomplete somewhere along the line.

4. Maintains focus

Pixie, an iPhone location app, released a survey revealing that a person spends an average of 5 minutes and 20 seconds looking for misplaced items. And if you think that this is just a simple matter, think again.

A lot of opportunities were missed, and money was spent because of lost items:

  • 60% of the respondents got late for work and school
  • 49% have missed an appointment or meeting
  • 22% missed their plane, bus, or train
  • 67% spend about $50 per year to buy replacements

On the other hand, an organized work area allows an employee to reach the tools that he needs to use with ease. Thus, it helps maintain his focus at work. This can result in an increase in productivity.

5. Maximizes work time

We have already established that clutter is a major productivity killer. That’s because it causes distraction to you and to other people in the office.

That said, it is important to keep your desk clean and clutter-free to maintain your focus. Doing so will also prevent you from rummaging through your belongings just to get things done.

Remember, a person spends an average of 5 minutes looking for lost items. When your desk is organized, you get to save these precious minutes and spend it on fulfilling your task instead. This allows for better results to take place.

As Shawn Mike, a web developer and copywriter puts it, “When your working area is organized, less time will be spent on hunting for a crucial document and more time will be spent on performing the tasks that matter.”

Wrap up

Having a clean and hygienic workplace is one way to make a positive impact on the productivity, health, safety, and satisfaction of your employees.

For one, it prevents them from getting overwhelmed with the tasks that they need to do. This can drive their determination to tackle their work and get things done.

Categories
Kitchen

9 small kitchen ideas

We cook, eat, drink, and socialise in this space. Kitchens are more than just a place to make a meal, and they are a design statement within homes. Whether you live in a high rise city apartment, or a classic, narrow terrace house, you might be dealing with a kitchen on the smaller side. But that doesn’t have to be negative! There are certainly ways to accentuate and embrace your cosy kitchen.

Here, we’ll take you through 9 small kitchens all with unique qualities that make them stand out from the rest.

Timeless style: Industrial

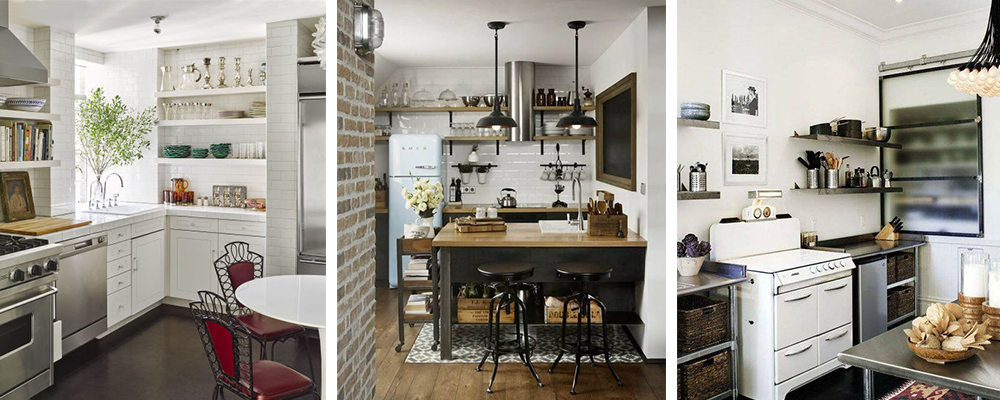
Small kitchens in industrial style decor
Source: Pinterest

An industrial-style kitchen is a timeless trend that never phases out. While this style is predominantly found in larger spaces, these three cooking areas use just the right amount of stainless steel appliances and fixtures, wooden block surfaces and rustic metal accents.

Classic rule of thumb: White

Small kitchens with white decor
Source: Pinterest

It’s a basic rule of thumb that lighter colours and plentiful natural light can make a room feel larger than it actually is. The far left kitchen challenges this notion and uses a light grey hue – and it works!

Uprising trend: Accent walls

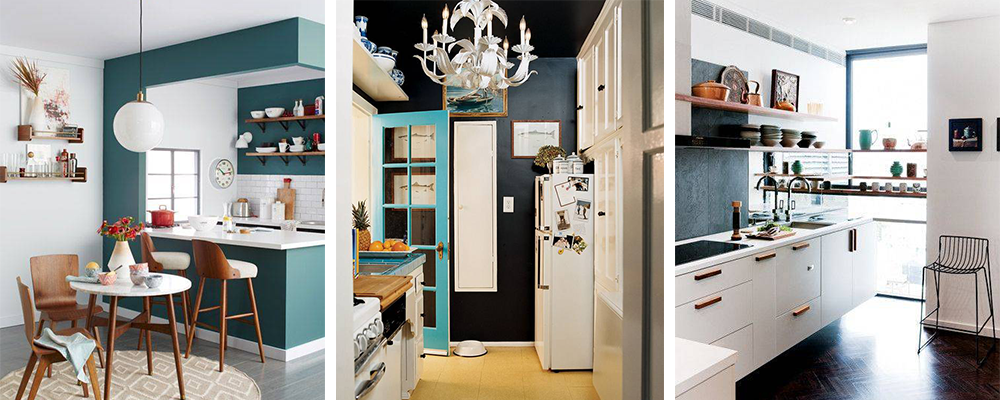
Small kitchens with bold, accent walls
Source: Pinterest

While white can make a small room look larger, it also works on the other end of the spectrum. Accent walls using dark colours create a sense of boldness and edginess that doesn’t come with a stark white colour scheme. A bold-coloured wall can accentuate the frame of a kitchen and it gives more dimension.

Dare to go all out: Accent appliances

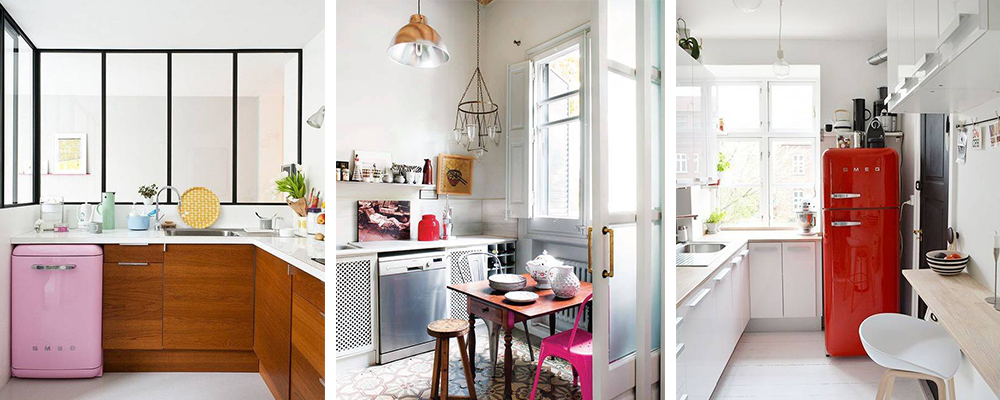
Small kitchen with bold appliances

These tiny kitchens all have one thing in common – and it’s pretty hard not to miss – the brightly coloured objects in the room. The bright pink fridge as well as the bold classic red fridge pair perfectly with the otherwise dull setting. If you opt to use an accent colour as bold as this, make sure there are no other conflicting bold colours within the space.

Categories
Gardening & landscaping

How to prepare your garden for winter

With the drop in temperature and the sun setting earlier, the thought of spending extended time in the garden seems less appealing, not to mention not all plants survive the frost. There are plenty of things you should to make sure your garden is protected through the cold and will bloom again brighter and more beautiful in the spring. Here’s our guide to keeping your garden strong through the winter months. 

Preparing your garden for winter

Take a moment to sit back and look at the layout and design of your garden. Winter is the ideal opportunity to consider what seeds you’d like to plant or how you want to landscape your outdoors.

Place your plants in areas where they can take full advantage of whatever sunlight is available. Winter plants need plenty of room for optimum air circulation, so they need to be placed further apart from each other. This also prevents fungus and diseases from developing.

Source: B.I.G Big Image Gardens

Mulch & weed

The first thing you need to do is lay down some mulch you can think of mulch as a blanketing insulator for your garden. It will protect your plants from the cold and frost, and when the mulch decomposes, it will add all of its rich nutrients right back into the ground. They’ll make your plants that much stronger when they start to grow back.

Next, it’s time to weed. That’s right, get down and dirty in there before the weather gets cold. Yank out every weed that you see, or just treat the area with plenty of weed-killing products. This is a necessity. It reduces the risk of unwanted seeds and spores spreading through the garden, which could take root and disrupt the lives of all of those plants you worked so hard to grow. You want those plants to bloom in the spring – not some undesirable weeds. 

Compose some compost

Begin a new compost heap in the time leading up to the winter months. Throw in all of the organic stuff that your house produces – grass clippings, leaves, plant shavings, household scraps. Over the cold winter months, all of this material will break down, and when spring breaks, you’ll have a heaping pile of compost that will sustain plenty of plant life in the garden!

Keeping up the garden

The time leading up to winter is also the perfect time to do some maintenance tasks – remove old plants and chop off dead and dying leaves or branches. Don’t prune plants (that just encourages growth), unless they’re perennials – those will just grow back stronger. This time is also the time to start rearranging plants and thinking about your garden layout for next year. You can also start to plant bulbs and bare-rooted shrubs, and it’s also the right time to divide up perennial plants. 

Source: All Round Gardening Services

Oh, and one last, very important point – be sure to store your gardening tools for the winter. Clean them thoroughly, oil the blades, and put them away in a secure location. You don’t want the elements dulling the stuff you’re going to need. 

Plants that thrive in winter

Some plants can grow considerably well in the winter so don’t shy away from planting flowers, vegetables, or plants that thrive in the colder months. If you’re interested in keeping blooms and buds around you all year round, here are some tips for planning a lovely winter garden.

Go Native

When planning a winter garden, the best place to start is by looking for native plants that are indigenous to your area. In Australia the majority of native plants start flowering in autumn and continue until early spring. These native flowers help to provide nourishing proteins and carbohydrates to the birds during the winter months.

Here are a few colourful plants you should consider for your winter garden:

  • Grevilleas: These popular plants come in a wide range of gorgeous colours and continue to flower throughout the winter season. You can choose groundcover varieties in addition to different sizes of shrubs and trees.
  • Correas: With more than 30 different varieties of correas, youll be able to choose from colours such as vermillion, green, bright red and pink.
  • Hakeas and banksias: These have gorgeous, show-stopping flowers that produce a heavenly scent.

Winter Soil

For native plants, it’s important to enrich the soil with compost and mulch as well as to aerate it regularly so that the soil will stay loose. If you have clay soil, youll want to loosen it first and then add gypsum, which will help break the clay down to make it more manageable. Fertilisers are also good for native plants, but make sure that they’re low in phosphorous. You can fertilise once or twice every year; the optimum times are early spring, late summer, early autumn and late winter.

Effective Foliage Plants

Because so many plants lie dormant during the winter months, consider adding some colour to your garden by using foliage plants. These come in solid or variegated shades and can bring touches of red, purple, grey, yellow and black to an otherwise monochromatic winter garden. For added drama, chose plants that have a variety of textures and shapes. Spiky-leafed plants, for example, look striking when placed next to plants with broad, curving leaves.

Here are some other flowers that can grow well in the winter:

  • Mahonia
  • Kniphofia or ‘Winter Cheer’’
  • Camellias
  • Pansies
  • Calendula
  • Stock and nemesia

For a garden that blooms all year round, consider also planting some winter veggies

  • Cabbage
  • Radishes
  • Peas
  • Coriander
  • Broccoli
  • Brussel Sprouts
  • Cauliflower

Preparing your lawn for winter

Just because winter is coming does not mean you will lose all the work you put into your lawn over the summer. Preparing your lawn for winter is your best insurance for having it come back next spring, as lush and green as ever.

Source: Foresight Horticulture
  • Weed Control: These prolific species are one of your biggest challenges because they are such hardy, stubborn bunches. The fix? Do thorough weeding during early winter and these weed-fests won’t stand a chance in the new season.
  • Breathable Soil: Ever notice how rock-hard your lawn becomes over the summer? This natural tendency discourages lawn growth and encourages weed growth. Over the summer, buy a lawn aerator from a garden supply store. Aerators will oxygenate the soil and balance water flow when the rainy season comes.
  • Fertilisers and Soil Conditioners: Ideally, your soil should have a pH balance ranging from 5.5 to 7.5 – you can check this with a test kit or by taking a sample to a local nursery or agricultural office. Fertilisers are like antioxidants for plants. They spur healthy growth at fundamental stages during winter, spring and summer. Choose a liquid fertiliser, such as Nitrosol or Seasol to use on the lawn. Alternatively, you can add slow release lawn food or a complete lawn food. Consult an expert in your town to test the pH level and to recommend the best products for optimal results.
  • Fill Dirt Patches: A good time for seeding dirt/dry patches is late fall, or you can try transplanting from an overgrowth area of your lawn to fill these patches in.
  • Regular Winter Maintenance: Even when your lawn is near or in hibernation, you should perform regular maintenance. Pick up debris and keep your lawn clear of leaves. Your lawn needs light to nourish it, even in the cold months. A buildup of debris could result in dead spots come spring. Also pull any weeds that pop up to prevent them from spreading. If you have pets, give your lawn a light watering once a week to dilute the urine. This will also help prevent dead spots.
Categories
Kitchen

Modern kitchen trends: Introducing the galley sink

Everyone desires to own a kitchen that offers them the utmost ease and comfort while preparing meals or hosting guests. You, too, can be in the same league as them. You must be looking for ways to make it more functional and attractive. If that is the case, then you don’t need to scurry here and there for ideas. As per the latest trends, one of the must-have features of any modern kitchen is the workstation sink (or galley sink). Why? A typical sink allows you to wash fresh produce and dishes. However, workstation sinks offer you much more than these necessary conveniences.

With the newly curated galley sinks, you usually get a variety of accessories, including drying racks, cutting boards, bottom grids, and serving boards. Due to these accompaniments, these multi-purpose sinks become an exemplary functional piece no matter whether the size of the kitchen is small or big. You can use them to accomplish your cleaning tasks as well as to prepare meals. Alongside this, you can also take advantage of their extension as the countertop when it comes to entertaining or serving guests. So, it will not be wrong to say that the first thing that you can think of adding to your kitchen is the workstation sink.

Modern kitchen with black cabinetry and fittings with stainless steel appliances and a white benchtop.
Galley sinks allow for convenient preparation of meals and cleaning / Source: Precise Kitchens

There are several galley style kitchen sinks available, from stainless steel to composite. If you intend to give your kitchen a fresh look within a limited budget, then stainless steel can be an ideal choice. However, when it comes to increasing the overall interior aesthetics, choosing composite granite sinks can be a better idea. With this, you can decide on the mounting options, such as drop-in, under-mount, and farmhouse. Every installation type has its purpose. You can go through the pros and cons of each of them to understand what suits your kitchen habits the best.

Now, let’s see what else you can select for your kitchen to make it friendly, stylish, and more productive.

Countertops

Integrating the sink with your benchtop will create a beautiful continuous surface and allow for easy cleanup. If you are looking for a sophisticated look, then this seamless design is a good choice.

Earlier, granite used to be the ubiquitous choice everywhere. But maintenance and cleaning challenges cropping out of its porous characteristic made people watch out for some alternative. This situation gave rise to composite granite. A mix of natural stone and resin, this surface turned out to be far more durable and more reliable than the granite slabs. And the best part was it retained the charm of the natural stone as well. For your kitchen, you can also go with this option. If you still want to explore more, then porcelain can be another choice. Porcelain worktops have been trendy in Europe, and now, American homes are also embracing this joyfully.

Modern kitchen with black cabinetry, marble island benchtop and splashback.
Integration of benchtop with sink / Source: Handy Kitchens Pty Ltd

Porcelain surfaces can match the elegance and appearance of wooden, granite, marble, and other materials effortlessly. Plus, it can provide excellent resistance to stain, bacterial growth, and heat.

With this countertop, your choice of the workstation kitchen sink will mingle well. It is just that you have to take a call on the type of installation and surface available in the market.

Flooring

The open floor is the new-age choice. It overflows into your living space, creating an illusion of spaciousness so that you don’t feel the pinch. For continuity, designers usually extend wood flooring of the living area into the kitchen. Wood tends to be susceptible to water damage. However, it doesn’t feel as hard as a tile surface. Plus, it can remain moderately cold and warm, unlike other materials. A lot of kitchens these days showcase this style. Hence, if you desire, you, too, can benefit from this popular choice. A combination of porcelain or granite worktop, wooden flooring, and workstation sink can prove wondrous.

Brown hardwood flooring in a bright kitchen with white cabinetry and island bench.
Hardwood flooring is a popular choice for kitchen renovations / Source: Aspect Cabinetmakers

Kitchen Taps

There is an incredible number of choices for kitchen taps. Design and function are the two elements to be pondered when making a selection. Single levers are a great choice in an open-plan kitchen. A two-handle lever looks wonderful in a more traditional kitchen.

Gooseneck spouts are a popular choice, as they can add a sleek and polished look or a more vintage look. Consider spouts with pull-down sprays or with sensors that let you turn the water on or off with the touch of a hand.

Marble kitchen benchtop with dark grey sink and tap.
Gooseneck kitchen taps are becoming increasingly popular / Source: Focus Building & Renovations

Cabinets

White has dominated the choices for far too long until people faced maintenance challenges. It is still everyone’s favourite, but many homeowners are now inclining towards other colours. Even today, white cabinets can be visible in many homes. To break the monotony of the tone, interior designers use wooden materials on shelves, pullouts, and drawers where white is the leading theme. If you want to add vibrant colours instead of white, then choosing from greens and blues can be the right thing. From the family of blues, navy colour emerges as the classic choice. Other than this, hues like teal, spring green, and deep forest green can also look exciting in the kitchen cabinetry.

Small kitchen with dark brown and white cabinets
Be sure to match the choice of cabinetry with your workstation sink / Source: Hudson Construction & Renovations

Anyway, whatever cabinet you choose, make sure that it supports the choice of workstation sink and installation type you select. Some materials tend to be heavy and hence, require full support from cabinets where they are installed.

Kitchen appliances

The sink is a small plumbing fixture. Still, it magnificently contributes to the overall look of the cooking area. So, when it comes to tools that occupy ample visual space in the kitchen, you can imagine the kind of responsibility you have to shoulder while selecting them. Stainless steel surfaces continue to be a prominent part of any modern kitchen. But the challenge with them is that they leave behind the fingerprints. To avoid this, you can switch to shades like black, blue, yellow, red, and orange. The more colourful choices you make, the stronger the personality your kitchen will acquire. Then, you can keep modifying colours to deal with the boredom of seeing the same thing.

Bright kitchen with white cabinetry, marble benchtop and splashback and stainless steel oven/cooktop.
Stainless steel appliances continue to be the main feature of modern kitchens / Source: Focus Building & Renovations

What are your plans now? If you desire to transform your kitchen, you can buy a workstation sink, and with that, work around other areas too. A blend of all these changes can elevate the overall appeal of your kitchen while taking care of practical aspects. No matter whoever comes to this part of your house, he or she will surely gush about the way you planned and executed the entire thing. And yes, even if you thought nobody is going to notice your workstation sink, you will get a reality check when guests appreciate this choice for being thoughtful and smart. Even when you get acclimatized to your new kitchen, you would still be praising your decision to buy a workstation sink for it.

Categories
Doors & windows

What is an awning?

Awnings are an exceptional method of shading windows and outdoor areas. Luckily, there are many options available for homeowners.

Types of awning

There are many different types of awnings including:

Automatic: These are extremely popular types of awnings. Automatic models run on guides, so they can be easily adjusted to any entertaining area. Also, since they are available in a variety of lengths, automatic awnings are compatible with all homes.

Fixed Guide: These awnings are best when used on the upper levels of residences because they utilise guide bars that are permanently fixed. Fixed guide models are suitable for automation.

Heavy Drop: For a more European feel, heavy-drop-arm awnings can be adjusted within a 90-degree arc and can be motorised for additional convenience.

Retractable: Retractable awnings are ideal for patios and decks. They are installed directly onto the side of the house and extended to cover outdoor areas when necessary. When these are not being used, retractable awnings are stored inside the housing unit. These models area available in manual or automatic and can be customised for your specific needs. Additionally, retractable awnings are available in a variety of colours and patterns.

Straight Drop: As an alternative to verandah awnings, straight-drop models are recommended for pergolas, patios and verandahs. These models can be spring-loaded or have an attached gearbox.

Verandah: Finally, verandah awnings are the perfect choice for privacy and protection from the sun. They are typically operated through the use of pulleys. These are the most aesthetically pleasing of the group.

Materials used in awnings

There are several materials that can be used for awnings, including:

  1. Acrylic
  2. Aluminum
  3. Canvas
  4. Galvanised steel
  5. Woven mesh
Source: PANEZA Window Fashions

Automation

Manual awnings are operated by turning a crank. To provide shade, wind it up; to provide sunlight, wind it down. On the other hand, motorised awnings utilise a motor to extend and retract the unit via a switch or remote control. It is even possible to automate using a home automation system.

Benefits of installing awnings

There are several benefits to installing awnings; not only are they practical, but they also look great. Here are some of the main benefits of installing awnings on to the exterior of your home.

1. Awnings help protect your windows

Protection against the weather is one of the main reasons you’ll want to install exterior window awnings. Protecting your home is vital if you live in a climate prone to high winds and frequent thunderstorms, perhaps even hail. Installing something like straight drop awnings – either manually operated or motorised – means that as soon as the weather starts to turn, you can quickly drop those awnings and add a layer of protection for the fragile glass.

Even something like pivot arm canvas awnings that protrude out above the window will help protect your windows to some degree as well.

2. Window awnings help insulate your home’s interior

No matter what style of awnings you choose to go with, apart from offering window protection, one of the main functions of awnings is to help keep the temperature inside your house cooler.

Awnings help block out some of the sunlight. Even if you have thick blinds on the interior of your windows, if the summer sun can shine directly onto the glass, it gets hot very quickly and therefore heats up your house. With the protection on the outside, preventing the sun from baking the glass, your home will be much cooler.

No one wants to live in an oven during the long Australian summer, so awnings can undoubtedly help with climate control.

3. Enclose your patio or balcony

Once again, something like straight drop awnings is the perfect solution for enclosing a balcony or patio area and protecting you from the elements.

Imagine you’re out on your patio one evening enjoying some snacks and drinks with friends. It’s a breezy, but pleasant evening and things are going well. Soon the atmosphere is spoilt when a wind suddenly picks up, tugging at your clothing and giving you the chills.

You could duck back inside, or you could lower those awnings to protect you and your friends against the wind.

It’s the same out on your balcony. Highrise balconies, in particular, are prone to lots of wind, so having some awnings in place that you can use when needed is a blessing. Enjoy your alfresco balcony lifestyle in comfort and style.

Awnings are a great way to provide shade over outdoor entertaining areas / Source: Smart Canvas

4. Window awnings are very easy to maintain

Don’t think that because you’ve installed some awnings on the exterior of your home that you’re going to be spending hours every weekend cleaning them up to keep them looking good.

Modern awnings are extremely easy to look after. Often all you’ll ever need to do is hose them down with some freshwater from time to time to keep off any grime. Every once in a while you might run a sponge and some soapy water over them before hosing them off.

Today’s awnings are also extremely strong, durable and highly weather resistant. They are designed not to fade in harsh sunlight, nor split or crack from constant exposure to the elements. Your awnings will serve you well for many years.

5. Awnings add style to your home’s exterior

Window and patio awnings have come a long way in recent decades. Not only are they very functional, but they possess a lot of styles as well.

You can have awnings made to order in a variety of materials, styles and colours that blend in well with your existing colour scheme. The installation of awnings will also add a lot of value to your house, should you ever decide to put it on the market, way more value than the cost of the awnings themselves.