Categories
Resources

4 Australian winter wedding destinations

Having your wedding during the cooler months may seem odd at first, but if you’re looking to host a unique and unforgettable wedding, then winter is your winning month. It can also be a lot cheaper to host your wedding in the winter-time, as it avoids peak season, and that means you’ll probably have more flexibility and freedom when it comes to hiring the best professionals in the business.

A winter wedding can be a magical event / Source: Peter J de Vries Celebrant

While Australia is known for its heat and a glistening endless coastline, there are four beautiful alpine resorts that are picture perfect to host your winter wedding:

1. Thredbo, NSW

Thredbo is set 500km west of Sydney, and depicts a European-style ski village. The Denman is a hotel that boasts 4 stars, 33 rooms and a 55 seat restaurant, along with a day spa and cocktail bar, and acts as the perfect venue to get hitched in winter. It’s perfect if you’d prefer a more intimate affair, and the hotel provides wedding packages too.

2. Charlotte Pass, NSW

Charlotte Pass is Australia’s highest village, and is found within the Mt Kosciuszko National Park. During winter months, the village is completely covered in snow and is amongst one of the quieter ski resorts in Australia. The Kosciuszko Chalet Hotel boasts the aesthetics of a medieval castle and provides sweeping views of the Charlotte Pass village. The chalet can accommodate for up to 120 guests, and provides a restaurant that can host 35 people and an inner lounge space for 85 people.

3. Falls Creek, VIC

Source: Jason Robins Photography

Falls Creek is located 350km east of Melbourne and is at the base of Mount Beauty in Alpine National Park. Falls Creek is a fully serviced resort that offers a selection of restaurants, hotels and nightlife. The Quay West Resort & Spa is an apartment-style property, providing an uninterrupted, breathtaking view of the mountains from 63 luxury suites, a five-room day spa and four different venues available for private hire that can accommodate 20 to 100 seated guests.

4. Mount Buller, VIC

Only a three hour drive from Melbourne, Mount Buller has Victoria’s largest ski resort. There’s a range of accommodation to choose, from simple dorms and lodges to luxurious and opulent retreats such as the Mount Buller Chalet; containing 61 rooms and penthouse suites, a day spa and a restaurant area that can seat up to 150 people.

Winter wedding ideas

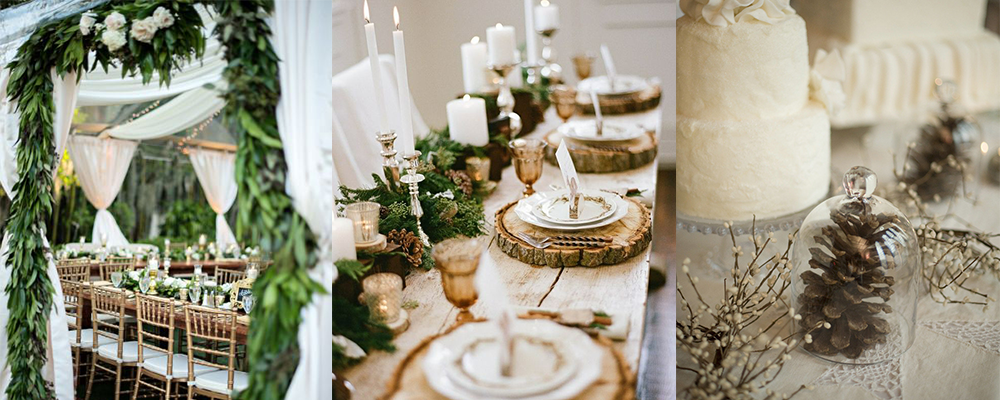
There’s a certain charm in having a winter wedding. It can be a magical experience with cosy and decorative touches that are unique to the colder seasons.

Traditionally, wedding flowers boast bright florals and decorations but for a winter wedding, there’s charm in holding a bouquet of earthy florals with unique colours such as rich reds, leafy greens, muted greys and warm oranges.

Opt for warm, wintry tones in your decor and florals for a winter wedding / Source: Shutterstock

A simple string of fern can add an elegant touch to a wedding invitation and pinecones tied to a gold ribbon can hang off the back of guests’ chairs or complement the candles on your wedding table. You can also bring some light to the decor with fairy lights.

wedding-2.2

Wrap up

Planning for your wedding to take place in winter doesn’t have to be dreary or dull, quite like the weather. Venturing to these alpine resorts will assure a unique wedding that will make the day even more special and memorable.

Categories
Kitchen

Achieve a Hamptons style kitchen

What is a Hamptons style kitchen?

With a Hamptons style kitchen, you get the perfect combination of a room that is perfect for both family meals and entertaining. Inspired by the region of the same name, the style uses natural colours such as tan and blue that work with the coastal theme along with a tonne of natural light. This style gives you all the space that you need and creates a functional space for cooking and eating.

Benefits of a Hamptons kitchen

Functionality

As you look at Hampton kitchen designs, you’ll find that these rooms are highly functional. Not only do you have separate spaces for cooking and prep work, but you get space for entertaining and organising your foods and ingredients too.

Aesthetically pleasing

The most significant benefit of choosing this type of kitchen is that it is aesthetically pleasing to both your family and guests. While the natural light makes the room look larger, the bright colours turn the kitchen into the focal point or central hub of your home.

Hamptons style kitchens are mostly white / Source: Bob Jet Building Services

Timeless style

If you’re tired of redoing your home every few years as trends change, you’ll love that the Hamptons style is timeless. The colours and features that it adds never go out of style.

What makes up the Hamptons style?

Colour pallet

One thing to keep an eye on while looking at Hampton’s kitchen ideas is the colour combos used. White is very popular because it has a clean and refreshing look. If you worry that you can’t keep white clean, go with a deep navy blue and add some white accents. You might opt for lighter shades of blue and tan that work with the theme too. These colours are reminiscent of relaxing at the beach.

Materials

Wood is the most popular material that designers use for a Hamptons kitchen, both in natural brown colours and white. Marble and natural stone are also commonly used. Wicker also looks excellent in this type of kitchen. You can use wicker baskets for storage or opt for wicker furniture. Wire and metal accent pieces work well too.

Nautical and coastal themes

Nautical and coastal themes transform the kitchen into something special. You don’t need to go overboard with tons of decorations though as just a few pieces work to emphasise the style.

Specific features

Architecture

Now is the time to make the most of the architectural features in your home. If you have tall ceilings, consider adding wood beams. When you choose the right stain, those beams will work in the space without overwhelming your senses. Large and open spaces are common in this type of kitchen, but you don’t need to tear down a wall. You can try removing the doors on your cabinets or installing open shelving. New shelves and cabinets open up the room and make it feel larger and more inviting.

Benchtops

Benchtops usually come in marble or wood in a Hamptons style kitchen. Use a darker colour to make the benchtops the focal point of the room, or use a lighter shade to blend in with the surrounding space. 

Flooring

In a modern Hamptons style kitchen, the flooring can make a big impression. Wood flooring is easily the most popular choice. A darker shade of wood hides stains but can make a small kitchen feel even smaller. When you select a lighter shade of wood, you get the beach feel every time you walk in the room. Not everyone likes using wood floors in kitchens though because the wood can develop scratches and scuffs. Consider going with tile in a soft and natural colour. 

Contact local interior designers

Lighting

Hanging lights are a standard option for a kitchen in the Hamptons style. Also called pendant lights, they usually have a cord or bar that hangs from the ceiling and supports the lighting fixture. Many of the top Hamptons lights use shades of white and black, but some prefer the look of entirely white pendant lights. You can use lights that incorporate gold or silver too as these colours work with the theme. 

Centre island

Adding a centre island is the easiest way to create a gathering space for your family. They’ll love pulling up a stool and taking a seat to share a quick breakfast and relaxing as you cook. The island also creates a place where you can read the newspaper or flip through a cookbook while your kids do their homework. It also comes in handy for entertaining and gives you extra storage space. Look for centre islands that have open shelving or cabinets for storing extra cookware and things that you need every day. 

Kitchen stools

Don’t forget to look for Hampton’s style kitchen stools to go along with your centre island. Look for comfortable seats that people will want to sit on when they eat a meal, help you cook or stop by during your next party. Chrome stools have a shiny finish and usually feature a leather seat. If you think that those stools are too modern, go with wood stools. You can choose stools with a fabric covering that matches the Hamptons theme and is easy to clean. Just make sure that the seats are tall enough that people can pull them up to the counter or island.

Hamptons style kitchens use a lot of wood and marble / Source: Aspect Cabinetmakers

Splashback

A splashback prevents damage to the wall and catches the splatters and splashes that come off pots and pans as you cook. A Hampton’s style kitchen splashback can be simple or elaborate. A simple idea involves tile in shades of white and grey that blends with the rest of the room. Using tiles in unusual shapes can make the splashback more interesting. You can incorporate other colours too, such as pale blue and light brown.

When bringing home the Hamptons look for your kitchen, choose contractors you can trust who get the job done quickly. They can install Hampton cabinets, put down new flooring, install a centre island and hang new lights. Those accents help you create the perfect kitchen.

Categories
Design & decor

How to make your own pallet bed

Buying a new bed frame can cost hundreds of dollars, even if you choose a cheaper material. As long as you can find wood pallets and have some free time, you can use the right tools to build a new frame out of that recycled wood.

What is a pallet bed?

Whether you want to do your part and help the environment through recycling or save some money, consider making a bed from old pallets. This type of bed uses the pallets to create both the base and headboard. While basic designs are suitable for most DIY enthusiasts, you’ll find some complex and intricate designs that you can try too.

Sourcing out a pallet

Where can you find pallets?

Home improvement stores now sell pallets that you can take apart and put back together again. However, finding free pallets can help you save money on your project. The best place to find free pallets is through small business parks in your area. Distribution companies often give away pallets too. Don’t forget to use the internet to find companies giving away pallets.

How many pallets do you need?

The number of pallets that you need to make a wood pallet bed depends on the size that you need. For a queen size pallet bed, you need at least four. Complex and intricate designs, as well as those with a headboard, will need more pallets. You only need two wood pallets to make a twin bed.

A bedroom with a desk and a pallet bed
You need multiple pallets to create a double bed / Source: Shutterstock

How to choose safe pallets

Companies often use pallets treated with chemical solvents that protect the wood from water damage. To choose safe pallets, look for any letters stamped on the surface. The initials MB stand for methyl bromide and indicate that the pallets aren’t safe for home use. You can also buy pallets from home improvement stores that are brand new.

Turning a pallet into a bed frame

Learning how to make a pallet bed is easy when you know what steps to follow. Check out the steps below and make sure you understand what to do before you start

Sand and wipe down

To make a DIY pallet bed, you need to sand the pallets first. Even if you choose new pallets, sanding the wood is important because it gives the wood a smooth surface and reduces your risk of getting splinters. An electric sander is the best tool for the job because it fits in one hand and works quickly. Make sure that you wear protective gear when sanding, including a mask and goggles. After you finish sanding, wipe off the pallets to remove any excess wood dust.

Paint

You do not need to paint a pallet bed base, especially if you have longer blankets or plan to use a bed skirt. Painting lets you add a personal touch though and make the bed yours. If you decide to paint, choose between spray paint or a brush application. Brushes allow you to add just enough colour that you can still see the natural wood grain through the topcoat. Using spray paint ensures that you get the even coverage that you want and will completely hide the wood grain.

Contact local interior design experts

Secure the pallets together

For a basic DIY wood base, you only need four pallets. Place the pallets on the ground in a two by two layout. Though you do not need to secure the pallets for this type of bed, you may want to use screws to keep the pallets from shifting as you get in and out of bed. If you use wood screws, make sure that the screws are long enough to go through the wood in two pallets.

Securing the pallets is necessary if you want a bed with some height. As pallets are relatively short, you can stack two or more and get as high off the ground as you wish. Use a power tool to sink the screws through the top of one pallet into the pallet below. 

When you get to the top level, put down some material that keeps your mattress from snagging on the wood. A thick piece of cardboard or some felt will work. Those who like sleeping on a firmer mattress can use a piece of plywood cut to the same size as the bed.

Create a pallet headboard

Though you don’t need a headboard for your bed, making one to go along with your wood pallet bed frame is as simple as securing a pallet to the wall. You’ll want to sand and paint the pallet to make it match the bed. Have someone hold the pallet flush against the wall as you sink wood screws through the surface and into the wall, which keeps the pallet bed headboard from falling. You can easily use the slats in the headboard as extra storage for everything from books and lights to clothing and decorations.

If you want to create a different look, try adding some fabric. Simply wrapping the wood in fabric before you hang it creates a fun and functional headboard. You can also secure slats of wood from a second pallet to the front of the headboard to create extra shelves. With another pallet, you can even make a matching footboard to go with your pallet bed base.

Optional decorations

Once you have a pallet bed frame, consider adding some optional decorations to make the bed look different from those that others created. You can go with something basic such as lights. Fairy lights add a nice touch of atmosphere and are small enough that you can weave them through the slats in the bed. If you don’t have a nearby outlet and don’t want to use an extension cord, look for fairy lights that run on a battery. Larger lights create a fantastic look too when suspended on the wall and above the bed. Twinkle lights placed inside the pallet below your bed adds a small amount of light also.

A bed with a pallet bedhead and lights
Lights can add a personal touch to the bedhead / Source: Shutterstock

Decorations can include extra wood that you source from other pallets. Consider cutting down some of the slats and turning them into tiny bedside tables that attach to the side of the headboard. You’ll have more than enough space for a glass of water and your cell phone. Some create beds that include a built-in section on the base for storing their shoes or slippers. You may add cutouts to the wood that lets you run cables through the bed too. Those cutouts are perfect for charging your phone or powering a laptop.

How to make a pallet bed with storage

Making a pallet bed with storage gives you more room for your belongings. It’s easy to make a bed that fits in a small room and has more storage space.

Leave extra room

Leaving extra room around the edges of the bed is the best way to make a frame with storage. Those spaces give you room for a potted plant or a few books. You also have enough space for a light and anything else you would display on a bedside table.

There are endless ideas for projects that you can do with a few wood pallets. Once you find pallets, you can make a DIY bed base and dozens of other items for your home.

Categories
Resources

Australian wedding costs 2021

The highly anticipated wedding of Prince Harry and Meghan Markle is estimated to have cost the Royal Family a staggering $58.3 million. Whilst it’s unlikely you have the budget of the Windsors, you can still make your wedding a royal success through some careful planning and research.

Here, we’ll breakdown the average cost of a wedding in Australia, and look at what’s trending for those looking to tie the knot.

Total wedding cost

The average wedding cost in Australia is around $51,000. The average cost of wedding venue hire is around $13,000, making it the highest cost in the overall budget. Finding the wedding venue is one of the first steps in the wedding planning process and due to popular venues being booked up far in advance, should be locked in around 12-18 months prior to the date of the ceremony.

Venue hire typically is the highest cost in the overall wedding budget / Source: Facial Beauty

Wedding dress

The next biggest expenditure is of course the dress, coming in at an average cost of $5,180. Many bride’s are now taking Ms. Markle’s lead and opting for two dresses; changing out of their traditional ball gown style dress for the ceremony to a more fun cocktail style dress for the reception. Brides are also going for less traditional dresses, coloured dresses such as, blush pink, mauve and rose gold being popular choices. Dresses with statement design features such as pockets, large bows and middle splits are also big in 2021.

Catering

The average Aussie wedding has 96 guests, with $9,000 being the typical amount spent on food and alcohol. Depending on your personal tastes and theme of your wedding, there are many different catering options you can choose from. Aside from the traditional three course meal, food stations serving quick bites like sushi, pizza, tacos and mini burgers are becoming increasingly popular, these work great if you have a large guest list and want to achieve a buzzy, social atmosphere at your reception.

Other popular trends include desert and cocktail bar setups where guests can make their own cocktails and lolly goody-bags. For country style weddings eco-menus are very in vogue, focusing on seasonal, organic and locally produced food served family style.

Photography

Wedding photographers typically spend around 8 hours capturing all of the magical moments from the day. Hiring a reputable photographer can cost around $2,600 on average, it’s important to hire a photographer that specialises in the style of imagery that you want to achieve, after all these are memories that you will want to hold onto forever. Natural and candid looking photos are popular in 2021.

Natural, candid wedding photography is the most popular style / Source: Little Glimpses

Hair & makeup

Brides typically spend 60-90 minutes getting ‘wedding-ready’ with the help of a professional hair and makeup artist. In 2017 Pinterest recorded a 1247% increase in searches for bridal ‘messy updo’ hairstyles, indicating that Australian brides are preferring a more natural, romantic look than in years gone by. Dramatic eyelashes and glossy lips are the look brides want in 2021.

Entertainment

The average cost of hiring a DJ or wedding band is around $1,600, with Ed Sheeran’s ‘Thinking out loud’ being the top first dance song choice for Aussie newlyweds. Other popular entertainment add-ons include photo booths, magicians and live caricaturists.

Transport

Vintage, classic cars like Rolls Royce and Bentley are the most choice of wedding transportation. Costs for wedding car hire is typically around the $830 mark but is dependent on the amount of cars needed in the fleet.

Contact local wedding planners

Flowers

2021 is the year of wearable florals with delicate, jewellry-like floral headpieces being very on trend. Seasonal bouquets made up of wild arrangements of bold colours and greenery are very popular, for that just picked fresh from the garden look. Hanging floral arrangements and floral ceremony arches are also in demand in 2021. Couples spend on average $1,500 on wedding flowers, however this number can significantly increase for elaborate, large scale floral interior decorations.

Whatever your budget is Oneflare have access to expert wedding service providers, from wedding planners, photographers, celebrants, hair and makeup artists, florists, DJs and transport specialists.

Categories
Reception

The order of wedding speeches

Wedding speeches give family members and friends the opportunity to share their thoughts on the couple. Speakers often narrate interesting and humorous stories about the couple’s relationship and lighten the environment at the wedding. These speeches are an important aspect of the wedding format and most guests look forward to it.

When you plan your wedding, you need to plan the order of wedding speeches as well. You need to give the speakers enough time to say what they want to. You also need to plan the order carefully to ensure no one feels slighted and your guests are entertained rather than bored. We have some tips and suggestions to help you come up with the right plan.

You can choose to follow the traditional order of speeches for your wedding, or customise it to suit you / Source: Marry Us Gary

Traditional wedding speech order

This traditional wedding order is safe, predictable, and easy to implement. You don’t need to think about where the speeches and toasts will fit in because everyone speaks at the right time and for a good reason. Traditional wedding speech order includes:

  1. The Master of Ceremonies – The MC conducts and directs all the entertainment during the wedding reception so they’re usually the first to speak. They welcome everyone to the reception and introduce themselves to the guests. They then introduce the bridal party before introducing the new bride and groom with enthusiasm and happiness. Based on the order of your wedding, the MC will introduce the father of the bride and prompt him to speak.
  2. The father of the bride – The father of the bride takes up the host’s position and speaks just before dinner is set to start and when everyone has settled into their seats. He will introduce the groom, his family, welcome the guests and talk about his daughter and her partner, before offering a toast. After this speech is over, the food is served and guests can indulge in conversation.
  3. The groom – The groom is next in line and his speech comes after everyone has finished eating dinner. The groom’s speech is usually a response to the father’s speech. He can thank the father, the hosts and the guests. Then say a few words about his new bride and toast to the bridesmaids and groomsmen.
  4. Best man – At this point, the best man responds to the toast from the groom on behalf of the bridal party. He then toasts to the bride’s parents.
  5. Bride’s father – The bride’s father will speak again in response to the best man and then toast to the groom’s parents and family. You can include anyone you feel is important to the groom in this toast.
  6. Response from the groom’s parents – The groom’s father will respond to the bride’s father’s toast with a few words of his own and a small speech about his son and new daughter in law.

After this, the MC can read messages and letters sent by people who couldn’t be present at the wedding but wanted their voices to be heard. You can even create a presentation and show these messages instead of reading them.

Non-traditional wedding speech order

You don’t have to stick with tradition if you don’t want to. For example, if the bride’s father can’t speak or the bridesmaid wants to speak, you can alter the format of the event accordingly. Here’s what you can do:

  1. Choose the MC – You don’t need to hire an MC but it’s a good idea to have someone organise the events of the reception and keep things on track. You can choose a friend or family member to act as an MC for the event. Just ensure they have a welcoming personality and can comfortably communicate with the crowd.
  2. Choose the host speaker – The host speaker doesn’t always have to be the bride’s father. It can be the bride’s mother, the groom’s father or anyone the bride considers an important part of her family. The host speaker can thank the guests, the families of the bride and groom, the bridesmaids and groomsmen, and share some interesting stories about the couple.
  3. The bride and groom – At this point, both the bride and the groom can speak about each other, about their relationship, their families and their friends. They can toast to each other and show appreciation for each other through their speech. They can also toast their parents and those who supported them throughout their relationship.
  4. Response – The people who were thanked during the speech can respond after the bride and groom have finished speaking. This can also be the closing speech where the MC thanks everyone for coming to the wedding and supporting the couple.

Contact local wedding planners

Things to keep in mind

There are a number of things you should keep in mind before you plan the speaking order and make the needed arrangements.

  1. Verify that people actually want to speak – Some people are uncomfortable speaking to large crowds and will only speak at your wedding if they’re forced to. Try to avoid this by asking people if they’re willing to speak at your wedding before you make your plans.
  2. Hire a professional MC – We mentioned before that you don’t need to hire a professional MC to conduct the event but there are some distinct advantages to taking that step. A professional MC understands how to keep audiences engaged with humour and wit. They’ll also help you arrange the order and prepare the speeches if needed.
  3. Keep room for some flexibility – These speeches can sometimes become spontaneous conversations, so it’s a good idea to ensure the order is flexible and allows people to interact. This is especially true for casual weddings where everyone knows one another.
  4. Set a time – Allot some time for every speech and let the speakers know. This will help them prepare the speech and ensure it doesn’t exceed the time limit.

Consider your entire wedding format carefully and determine where you want to fit the toasts and wedding speeches in. You can also ask a professional wedding planner or people with experience with weddings to help you plan the format.

Categories
Finance

How to do a Tax Return in Australia

We’ve reached that time of the year when the ATO (Australian Taxation Office) and accountants begin getting ready for the slew of calculations they will be handling as people across the country lodge their tax returns. The cost of having a registered Tax Accountant lodge your tax return on your behalf can vary. If you prefer to prepare your own tax return there are quite a few things you will have to remember.

Before we take a detailed look at how to complete your tax return, here is some basic information you should be aware of:

  1. Your tax return for any particular year (eg: 2020) is for all income earned from 1 July 2019 to 30 June 2020.
  2. The tax return for 2020 will be available in June 2020, with lodgement available from 1 July 2020.
  3. If you’ve missed any tax returns for previous years, you must complete them as soon as possible to avoid any fines from the ATO.
  4. Since most of us are now working from home due to COVID-19, the ATO has introduced a new method to calculate your expenses working from home called the Shortcut Method. Find out more about the Shortcut Method in our guide explaining How to Lodge a Tax Return if You’re Working from Home.

How to do your tax return online

As an individual doing their own taxes, you may have several questions. Here are some useful tips on how to do your taxes online:

Gather your paperwork

Before you lodge your tax return you need to gather all relevant information and paperwork to ensure it will be accurate. You will notice that the ATO pre-fills certain information from superannuation funds, Centrelink and banks in your online form. However, it is recommended that you check the accuracy of this pre-filled information. Some of the documents you require for your 2017 tax return include:

Your income

  1. Payment summaries – These record the income you’ve received from superannuation funds, an employer, or any government agencies such as the Department of Veteran’s Affairs or Centrelink.
  2. Bank statements – These will detail the interest you may have earned over the past financial year.
  3. Shares, managed funds or unit trusts statements – These will be required to calculate any dividends or distributions made to you.
  4. Statements of buy and sell investments – You can acquire these from your stockbroker or investment advisor if you purchased or sold any shares.
  5. Records from rental properties– This has information relating to either a capital gain or capital loss from the sale of any property.
  6. Foreign income details – All details of foreign pensions or any other form of foreign income will be required.

Your expenses

  1. Statement of your private health insurance policy – This will be required to complete the tax return section that requires information about your private health insurance. See more information below.
  2. Donation receipts – These are needed from all the approved charities you make contributions to.
  3. Educational receipts and records – Not every expense is claimable, refer to the self-education expenses page on the ATO site for additional information.
  4. Investment property receipts – These will be required to claim the maintenance and repairs costs on any investment property you own.
  5. Your spouse’s income and expenses – If you have a spouse, you will require details of their income as well as their expenses to ensure your entitlements are correctly calculated.
  6. Union membership – The cost of your union membership can be deducted from your taxable income amount.
  7. Work-related expenses – You might be eligible to claim certain work-related expenses.

Medicare levy and private health insurance rebate

From 1 July 2015, income thresholds used while calculating the Medicare levy surcharge and the private health insurance rebate have been frozen for three years at 2014-15 levels. If there is an increase in your income, you may move into the next threshold for the private health insurance rebate. This may mean a few things:

  1. If you have private health insurance, there may be a decrease in your rebate entitlement.
  2. If you don’t have the required level of private health insurance, you may have to pay the Medicare levy.
  3. If you paid the Medicare levy surcharge payment last year, there could be an increase in the levy you pay in 2017.
  4. If you’ve received an increase in pay, contact your health insurance provider to make sure the appropriate rebate is applied. You will be able to find more detailed information about income thresholds for private health insurance on the ATO’s website.

Claim your deductions

You may be eligible to claim income tax deductions for certain job-related costs; the expenses must meet these criteria:

  1. Relevant – The expenses must be job-related.
  2. Real – The money spent must have been your own and has not been reimbursed.
  3. Recorded – You must have records such as receipts as evidence of the job-related cost.

You will find more details on the ATO website about how you can claim work-related expenses.

MyDeductions

Tax Return Australia - MyDeductions
Source: Australian Taxation Office

The myDeductions tool on the ATO app can be used to help you keep track of all your deductions. Using this tool, you can:

  • Record all work-related expenses
  • Store photos of receipts
  • Record gifts and donations
  • Track car trips

NB: myDeductions isn’t for small business owners. It’s only for those claiming various work-related expenses as employees. With effect from 1 July 2016, these deductions can be pre-filled on your online tax return via the app. Alternatively, you can share this information with your tax agent.

How to track my tax return

To lodge your tax return online, you need to ensure you have a MyGov account (this can be easily created if you do not yet have one). This account will have to be linked to the ATO. Once you have completed the process and lodged your tax return, you should check your MyGov inbox for the tax receipt and your notice of assessment.

If you are planning to use a professional to handle your tax returns, make sure the tax agent is registered. You can check the agent’s registration status via the online tax and BAS (Business Activity Statements) agent register.

Categories
Kitchen

Make the most of your kitchen storage

Every home has a designated kitchen space to prepare, store and consume food but as we replenish the fridge and restock the pantry, our kitchen space can quickly get cluttered, bursting at the seams with stored ingredients, condiments and utensils. Rediscover the luxury of extra space and declutter your pantry and cabinets with our simple kitchen storage solutions that will refresh your existing space without a costly reno. To give you the best head start on organising your kitchen, we share our top kitchen storage solutions.

Make your kitchen drawers more functional 

Most people attempt to organise their kitchen drawers so that everything has a place to go and is easy to find, but usually, there isn’t enough room and everything ends up piled in the drawer haphazardly. Try these kitchen drawer storage tips to de-clutter your drawers:

More space for silverware

Install two shallow drawers in place of one. Place plastic cutlery inserts in both drawers and now you have twice the storage space for silverware as you did before.

Organise your junk drawer

Throwing all your odds and ends in one drawer really isn’t functional. Digging through a drawer desperately trying to find something is the exact opposite of organised. Solve this problem by placing dividers in your drawers to separate off sections. This way, you can categorise your items in the junk drawer and make them easier to find.

Using drawers for pots, pans and dishes

If you have plenty of drawers, why not use some of them to store your pots, pans and dishes? It’s much easier to separate and access these items when they are in drawers instead of cabinets.

Make your kitchen shelves more functional 

Kitchen cabinets have the same problem that kitchen drawers have. If they aren’t organised, it’s hard to find anything in them. Make the most of your kitchen cabinet space by following these tips.

Increase storage by installing shelves over island benches / Source: In Design International

Slide-out shelves

Hire a contractor to install slide-out shelves in your kitchen cabinets. Slide-out shelves significantly increase the usable space in your kitchen cabinets and allow you to organise better.

Wire racks

Place wire racks in your cabinets to increase your storage space. Wire racks work nearly as well as slide-out shelves and are a whole lot cheaper.

Hooks

Screw hooks into the inside of your cabinet drawers to hang commonly used small items, such as bottle openers and can openers.

Drawers for corner cabinets

It takes a lot of effort to reach all areas of a cabinet. This is okay for most people, perhaps; but those with limited mobility will have a hard time reaching out for several items. However, you can easily overcome this drawback by installing corner drawers. The sizes or depths of the drawers can be customised depending on the sizes of stuff you’re going to store in them. You can store small appliances and utensils, or bigger stuff such as pans and pots. Additionally, corner drawers should be designed to have inwardly folding fronts for ergonomic reasons.

Install additional cabinets

One way to take advantage of overhead cupboard height in your kitchen is to place additional shelving or cabinets that extend all the way up to the ceiling. This provides extra storage for items used less frequently or bulky, like large serving platters or seasonal items like holiday decor.

Lazy Susan

It can be really tiring to keep reaching and fumbling blindly for the thing you need. Not to mention, it can be a total waste of time as well. To avoid this from happening again, you can ask for a rotating, circular tray most popularly known as the Lazy Susan to be installed. They are mostly seen on round tables but can also be installed in cabinets for easy accessibility. All you need to do is to put your kitchen necessities on the tray and by the next time you need them, all you do is to turn the Lazy Susan until the item you need is within your reach. How easy is that?

Contact local kitchen experts

Pull-out storage space

Pull-out storage allows you to use existing space, no matter how small or confined it might be. You can install pull-out storage features in corners, cabinets, under the sink and in other places where you can access them quickly and easily without having to bend or reach.

Pull-out storage generally consists of drawers, trays or shelves that can be deep enough to hold large pots and pans or shallow enough to hold cutlery and linens. Pull-out shelves are especially helpful if its hard for you to reach all the way to the back of your cabinets.

Pull-out storage doesn’t have to be constructed into your kitchen walls, shelves and cabinets. It can also be added on by using pre-built, inexpensive units. For example, you can easily install pull-out crockery racks or spice racks in your pantry. Likewise, pull-out wire baskets are an excellent choice for storing fruits and vegetables or for storing cleaning supplies in your pantry or underneath your sink.

Swing-out bins

If you are still looking for a few options for space under the sink, consider using a swing-out bin. When you open the door to the cabinet, the swing-out bin comes out with it, making it very convenient for you to access. It also allows you to hide your bin from view in the kitchen. You may want to find a way to store all of your plastic grocery bags. An option for this is to install a holder on the door that is designed specifically for these bags. This is a great way to keep them within reach without actually having to have a mess on your hands.

Adding a pantry

Having a functional and versatile pantry storage system is a great way to de-clutter a kitchen for a more organised feel. If you have always wanted a pantry of your dreams, here are some of the options you should consider for your kitchen.

Placing appliances in the pantry frees up bench space in the kitchen / Source: Kitchen Perfection

Drawers and baskets

An easy way to add quick and attractive storage to small spaces in both apartments and homes is by installing drawers and baskets. Similar items can be grouped together for a streamlined system, and they are also easier to locate. Flours, spices and pasta are suddenly within reach and in the same spot for an added convenience. Plus, baskets and drawers are temporary options. They’re easy to install and remove, so even renters can use them. They’re also versatile, so no matter the size or shape of the pantry, there are baskets and drawers that will suit it. One thing to remember with drawers is that you need to account for the full opening range and weight of the objects within to maintain complete functionality and to keep the area safe.

Two kinds of pantry shelves

Sometimes, tight spaces or limited mobility make it hard to reach the back of the shelves. In these cases, it’s best to install either pull out or swing out pantry shelves. 

Swing-out shelves swing out to the left and right like a door. This opens up the entire pantry for the clearest view of all your goods, but it does use a greater amount of space in your kitchen.

All the accessories

If organisation is your ultimate goal, there are dozens of helpful pantry accessories that can make your life simpler. Modular storage is a great example and makes short work of neat stacking and frees up the greatest possible space in packed pantries.

Categories
Bathroom & laundry

Storage ideas for your bathroom

In your bathroom, the amount of storage space you need is surprising. When renovating a bathroom or building a new one, be sure to address the storage space to ensure that you have enough in the future. This will make the bathroom much easier to navigate as well as more fun. The following are solutions for getting the most out of your bathroom storage.

Plan

Prior to the renovation, utilise the planning stage to design your storage. Consider the items you wish to keep in the bathroom. Although keeping towels and electrical items handy is convenient, make sure the correct ventilation exists so that moisture does not have detrimental effects. It is unsafe to allow electrical components to corrode and towels to form mildew.

Take measurements

Before purchasing bathroom storage, measure your bathroom adequately. Make a small blueprint of your bathroom taking the consideration where your tub sink and toilet is placed. Also, take into consideration how tall your walls are. Storage units don’t have to be floor units, they can be attached to the wall as well. Once you have done this, decide whether you want freestanding or portable storage. Portable storage can be moved around the bathroom when you find it it’s no longer useful in one area. However, built-in storage cannot be moved it becomes a permanent part of the bathroom structure.

Recessed nooks above baths and in showers are ideal for products / Source: Modern Living Constructions

Innovate

Be creative when placing your storage units. Do not only use vanities and medicine cabinets. Instead, utilise the space in your walls and recessed cabinets which will provide additional room without decreasing the floor space of your bathroom. Additionally, placing recessed nooks around the shower will really open up your bathroom.

Use fixtures

Use vanities with many drawers and shelving units with specialised trays that can be opened for quick access. These fixtures are perfect for applying cleansers at night and cosmetics in the morning. There are even modular units that can be customised to your exact requirements, so you remain organised.

Keep an open mindset

If you are lucky enough to have a large bathroom, utilise different forms of storage for visual interest and to create depth. For instance, combining a vanity, recessed cabinets, wall shelving and baskets will open up your bathroom.

Utilise temporary storage

For those who cannot renovate the bathroom, there are additional temporary storage options that can be implemented. Corner shelving units, regular shelving and hanging shelves are excellent temporary storage choices. Additionally, baskets, boxes and a variety of other containers provide exceptional storage options that can be used anywhere and are available in a variety of colours and styles.

Using storage to match your accessories

If you have a lot of plain accessories you might want to try decorative hooks. These can be installed directly into the wall or hung over the bathroom door on the bar.

Contact local bathroom experts

Corner shelves

Corner shelves come with and without doors and may be used to store things such as personal items and linen.

Linen cupboards

If you have enough room in your bathroom to add a 5-foot linen cupboard this might be ideal. Not only can you store most of the things your bathroom in a living covered, but it also makes the bathroom look more attractive.

Floating shelves

Floating shelves are not enclosed, therefore making the perfect opportunity to add character and style to your bathroom. These are the perfect vessel for towels or everyday washing products and can add a unique charm to the room.

Maximise cabinet, shelf and drawers space / Source: KTR Creations

Pull-out storage 

Pull-out storage has been long-used in kitchens – it also works really well in bathrooms. This type of storage is considered hidden and it definitely saves space – it can be built into almost any narrow space. Since most bathroom products are quite small, it provides a perfect and cosy spot for your essentials such as; bottles of nail polish, moisturiser and makeup.
Adequate storage is crucial to the success of any room. Whether you would prefer to have your items and belongings hidden away, or you want to make a statement, these bathroom storage ideas have something for everyone. Feeling inspired to make some storage adjustments? Oneflare can connect you to a professional bathroom renovator in your area to bring your vision to life. Receiving up to three quotes on your job request will also mean you’re able to keep within your budget or get a better idea on what the project may realistically cost.

Categories
Gardening & landscaping

Sod vs artificial grass: Which is better?

When you are deciding to build a house or any other structure; the most important question that comes to the mind is, what type of grass should I install? There are many kinds of grass that you can use, like sod grass or artificial turf.

To decide which is the best option for you, you should consider whether to go for sod or artificial turf. The qualities of the two must be known and especially the characteristic that makes them different from each other.

Qualities of artificial turf

The artificial turf is not synthetic grass that has a texture that is identical to the natural grass. It is made of man-made or synthetic fibres which are most famously used in sports arenas. It was first seen in a stadium in Huston, Texas.

When installing a lawn you have a choice between artificial or natural turf / Source: Protek Design

1. The height is always the same

As this grass is synthetically made; the height always remains the same. The length of it depends on the demand of the customer. It is the same from the time of making, throughout the installation process and even afterwards. It never changes in height.

2. The grass can be moved easily

Unlike other grass types which can’t be moved from one place to the other;  artificial turf can be lifted or removed easily. The easy removal makes artificial turn ideal for maintenance of either the turf or the ground on which the turf is laid. Then it can be put back on without any hindrances.

3. Colour is consistent

As the artificial grass is not disturbed by natural elements in nature like air, water and sunlight; the polyethylene grass never changes in colour. It remains the same throughout the lifetime. You have the choice of selecting any tints and shades of green, and the manufacturer can make it for you

4. Low maintenance

Artificial turf requires little maintenance and isn’t reliant on water, air or sunlight to grow.  All you need to maintain synthetic grass is sweeping away the debris on it with the help of different kinds of rakes.

Attributes of sod grass

The first choice and most popular real grass option is the sod grass. It is actually a grass but manufactured and then installed on the ground. Sod grass has amazing abilities to grow because it has all the attributes of the typical grass but is enhanced.

1. Appearance is Identical

All of the sod grass that is manufactured is of the same appearance. If you grow the grass by seed, the grass may grow unevenly or not at all through seeds. An advantage of all varieties of sod grass is that they are identical.

2. The texture is the same

The different types of sod that you can purchase have a wide range of textures and colours. They range from full dark green to lighter shades. But the type that you will order will have the same texture and colour of all the bulk order. The density of the grass can be thick to less dense.

3. Appropriate quantity of fertilizers

All types of sod grass need a specific amount of fertilizer. The application of fertilizer is necessary when the soil is to be prepared for the installation. Immediately after the establishment, the sod needs it also. But quarterly or yearly fertilizer is needed for the rest of the sod’s lifetime.

4. Equal Growth Rate

When the sod is mowed; it re-grows at the same rate. It is essential to mow it properly with sharp blades and cutting at the appropriate height. The only reason for the disruption in the height is if the grass has a disease. If you’re not a green thumb, consider hiring a lawn mowing service to get your grass looking cut and clean.

Source: Old School Landscaping

Choosing Between Sod & Artificial Grass

There are other factors that you have to consider when selecting between the artificial turf and sod grass. Both the grasses indeed have some qualities that make you confused. Ultimately, the decision is yours! You should consider basing it on your ability to maintain the grass and your vision for your lawn.

1. Sturdiness over time

The sod grass is sturdier than artificial grass. If one blade of artificial grass is broken or pulls out of the base, it can’t be repaired, and the whole turf has to be replaced. Replacing and repairing sod grass is easier, but the rates can vary.

2. Impact on the environment

A small area of sod grass has the ability to generate a high amount of oxygen. It can also keep the environment cooler as compared to areas where other kinds of grass are seeded. The artificial turf is produced by using human-made materials which need more energy and resources.

How much will you need to budget?

You must think that sod grass needs more money than artificial grass. But that’s not the case; sod grass needs ordinary soil to be installed. The ground for artificial turf has to be made accordingly, which can cost you more than the other.

Contact local gardeners

Which will last longer?

Although both sod and artificial turf will last long is depends on how well you maintain your grass. Without it, neither if the two can survive. Sod grass has the capability to repair itself; therefore, it can last longer than the artificial turf.

Wrap up

Turf and sod both have their pros and cons. Choice of one over the other mostly depends on the purpose of use. The location, along with personal preference, also influences the decision. At specific areas or climates, turf would be better suited than sod and vice versa. Deliberation on the features of both would help make a better and more suitable choice.

Categories
Doors & windows

The benefits of double glazed windows

Windows are definitely an item to take care of on your home construction or renovation list, and sooner or later, you will need to choose between single and double glazed windows. It is common knowledge that the latter insulates the home better, although it comes at a higher price. If you are wondering whether it is really worth investing in double glazed windows, the points listed below will help you make the right choice.

How do they work?

The reason that double glazed windows provide good insulation is the trapped air in the space maintained between the two glass panes. This air works in three ways, with the first being to reduce the transfer of hot or cold air between the outdoors and indoors of the home. It also prevents condensation within the home when the outdoor temperature is much colder than that inside. Further, double glazed windows keep all external noise out, thereby making your home more peaceful to live in.

It’s important to note that double glazed windows only provide insulation from hot air temperatures and not from radiant heat. This means that they are not capable of preventing the heat of the sun’s rays from entering your home. If you want to achieve this, you need to get your single or double glazed windows tinted with special UV light-blocking film.

Double glazed windows provide great insulation for bedrooms / Source: MacKenzie Lane Real Estate

The benefits of using double glazed windows

Some main benefits of double glazed windows are:

  • Energy efficiency: Double glazing adds to your home’s insulation, which in turn reduces your electricity accounts.
  • They reduce noise: This is done by reducing sound transmission via your windows by up to 70 per cent.
  • Ability to use a wider variety of window coverings: Glazed windows make it possible for you to use any type of window covering, as there is no need to prevent heat and cold from entering the home. You can opt for any covering, ranging from blinds and lightweight curtains to no blinds at all for those who want to keep their views unblocked.
  • Condensation reduction: double glazing lowers the condensation that usually forms on the interior of your window.
  • Improved security: Security is enhanced as denser glass is used with the conversion to double glazing. There is also an additional pane, which in turn, boosts safety. You can opt to improve security even further with a special glass that has been laminated.

Style and colour choices

Another great benefit is the fact that with these windows you have a variety of options that you can choose from. They are available in many styles including awning, casement, tilt and slide, and fixed.

Double glazed options for your doors

Double glazing is also a great option for glass doors. Double glazed front doors come with a range of options. From single doors and double doors to French doors, there are a variety of stylized doors for you to choose from. Another benefit of opting for a double glazed door is that they are available in traditional as well as modern styles enabling you to select a front door that fits in with the general theme of the rest of your home. 

Contact local window experts

Protective-coated windows

An alternative to double glazed windows is having protective-coated windows. Additionally, you can have a protective coating applied to you double glazed windows for extra insulation. This special coating blocks UV rays and heat to help keep your home cool in the summer, without having to kick on the air conditioner. The protective coating also keeps the heat from escaping your home during the winter so that you can keep your home warm without having to blast the heater 24/7.

There are two main types of special coatings that are applied to protective-coated windows, which are liquid coatings and e-glass coatings. Liquid coatings utilise nano-technology to make a virtually invisible but extremely durable coating that can be applied to any window.

The big advantage of protective coatings is that they can be applied to your existing windows, so you won’t have to spend money buying new glass.

E-glass protective coatings are special coatings that reflect UV rays and heat. Soft coat and hard coat e-glass protective coatings are available. Soft coats can only be used on double-glazed windows. Hard coats can be used on single or double-glazed windows.

The disadvantage to e-glass protective coated windows is that the coating has to be applied at the factory, so you will either have to purchase new window glass or remove your existing windows and send them to the factory to be coated.

Double glazing is a great option for glass doors / Source: S.F.D Caringbah

The price of double glazed windows 

With these benefits, though, comes the cost. Most people compare the price of double glazed windows to regular windows and think that the overall cost is too high. Although the initial installation is pricey, double glazed windows save you money over time because of their energy efficiency. The insulation keeps the warm/cool air inside during the colder/warmer months, which in turn allows you to use your heater and air conditioner less. With electricity bills only growing larger and larger, anything that you can do to stem the tide is worth it in the grand scheme of things. It’s much better to pay a little more now for double glazed windows than pay for your choice in the years to come if you decide not to install them.

Believe it or not, double glazed windows actually cover their own cost pretty quickly and not just where your energy bill is concerned. With double glazed windows, you won’t need heavy curtains (which are definitely expensive). You can opt for a lighter window treatment instead. Whatever your window needs are, double glazed windows are a sensible option for the overall cost and energy efficiency of your home.