If you’re looking for ways to reduce your water bill, low taps are are in ideal solution.
What are low flow taps?
Low flow taps are deceiving by name. You may think that because they’re called low flow taps, you won’t have high-pressure water coming out, but this is the contrary. Regular taps use more water and therefore produce more water pressure which results in increased water flow. However, low flow taps also produce a high power water flow, but it does this by mixing air into the water, which gives the appearance of a higher flow; although the pressure feels just about the same.
A normal tap lets out up to 18 L of water per minute whereas the low flow taps only use about 2 L of water per minute, which really saves you a tremendous amount on your water bill. When looking for low flow tap, you may run into the Acronym WELS. WELS is a water efficiency labeling scheme. WELS rates items according to efficiency and it allows you to see how much you’re saving and how efficient the product is before purchasing it. WELS has a six star rating system with the higher stars being more efficient and the lower stars being less efficient. Any water producing item that you purchase is rated by WELS.
Advantages of using low flow taps
Low flow taps help to stop water wastage and also provides you with a better source of water. In addition, they decrease your water cost and are more energy-efficient. This might be an ideal solution in a household that has high water usage or higher water bills. Besides simply saving you money on your water, there are two other benefits to using low flow taps. These benefits include saving money on electricity and reducing water wastage.
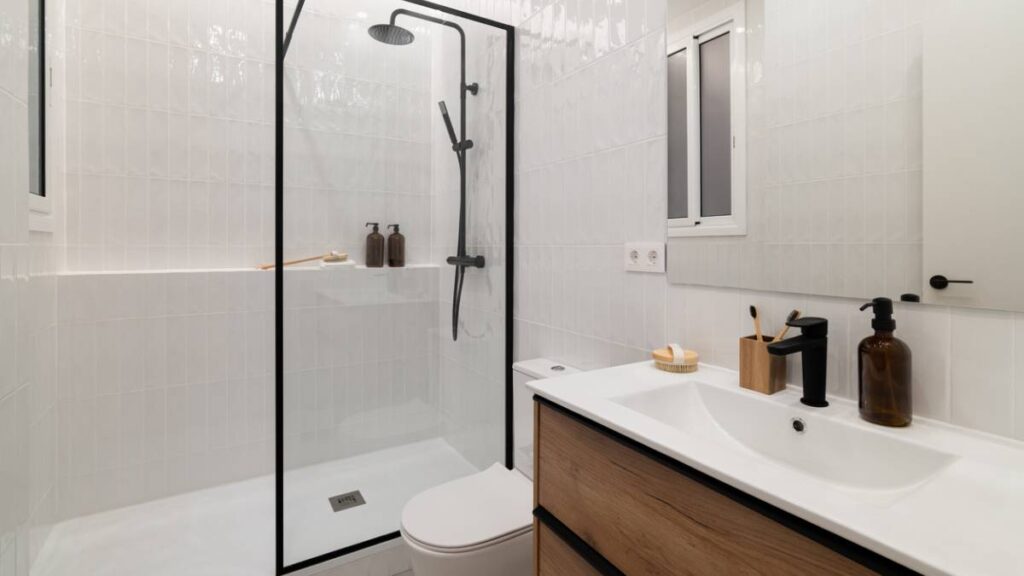
Low flow toilets
As one of the most essential fixtures in your home, the toilet is also the most consuming of water. By installing low flow toilets, you will lose significantly less water (and see a lower water bill), without noticing a change in the toilet’s effectiveness. In addition to improving water efficiency, low flow toilets will ensure your home is up to code.
What are low flow toilets?
Other than outdoor irrigation, the standard toilet is the largest water consumer in your home. By installing a low flow toilet, you can reduce water usage while still performing the same function of removing bodily waste. To effectively remove waste, gravity assists during the flushing process allowing low flow toilets to only use six litres of water per flush. These toilets are available in the most basic models and also top-of-the-line units.
The most common type of low-flow toilet on the market is the dual flush model which has two buttons. The first button, known as the half flush, uses only three litres of water to eliminate liquid waste. The second button, referred to as the full flush, uses up to six litres of water to dispose of solid waste. Therefore, you are only using as much water as necessary for each visit.
Buying a low flow toilet
If you are in the market for a low flow toilet, there are a few considerations. First, ensure the toilet has been certified as water efficient. The amount of water used in the half and full flushes should be readily available. Second, ensure there is enough space in your bathroom to fit the new toilet. Third, there is a wide variety of designs including:
Colour
Height
Modifications (heated seats, bidet, etc.)
Shape (round or elongated)
Noisiness
Water saving tips
In addition to installing low flow taps, there are many other ways that you can reduce your energy costs and save wastage. Some of these tips include:
Installing low flow tabs on all sinks, tubs and basins in your home
Minimizing the temperature on your heater
Closing taps when you’re not using them and frequently checking any pipes for leakages
Remember a small leak can add up, so it’s best to have that leak under control before it causes more problems. Low flow taps can be a tremendous help, but if they aren’t maintained or used properly they can contribute to water wastage.
A beautiful bathroom is your private sanctuary, a place for long, relaxing baths and pampering. It may be one of the smallest rooms in the house but it’s one with a lot of components and should be one of the most considered spaces when renovating. If you’ve decided to update your bathroom, some careful planning can go a long way to ensuring your end result is what you’ve been dreaming of.
Here are some things to consider when planning your bathroom renovation.
What do you want to achieve?
Are you looking to create a luxurious space that feels like an exclusive spa, or do you need a practical bathroom that will meet the needs of a family of 5? It’s important to start your planning process with your goals in mind to ensure you and your family’s wants and needs are met. Who will be using this bathroom and will their needs be met? Think about what are absolute must haves and what you’re prepared to compromise on. Write a list of what you don’t like about your current bathroom so that you can rectify these problems in the next.
Start your bathroom renovation planning with the end goal clearly in mind / Source: Ryan Linnegar Photography
Budget
Knowing how much you have to spend is critical when planning a renovation. Can you afford a total remodel or do you just want to change the vanity and fixtures? Having a budget will make it much easier to determine your parameters and will ensure you get maximum bang for your buck. The size of the space, the materials you choose and whether you’re going to be doing any of the work yourself will affect the cost of a renovation.
Get inspired
Look for design inspiration in magazines, online or in showrooms. Keep your goals in mind, along with the rest of your home – the bathroom should ideally continue the flow of the décor. You don’t want your bathroom to quickly date so be wary of trends. Do your homework and find classic, timeless designs you’ll love for a long time to come. Collate a collection of inspiring images, get samples and actually see the products where possible instead of just looking online. Utilise visual rendering technology where possible to give you a better idea of what your finished bathroom will look like.
Design & layout
In a space as small as a bathroom, design and layout is critical to ensure functionality and usability. You don’t want to end up with your knees hitting the edge of the bath every time you use the toilet or a tiny shower that you’re disappointed with. Get familiar with the space you have to work with and once you have a preliminary design, ensure it’s to scale.
There are lots of space saving ideas for a bathroom. Things like corner vanity units can really open up your space or having a sliding door instead of a traditional hinged door can work wonders.
Determine the focal point of the bathroom when you enter the room and be sure to plan for quality materials and fixtures in this area. The primary fixtures are the toilet, sink, bathtub and/or shower stall. Think about clearances, such as the shower door hitting the main door. If you are laying in the tub, do you want to be staring at the toilet? Also, where are the utilities such as water, sewer and electricity located? The less you have to move existing utilities or run new ones, the more economical the bathroom will be.
Some things other questions to consider:
Is there adequate ventilation?
Do I want a wet room or a shower screen?
Is the shower large enough?
Are there enough windows and do they need to be moved?
Is there enough storage space?
Is the bath large enough?
Is there enough natural light?
Are there enough power outlets?
Is there enough benchtop space?
What will the height of the sink be if it’s a bowl sink?
Lighting choice is critical in a bathroom. You need to have different lighting for different functions – a bright light for applying make-up and soft, muted lighting for a luxuriously long soak in the bath. Be sure to include layers of decorative, task, accent and ambient lighting to achieve a beautiful yet practical design that will meet all of your needs.
Timing
If you are project managing, plan your trades and services in the correct order to avoid costly mistakes. If you’re doing a lot of the work yourself, make sure you’ve done your research. The more mistakes, the longer it takes, and the longer you’ll be without a bathroom and using the gym showers.
Have everything you need
Before you take to your old bathroom with a sledgehammer, make sure you have everything you need on hand. It can be a long wait for those porcelain tiles from Morocco to arrive when you don’t have a usable bathroom. Check that all of your materials have arrived undamaged so you don’t hold up progress having to get replacement materials at the last minute.
Spend money wisely
Assess what can be saved from your existing bathroom. If you can work with some of the things you’ve already got you’re going to save a considerable amount of money. Tiles can be re-grouted, baths can be resurfaced and walls can be painted, there are lots of things you can do to refresh your space without doing a total demolition job. Just changing the vanity unit or the fixtures and fittings can really transform a bathroom.
Don’t be tempted to buy the cheapest options available for everything. Buy quality where you can and splurge on a few key pieces that will really set the tone of the space and add to its luxury.
Think about whether you absolutely need to move the location of the shower, toilet, bath and vanity units – doing so may mean you need to need to move the plumbing which can be costly. Sometimes it’s absolutely worth doing but you need to weigh up. Perhaps you could upgrade the toilet instead of moving it, or change the old shower screen to a sliding screen. There are plenty of ways to improve your space without spending a fortune. Be smart with your budget and it will stretch a whole lot further.
Contact local bathroom renovators
Storage
Clutter isn’t appealing in a bathroom and can quickly ruin your carefully planned aesthetic. Those tacky plastic hangers for shampoo and conditioner can be avoided if you plan to have a recessed area built in to your shower. Choose your vanity unit wisely and in accordance with your storage needs. Whilst pedestal basins may look fantastic, they aren’t exactly practical if you’re short on storage space.
Think about what you keep in your bathroom now and plan for plenty of space, especially if the bathroom is being used by multiple people. Consider options such as recessed cabinetry, vanities, medicine cabinets, over the toilet storage, and eye level shelving to keep your bathroom looking organised and provide a place for everything.
Do you need to have plans drawn up or council approval?
Depending on the extent of your renovation, you may need to have plans drawn up or gain local council approval. Most councils allow for minor changes that don’t alter the structure or services such as plumbing, drainage and electrical, however it is always best to check what your local government’s policies are.
A toilet cistern, also known as the tank, is one of the most essential components of toilets and is where water is stored before it’s used to flush the toilet. It’s located above the toilet bowl and may also be higher above the toilet, connected by a single pipe. The cistern has a flushing mechanism in proximity to it to control the water.
Types of toilet cisterns in Australia
1. Concealed Cisterns: These cisterns are installed within the wall cavity, making them completely hidden from view. They are commonly used in modern bathrooms to create a sleek and minimalist look.
2. Close Coupled Cisterns: This is the most common type of cistern used in Australia. The cistern is mounted directly on top of the toilet bowl and connected with a flush pipe.
3. High-Level Cisterns: These cisterns are mounted high on the wall above the toilet bowl and connected with a flush pipe. They are a classic and elegant option often used in heritage homes or to create a vintage look.
4. Low-Level Cisterns: Similar to high-level cisterns, low-level cisterns are mounted on the wall, but much closer to the toilet bowl. They are a good option for those who want a traditional look without the height of a high-level cistern.
5. In-Wall Cisterns: These cisterns are installed within the wall cavity but have an access panel for maintenance. They are similar to concealed cisterns but are easier to access if repairs or maintenance are needed.
6. Dual Flush Cisterns: These cisterns have two buttons or levers that allow you to choose between a full flush or a half flush, depending on the amount of water needed to clear the bowl. They are a popular option for those looking to reduce their water usage.
7. Caroma Uniset Cisterns: This cistern is a specific type of close-coupled cistern that features a unique design and built-in inlet and outlet valves. It is a popular choice in Australia due to its ease of installation and water efficiency.
8. Fowler Ware Toilet Cisterns. These cisterns are known for their durability and reliability. They typically have a traditional design and are made of ceramic. These cisterns operate using a flushing mechanism that releases water from the cistern into the toilet bowl to remove waste.
What does a cistern do?
A cistern operates using a valve that controls the water flow with the help of a plastic float. The float is responsible for regulating the water level inside the tank by opening or closing the valve depending on how much water is present. The valve fully opens each time the toilet is flushed to allow more water to enter the cistern and refill it to the required level.
How to replace a toilet cistern?
Suppose the toilet cistern becomes damaged or develops flush tank water leakage. In that case, you’ll need to replace it by completing a few steps. You can complete the project yourself because it’s a simple and common plumbing repair. Start by turning off the shutoff valve clockwise and completely drain out all of the water from the tank. You can use a sponge to absorb any remaining moisture.
Use an adjustable wrench to hold the nut under the tank bolt and unscrew the bolts with a screwdriver. After completely removing the tank, lay it down. In some cases, the washer may not move and come loose. Try using an adjustable wrench to turn it. You can now insert the new spud washer before removing the bolts and gaskets.
You’ll then need to clean around the holes of the tank with a sturdy wire brush to remove any of the old bold gasket, which may still be present on the inside and outside of the tank. The new gasket will only seal properly if the surface is clean. The new gaskets will need to be firmly seated onto the bolts. Reinstall each nut on the bottom of the cistern and tighten them by hand until they feel secure.
The last step of the DIY leaking toilet repair process is tightening the nuts and bolts and alternating to each side until it looks like the gaskets are seated. It’s also important to avoid tightening the bolts too much, which can cause minor cracks to form on the toilet cistern.
How to repair a toilet cistern?
There are a few common ways to fix a leaking toilet cistern to restore its operation and prevent the problem from escalating.
1. Repairing the flush valve – Located in the middle of tanks, the flush valve is one of the main components of the leaking toilet cistern and operates with a float ball. Bend the float arm down to shut off the water. Adjust the water level and also consider replacing the ballcock valve with an updated float-cup style fill valve to avoid potential problems in the future.
2. Fixing a loose flush handle – The lift chain should be reconnected to the lift arm from the flapper. You can also adjust the handle mounting nut located inside of the cistern by rotating it counterclockwise.
Don’t let a leaking toilet cistern ruin your bathroom / Source: Euroluce Pty Ltd
Toilet cistern washer replacements
Cistern washer – Inlet
You can replace a leaking toilet cistern inlet valve by turning off the water supply to the toilet and flushing the toilet. Remove the blue top and remove the arm from the float cup adjusting rod. Remove the cap by turning the arm counterclockwise before removing the inlet valve head seal.
Cistern washer – Outlet
When you need to perform a toilet cistern washer replacement for the outlet, start by shutting the water off through the mains isolation or the stop tap. Thoroughly drain the tank and remove the old seating washer. The seat should be in good condition before you install the new cistern waster outlet. The seat should be smooth to prevent the new washer from leaking. Install the new piece and verify that the clips are in position.
How to fix leaking cistern valves?
Cistern inlet valve – Remove the lid and flush the system and turn off the water valve before draining all of the water out by flushing the toilet. Remove the broken parts and attach the new pieces onto the cistern inlet valve. As the tank fills with water, check the water level while tightening connections and looking for leaks.
Cistern outlet valve – Turn off the water supply and remove the lid on the toilet cistern. Flush the toilet to remove all of the water and use a sponge to absorb any remaining moisture.
How to fix a cistern flush?
You can fix a cistern flush to avoid wasting any more water when the inlet valve doesn’t shut off once the water reaches the desired level. Start by checking for leaks in the tank with the use of vegetable dye. Lower the float arm to ensure the ball starts to sit lower to ensure the inlet valve shuts off sooner.
Adjust the float levels by adjusting the screw on the float arm and ball to ensure the inlet valve shuts off. Keep a close eye on the water level markings to ensure the water hits the appropriate level. Gently remove the damaged parts and install the new pieces. Check to see everything fits securely. Place the lid back onto the cistern and connect the water valve. Flush the toilet again and check to see if the toilet is still leaking.
When should I call an expert?
It’s important to know when to contact a professional to ensure your toilet continues to operate correctly after you spot toilet leaking. Calling a plumbing expert will allow you to get the toilet back in working order and consult the help of someone with more training and experience.
Contact local plumbing experts
The Problem Persists
You’ll need leaking cistern repair if the problem isn’t resolved with your attempts. You may follow each step and still have questions. You may also have caused more extensive damage during your dripping toilet attempt.
The Parts Aren’t Damaged
After inspecting the parts on your leaking toilet tank, you may not spot any areas where the problem is located. Calling a professional will allow you to hire someone who can diagnose the problem and remedy it if it’s an underlying issue that’s not related to the parts.
You Have Questions
You may have further questions about the mechanisms and operation of your toilet cistern to address, which is when a professional can help. You may want to know how to stop a toilet cistern from overflowing or how to prevent damage or wear to the parts. If the above steps have not fixed your problem or if you lack confidence in your DIY abilities, it may be time to call a licensed plumber.
Highlights: • Focus your budget on professional waterproofing, plumbing, and electrical work. You can save money on DIY tasks like painting, decorative fixtures, and vanity updates. • Strategic wall and floor updates using budget-friendly materials and using LED lighting, water-efficient fixtures, and consistent finishes can dramatically transform the space without major structural changes.
Dreaming of a spa-like bathroom retreat but worried about the cost? You’re not alone. A bathroom renovation consistently ranks as one of the highest return-on-investment home improvements, potentially increasing property value by up to 10%. The challenge lies in achieving that magazine-worthy look without draining your savings account.
The good news is that transforming your bathroom doesn’t require a six-figure budget. With smart planning and strategic choices, you can create a stunning space that feels both luxurious and functional. This guide reveals practical bathroom renovation ideas on a budget that deliver maximum impact for your dollar, helping you prioritise where to save and invest wisely.
What are the benefits of renovating your bathroom?
It’s the small things that can have a big impact on your bathroom renovation / Source: ESTEEM Constructions
When you’re looking for ideas for bathroom renovation on a budget, you want upgrades that extend beyond mere visuals. These improvements can transform your daily routine while boosting your home’s value and appeal:
Increased property value:Bathroom renovations typically recoup 60-80% of their cost when selling, making them one of the smartest home improvement investments.
Enhanced daily comfort: Modern fixtures, better lighting, and improved storage make your morning and evening routines more pleasant and efficient.
Improved functionality: Strategic layout changes and smart storage solutions can maximise space, particularly in smaller bathrooms.
Better energy efficiency: Upgrading to LED lighting, low-flow fixtures, and energy-efficient ventilation reduces utility bills while supporting environmental goals.
Health and safety improvements: New waterproofing, slip-resistant flooring, and proper ventilation create a safer, healthier environment that prevents mould and water damage.
Where to save vs where to spend when doing a budget bathroom renovation
A newly renovated bathroom can add serious value to your home / Source: Origin Bathrooms
Smart budget bathroom renovation ideas focus on understanding which elements deserve investment and which offer opportunities for savings. This strategic approach ensures your renovation delivers lasting value while staying within budget.
Top 3 areas where you can cut costs
Painting and wall treatments
DIY painting can save you plenty compared to professional services. Quality moisture-resistant paint costs around $60 to $100 for an average bathroom, while special tile paint can refresh existing surfaces for under $80.
Decorative fixtures and accessories
For a cost-effective update, consider swapping out accessories like towel rails, toilet roll holders, and shower caddies yourself. Online retailers offer a wide variety of affordable options, with many pieces costing between $20 and $50.
Vanity updates
Refreshing an existing vanity with new paint, handles, and hardware could be as affordable as $150 or up to thousands. This approach can achieve a completely transformed look for a fraction of the cost.
Top 3 areas you shouldn’t skimp on
Waterproofing and structural work
Poor waterproofing could lead to costly damage that can run over $10,000 to repair. Professional waterproofing doesn’t come cheap; some may even cost $500 to $2,000, depending on the extent of the work. However, this investment can be worthwhile in the long run.
Plumbing and electrical
Plumbers and electricians ensure safety and compliance. Cutting corners here risks expensive repairs, safety hazards, and insurance issues.
Quality tiling in wet areas
Proper tile installation in showers and around baths prevents water damage. Professional tiling could range around $50 to $80 per square metre to ensures durability and waterproof integrity.
Renovation ideas for every part of the bathroom you can do on a budget
Fixtures can add real impact to your budget bathroom renovation / Source: ESTEEM Constructions
Transform each area of your bathroom systematically with targeted improvements that maximise visual impact while controlling costs. These small bathroom renovation ideas on a budget work particularly well in compact spaces.
Bathroom walls
Fresh walls instantly modernise any bathroom and provide the foundation for your entire bathroom design scheme.
Replace the wall tiles
Partial bathroom tile replacement focuses the budget where it matters most. Remove and replace tiles around the vanity or in the shower. Consider subway tiles or mosaic feature walls for contemporary appeal, or larger format tiles to reduce grout lines and create a cleaner, more spacious feel. Light-coloured tiles reflect natural light, making small bathrooms appear larger and brighter.
Repaint the walls
Moisture-resistant paint transforms bathroom walls for $60 to $100 in materials. Semi-gloss or satin finishes resist humidity while providing easy cleaning. Light colours like soft whites, pale greys, or warm beiges create an airy atmosphere that makes spaces feel larger.
For accent walls, thinkdeeper colours like navy or forest green behind the vanity to add depth without overwhelming the space.
Install splashback panels or peel-and-stick tiles
Acrylic splashback panels provide waterproof protection with minimal disruption. These panels come in various finishes, including marble-looking, timber-style, or solid colours.
Peel-and-stick tiles offer DIY-friendly installation for $20 to $40 per square metre. While not suitable for shower areas, they work well as backsplashes behind vanities or as accent features.
Bathroom floors
A modern bathroom. / Source: iStock
Budget bathroom renovation ideas for flooring focus on materials that combine affordability with moisture resistance.
Install slip-resistant flooring
Vinyl plank flooring designed for bathrooms costs $25–65 per square metre and easily installs over existing surfaces. Modern luxury vinyl replicates timber or stone appearances while providing superior water resistance and comfort underfoot.
Meanwhile, textured surfaces and bevelled edges add visual interest while improving safety. Choose planks with built-in underlay for added comfort and sound reduction.
Play with tiles
Mix tile sizes and patterns to create visual interest without premium costs. Make things interesting by combining large-format tiles with smaller mosaic borders for custom looks.
Another tip: matching wall and floor tiles creates a seamless flow that makes small bathrooms feel larger. Alternatively, contrast light walls with darker floors to ground the space and hide dirt.
Consider polished concrete or pebble tiles
For a modern, low-maintenance look, a polished concrete finish is a great option. However, costs vary significantly depending on the method. The most budget-friendly option, a ‘grind and seal’ finish, can start at around $50 per square metre. A more robust, mechanically polished concrete finish typically starts at $100 per square metre.
Pebble tiles add natural texture and create a spa-like ambience. Install them in shower floors or as accent strips for tactile interest that enhances the sensory experience.
Contact local bathroom renovation experts
Shower and bath area
The shower and bath area typically receives the most use and attention in bathroom renovations.
Replace the showerheads
High-pressure showerheads cost $100-500 and install easily without plumbing modifications. If you want a transformative daily shower experience, explore rain showerheads, handheld options, or water-saving models.
Want more luxurious showers? Multi-function showerheads combine rainfall and targeted spray patterns for that luxe feel at a moderate cost. Look for models with flow restrictors to reduce water consumption.
Switch glass shower screens with acrylic
Choose shower screens that resist yellowing and scratching while offering easier installation and replacement. Acrylic shower screens cost 40% to60% less than glass while providing similar functionality.
Frameless acrylic screens create open, spacious feelings in small bathrooms. For professional installation guidance, learn about shower screen installation techniques to ensure proper fitting and sealing.
Opt for a walk-in shower and bath area
Remove shower doors entirely for an open, accessible design that costs nothing but creates significant visual impact. This approach works best with proper waterproofing and floor drainage.
Conversely, you can consider installing a floor-to-ceiling tile feature wall or mosaic accent to define the shower area without physical barriers. This creates the illusion of a bigger space while improving accessibility.
Vanities and storage
A bathroom vanity. / Source: iStock
Smart storage solutions and vanity updates provide both functional and aesthetic improvements. Ready-made vanities are cheaper than custom options, while still delivering style and functionality.
Install smart storage
Floating shelves cost between $30 to $80 and provide essential storage without consuming floor space. Install them beside mirrors, above toilets, or in shower niches for toiletries and decorative items. Mirrored medicine cabinets combine storage with essential functionality.
New cabinet handles can instantly modernise any vanity. For a cohesive design, choose consistent finishes throughout the bathroom, such as brushed brass, matte black, or chrome. This is useful if you’re renovating your bathroom piecemeal or designing a modular bathroom.
Also think about replacing your tapware to complement your handle choice. Modern mixer taps with waterfall or swan-neck designs add luxury appeal without premium costs.
Paint the mirror frame
Transform existing mirrors with specialty paint designed for glass and metal surfaces. Metallic spray paints in gold, bronze, or black cost under $20 and create custom designer looks.
Mask the mirror surface carefully and apply multiple thin coats for professional results. This technique works particularly well with ornate or dated frames.
Lighting and finishing touches
Proper lighting and coordinated finishes create cohesion and enhance the functionality of your renovated space without breaking the bank.
Upgrade to LED lighting
LED downlights cost $15 to $40 each and reduce energy consumption by 75% compared to halogen alternatives. For comprehensive illumination, install them over vanities, in showers, and as general ceiling lighting. Backlit mirrors combine task lighting with storage.
Match finishes
Consistent finishes throughout the bathroom create a sophisticated, designer appearance. Choose one primary finish (chrome, brushed brass, or matte black) for all tapware, handles, and accessories.
This coordination principle extends to lighting fixtures, towel rails, and even tile trim. Mixing more than two finishes can create visual chaos in small spaces.
Add/replace towel rails and shower caddies
Heated towel rails add luxury while providing practical towel drying. Choose models that complement your finish scheme and provide adequate hanging space. Keep in mind that for a hardwired, polished look, you will need to budget for professional electrical installation, which can add several hundred dollars to the total cost.
Corner shower caddies maximise storage in compact shower areas. Stainless steel or powder-coated options resist rust and maintain appearance over time.
Place an indoor plant
Low-light plants like snake plants, ZZ plants, or pothos add natural elements that soften hard bathroom surfaces. Synthetic alternatives provide similar visual benefits without maintenance concerns.
Choose decorative pots that complement your colour and finish choices. Position plants away from direct water exposure while ensuring adequate light for living varieties.
Eco-friendly and sustainable budget bathroom renovation tips
A clean bathroom countertop. / Source: iStock
Sustainable choices in bathroom makeover ideas on a budget deliver environmental benefits while reducing long-term operating costs. These improvements often pay for themselves through reduced utility bills.
Low-flow showerheads and dual-flush toilet mechanisms reduce water consumption by a significant amount without sacrificing performance.
LED bulbs last 15–25 times longer than incandescent alternatives while using 75% less energy. The higher initial cost is offset by reduced replacement and electricity costs.
Bamboo vanities, recycled glass tiles, and reclaimed timber accents provide unique character while supporting environmental goals.
Energy-efficient exhaust fans prevent moisture problems while consuming less power. Proper ventilation extends the life of all bathroom materials.
Low-VOC paint products and finishes improve indoor air quality while often costing similar amounts to conventional alternatives. They’re particularly important in small, enclosed bathroom spaces.
Time for a bathroom makeover
Creating your dream bathroom on a budget requires strategic thinking rather than unlimited funds. The key lies in understanding where to invest for maximum impact and where smart savings won’t compromise quality or safety.
The most successful bathroom renovations on a budget balance DIY enthusiasm with professional expertise. While you can do some tasks yourself, professionals should handle the majority of the heavy lifting. Start planning your project with trusted bathroom renovation experts today.
FAQs on bathroom renovations
How much does a budget bathroom renovation cost in Australia?
Budget bathroom renovations typically cost $8,000 to $15,000 for basic updates, including painting, new fixtures, and cosmetic improvements. Mid-range renovations with some structural changes cost $15,000 to $25,000, while high-end renovations can exceed $30,000.
Can I renovate a bathroom myself in Australia?
You can handle cosmetic work like painting, installing accessories, and replacing non-plumbing fixtures yourself. However, licensed professionals must complete waterproofing, plumbing, and electrical work to meet Australian building standards and maintain insurance coverage.
Is it worth renovating a bathroom before selling?
Yes, bathroom renovations typically return a significant amount of their cost when the property is sold. Focus on neutral colours, modern fixtures, and quality finishes rather than highly personalised design choices.
Do I need building permits for bathroom renovations?
Minor cosmetic updates don’t require permits, but structural changes, plumbing alterations, or electrical work typically do. Check with your local council, as requirements vary by location and scope of work.
What mistakes should be avoided when renovating a bathroom?
Common mistakes include inadequate waterproofing, poor ventilation, choosing style over function, and attempting complex plumbing or electrical work without proper licensing. Always prioritise quality structural elements, even when working with tight budgets.
Which bathroom fixtures give the best value for money?
LED lighting, water-efficient showerheads, and quality tapware provide excellent value through energy savings and durability. Bathroom resurfacing of existing tiles and vanities often delivers better value than complete replacement.
The bathroom is a commonly used and renovated area of the home, but with an array of stylish faucets, tubs and vanities, keeping your bathroom trendy can be a constant battle between the new and outdated. If you are planning to refurbish or redecorate your bathroom space, consider these enduring bathroom designs that will add a classic touch that will never grow old.
1. Natural beauty
Embracing eco-friendly designs and natural materials in your bathroom space is a lasting trend that will remain a popular option for the way it transforms a sterile space into a refreshing refuge.
Natural materials such as stone, are an all time favourite that adds a warm and serene appeal to your bathroom. Neutral hues such as grays, creams and shades of brown nicely complement a bathroom environment that is eco-friendly.
Modern additions such as the vertical garden, can also enhance a green inspired design but as a simpler alternative, indoor plants make a suitable addition. Natural textures and wall features also add an organic element to your bathroom.
2. Wood finishes
Timber floors, wooden beams or bamboo touches are a bathroom design you won’t grow weary with. By combining a modern and rustic look, wood is the perfect addition to your bathroom space.
Dark timber creates a sleek, modern element in your bathroom but lighter panels of wood add a rustic and vintage finish to your bathroom. You can either use timber as a wall feature, or used throughout your statement pieces like on the vanity.
Monochrome in black and white, is a classic and elegant design that will never go out of style. Embrace black and white with elegant tiles and shower covers.
When you are renovating your bathroom and installing a new shower, you will need to choose the material that will be used for the shower base. You have a few options to choose from.
What is a shower base?
If you do not want the currently trendy wet room style, then you will need a base for your shower. Some bathrooms feature a walk-through style area that is completely tiled, but if that is not the look you want, then you may wish to install a cubicle-like setup with a shower base in it.
There are a few specific benefits to choosing a shower base option over others. First, it is easy to install and very easy to clean – since there are no grout lines, the cleaning process is quick and painless. Additionally, you will not have as many problems with the waterproofing failing, something that is common with tiled shower floors. A shower base is great if you do not have a lot of space in your bathroom, and if you want an updated look without a lot of renovation work, this is a good option as well.
Types of shower bases
There are different types and styles of shower bases available on the market. You may want to choose the most common types of base, which is square in shape. You can, though, choose angles and curves as well. Some are designed to fit well in the corner of the room, making it easy for you to use as much space as possible. You can also choose from a range of colours, giving you a bit more design freedom. Also, these bases tend to be safer than other options if you choose one with a non-slip surface.
Materials
Most types of shower bases are made of polymarble or acrylic. Some are made of steel, glass, or ceramic, which might be more difficult to find. Keep in mind that some surfaces can be very slippery as well, making them less safe overall, especially for children and the elderly.
Shower bases are easier to clean than tiles as they don’t have grout lines / Source: CK Contracting
Polymarble shower bases
Polymarble shower bases are commonly used as they are solid and long-lasting thanks to being coasted in a 2mm hard gel-coat resin. They are also stain, scratch and chemical resistant, and easy to clean.
Polymarble is also easy to refurbish, revive worn surfaces by simply sanding or buffing the surface. They are also usually a more expensive option.
Acrylic shower bases
Acrylic shower bases are light and durable, and a cheaper alternative. They are extremely low maintenance and easy to clean – you simply need to wipe down the the surface. However, acrylic bases generally come in set sizes, so custom dimensions and drain locations isn’t always possible.
Contact local bathroom renovators
Installing a shower base
As far as installation goes, because shower bases need support and a mortar bed for proper installation. So while it is possible as a DIY job, if you’re not a confident renovator, it’s best to turn to a professional.
Cost of installing a shower base
When costing out a shower base, take into consideration the material, shape, and size. You can pay anywhere from $150 to $1000 for the shower base alone, and then must factor in the cost of installation.
Are you tired of your old shower screen? Looking for something new and unique to replace it with? Fortunately, there is a wide variety of shower screens with stylish and attractive designs to choose from. In the past, there were very little options to choose from, but shower screens have evolved greatly since their inception and we now have more variety than ever before. Here is a look at your shower screen options and how you can liven up your bathroom.
Different types of shower screens
With the wide variety of shower screens available today, you’ll want to first determine the kind that will best suit your bathroom. Here are a few of the most popular options:
Sliding door: The classic sliding door shower screen has at least one fixed panel, with a door thats designed to slide from side to side.
Pivotdoor: These have stationary panels and a door on a pivot hinge for exiting or entering the shower.
Fixed and swing: These have both a fixed panel and a fully swinging door that opens outward. Because of the outwardly swinging door, they’re better for bathrooms that have a bit more space.
Cornershower screens: This corner unit has several fixed panels and a pivoting door to enter and exit the shower.
Fixedpanel: These don’t have a door but instead have fixed panels of glass to create a walk-in shower.
Fully frameless: This type has no frame at all around the screen. The glass panels are instead attached together using specially designed fixings or clamps. A frameless shower creates a streamlined, minimalist look, and it’s especially easy to clean because there’s no place for dirt and soap scum to accumulate.
Semi-frameless: This type of screen has a frame around the outside borders, but has no frame around the doors or interior panels. It gives the appearance of being almost frameless and is significantly cheaper than frameless varieties.
Fully framed: This traditional shower screen style has a frame around the entire shower as well as around each of the glass panels. These are the least expensive of all shower screen types.
Perimeter: Only the outside of the screen is framed, leaving the door completely unframed. Since the door does not have that additional support, perimeter shower frames are best for smaller showers.
Fully framed shower screen advantages
Versatility: Since they enjoy support on all sides, fully framed shower screens are suited to a wider variety of bathroom designs. Customise the look further by choosing framing that either contrasts or blends in with the rest of your bathroom. Glass can come in patterned, frosted, or clear panes, and the door can either pivot or slide.
Price: Where your budget is concerned, fully framed shower screens are your best friend. It’s consistently the most affordable of the four types of screen.
Longevity: If you want a shower screen that will last a lifetime, choose a fully framed shower screen. No matter how long it stands, it will look brand new, and it’s easy to maintain.
Frameless shower screen advantages
The greatest advantage of the frameless shower is the ability to create a clean feeling in the bathroom, while allowing other features in the bathroom to stand out, like a spa, statement basin or tiled wall. An additional benefit is that frameless showers are easy to clean due to the lack of nooks on the surface. Therefore, soap scum, mould and deposits are unable to build up.
Hobless shower pros and cons
Without a barrier to step over, hobless showers can provide a sleek and modern look to any bathroom. They can also be more accessible for those with mobility issues or for anyone who wants a safer and easier experience while showering. However, hobless showers may require additional waterproofing measures to prevent water damage to the surrounding areas, and they may also be more difficult to clean compared to traditional showers. Additionally, the lack of a shower hob can result in water spilling out onto the bathroom floor. As with any home renovation decision, it’s important to weigh the pros and cons before making a final decision.
Contact local bathroom renovation experts
Shower screen glass options
Frosted glass shower screens
Frosted glass is glass that is made opaque using acid etching or sandblasting or by applying special window films. Frosted glass lets light through, but can’t be seen through. When frosting glass, the entire panel can be treated or designs can be applied to create a pattern on the glass.
Several things make frosted glass a good choice for shower screens. It gives privacy without creating a sense of being closed in and without cutting out any light. This privacy is especially useful with an open bathroom plan, where the toilet is in the same area as the shower. With frosted glass, other people can use the bathroom at the same time with no loss of privacy for anyone. Frosted glass gives an elegant and classic look to a bathroom and doesn’t interfere with the colours of the tiles and walls in your shower. You can choose to have one or both panels of the shower screen frosted, depending on the layout of the bathroom, your preference and your budget. Frosted glass can be used without a problem in all kinds of shower screens.
Tinted glass for shower screens is just like any tinted glass. A film or coating is applied to the glass to colour it and reduce the light that gets through the screen. Glass is most often tinted in shades of grey, green or blue, but tinting in other colours is available.
Tinting can allow you to decide the level of privacy you want by picking how dark you want the tint to be. Darker tinting allows less light through and creates more privacy. The colours of tinting can also make the shower screen a more prominent feature, with more pop than clear glass. Tinted glass can look elegant, modern or cosy, depending on the colour and depth of tinting and will suit a variety of bathroom styles. As with frosted glass, you can have one or both panels of the screen tinted. When decorating your bathroom, be aware that the colour of tinted glass will alter the look of the tiles and walls of the shower. Make sure you pick tiles and tinting to complement each other and give you the colour result you want.
Shower screen installation
If you’re handy with DIY projects, you should easily be able to instal your own shower screen, but be aware that frameless and semi-frameless styles can be tricky to put in. In addition, you may need to invest in specialised tools in order to do the job properly.
Depending on your skills and your tool supply, you may want to consider bringing in a professional who can do the job for you efficiently and quickly.
So you’ve experienced a high-pressure drencher at your last hotel stay or while a house-guest at your friend’s place, and now you want it! That’s understandable; the sensation of a power shower is incredible, but the planning and installation process is not so straightforward. So, is the feel worth the hassle? You be the judge.
Weighing in on the ‘Power Shower’
A power shower (also called a pump shower) is described as a mixer with an integral pump. The pump increases the rate of flow from the shower head and operates on a low pressure tank-fed system. It must have a dedicated temperature supply (hot and cold water system) and an above ground water supply to be ready to use.
There are two choices to suit your needs: the single and the twin impeller pumps. The single impeller has one pressure blade that pumps the water, mixes it to the right temperature and then drives it through from the shower head. When installing the pump, it’s necessary to position it between the mixer and shower head for proper functioning. With the twin impeller, you can fit it to both the hot and cold water before reaching the mixer port.
Consider that a pump only makes practical sense if you have the appropriate hot and cold system installed in the home. If you have a gravity storage system in your loft space, the distance from that base to the shower head is most likely approximately one metre, which will result in a low pressure shower. Most manufacturers recommend having the pump electrically connected within four metres of the hot water source and at least 30 millimetres below your cold water tank.
Water efficiency
If you are a water conservationist, a power shower is an area to pay keen attention. You can easily rack up double the amount of water with a pump than from a soak in a bath. Some power showers use up to 24 litres of water per minute, while a bath will average 80 litres. If you do the math, youll be 40 litres over the amount for a bath within five minutes.
Luckily, you can purchase a water efficient shower head that conserves water, giving less than 10 litres per minute. However, going any lower than that will lose the power effect of a drencher.
One last note before purchasing a pump: it tends to be noisy to operate. Also, check the drainage in your tub. With a lot more water bursting forth, youll have a pool at your feet in no time if the drainage is inadequate.
If you’re undertaking a bathroom renovation, it’s absolutely essential you know how to waterproof a bathroom correctly. While it isn’t the most glamourous part of building your new bathroom, an incorrectly or inadequately waterproofed bathroom can cause serious damage to the structure of your home and can be extremely costly to fix.
Waterproofing is needed to protect the concrete base of the bathroom from the adverse effects of dampness. The waterproofing layer is a guarantee of the safety of walls, ceiling and floor in case of emergency situations associated with leaks, flooding and pipe breakthroughs.
Increased humidity, temperature changes, the periodic formation of steam and condensate – all of this has an adverse effect on the finish, the decor of the bathroom, on the floor. Moisture penetrates through the seams under the tile, accumulates under the tile, in places of laying and joints of pipes and communications, creating comfortable conditions for the appearance and reproduction of mould, fungi and harmful bacteria.
While there are parts of a bathroom renovation you can DIY, it is imperative that waterproofing is undertaken by a licensed professional. In short, it is simply too important that waterproofing is done correctly – even a tiny gap may cause serious damage to the internal structures of your home causing heartache and costing money down the track.
In Victoria, the work must be done by a qualified and licensed waterproofing tradesperson who can provide a written guarantee of workmanship and a warranty.
What are Australia’s waterproofing standards
Waterproofing must comply with regulations as set out by the Building Code of Australia and Australian Standards (AS 3740-1994).
To briefly summarise the requirements of the standard are:
Shower floor
Shower waterproofing is essential and the entire shower floor must be waterproofed
Shower walls
Shower walls should be waterproofed up to 1800mm high
Bathroom floor
If the bathroom floor is made of wood or contains wood OR if the bathroom is on the second story or higher, the entire floor must be waterproofed
Bathroom walls
Bathroom walls must be waterproofed up to 150mm high
Step down
Over the hob or step down onto the bathroom floor should be waterproofed to 100mm high
These are the minimum requirements, however depending on how the bathroom is intended to be used, the areas around the bath, toilet and vanity may also need to be waterproofed.
Tools needed for this job:
Cleaning equipment (Dust pan and brush / broom / vacuum cleaner)
Safety equipment
Caulking gun
Paint roller and tray
Rubber hammer
Silicone gun
Masking tape
Paint scraper
Paint mixer
Spirit level
Utility knife
Materials
Primer
Silicone
Waterproofing agent
Waterproofing membrane
How a bathroom floor is waterproofed
This is a step-by-step guide to how a bathroom is professionally waterproofed, it is written for waterproofing preparation rather than a DIY guide.
Step 1 – Prepare the area
After the old bathroom has been removed, the area must be completely clean and free of dust and other particles before waterproofing can start. The area is cleaned using a broom and a dustpan and dried in all wet areas.
Both the walls and the floors should be perfectly smooth. If the floor is uneven, you can use a levelling compound to smooth it.
Tip! To obtain perfectly smooth vertical surfaces, the walls treated with waterproofing can be sheathed with moisture-resistant gypsum plasterboard.
Step 2 – Apply the primer
Using a paint roller and roller tray, the primer is applied starting from the back corner of the bathroom. The primer is applied to 150mm up the bathroom walls and the entire bathroom floor is covered. Primer is allowed to dry.
Step 3 – Fill the cracks with silicone
Using the silicone gun, the silicone is applied to the gaps between the wall and floor and any other gaps or cracks. Silicone is allowed to dry over 24 hours.
Step 4 – Apply masking tape
Masking tape is used to mark the level to which the waterproofing agent must be applied according to the Australian Standards.
The waterproofing agent is painted on to the height of the masking tape starting from the back corner. The waterproofing product must be applied with a trowel in 1mm thickness.
The seal obtained by a coating reliably prevents the ingress of moisture and destruction, while the material cost is much lower than with the use of liquid compounds and plates, and the work can be performed qualitatively with one’s own hands.
Important: The room in which the work goes, you need to constantly ventilate. To avoid poisoning by vapours of the mixture, it is desirable to use a protective mask.
Step 6 – Apply waterproofing membrane
Roll out the membrane and cut to the lengths of the floor. The membrane is applied, making sure that it covers the cracks and the joints in the floor. The entire area is covered with membrane and painted over with waterproofing agent to make sure it sticks down. When the entire area is covered with membrane and waterproofing agent, it is left to dry for 24 hours.
Step 7 – Apply second coat of waterproofing agent
A second coat of waterproofing to the entire area and left to dry for 24 hours.
The area is now waterproofed and ready for your new bathroom to be installed.
How to waterproof timber floors in the bathroom
Waterproofing timber floors in the bathroom is crucial to ensure they remain in good condition. Bathrooms are high-traffic areas, subjected to moisture, and susceptible to wood rot and damage. Waterproofing the timber floor adds an extra layer of protection against water, dampness, and mould that can cause havoc in your bathroom. Here are some benefits of waterproofing timber floors in the bathroom.
Benefits of Waterproofing Timber Floor in the Bathroom:
Increases Durability: A waterproofed timber floor will last longer since it’s made water-resistant and less susceptible to moisture damage and rot. This means you will save money on repairs and replacements over time.
Enhances Safety: Damp, mouldy, and slippery floors pose a considerable risk, especially in a bathroom where water is frequently used. Waterproofing your timber floor reduces the health hazards and potential injuries caused by slipping.
Easy Maintenance: Waterproof treated timber floors are easy to clean, and you do not have to worry about water damage, mould, and mildew buildup. Regular cleaning with a mild detergent is enough to keep the floor clean.
Improves Aesthetics: A waterproofed timber floor adds an extra layer of aesthetic value to your bathroom. You can choose different waterproofing finishes that enhance the look of the timber floor, such as clear finishes that bring out the natural timber allure or a tinted finish that matches the bathroom’s interior colour schemes.
Methods of Waterproofing Timber Floor in the Bathroom:
Sealers: Sealers create a barrier over timber that fills gaps and cracks, repels water, and increases the timber’s lifespan. Look for sealers designed explicitly for bathroom floors and ensure it’s compatible with your timber floor type.
Membrane Systems: Membrane systems are more effective in preventing water damage since they cover the whole floor area and provide an unbroken barrier. This layer is then covered with tiles or vinyl flooring, making it a permanent solution.
When considering waterproofing your timber floor in the bathroom, there are various factors to consider, including the type of timber, bathroom’s traffic flow, and the extent of damage. Hire a professional for expert advice and to ensure that the waterproofing process is done correctly.
In conclusion, waterproofing your timber floor in the bathroom is a smart investment. It will keep your bathroom floor looking great and prevent water damage to the subfloor and the expansion of mould and mildew. As with any home project, seek advice if in doubt, and always ensure safety measures are put in place.
DIY vs Contractors
We strongly recommend that a qualified and licensed professional is hired to do the work. Even if in certain areas the laws allow you to do it yourself, the consequences of incorrect waterproofing can be very expensive, and not worth the risk.
Waterproofing when done correctly will penetrate beneath the surface and actually treat the masonry. This precaution will save you much heartache should there ever be a burst pipe, flooding or any other event that could cause water damage to your home, investing in an expert to waterproof your bathroom is a must.
A professional waterproofer will guarantee the work for up to 15 years, often much longer than that, and the job when done professionally can last 25 years or more. Make sure you ask to see their license and insurance associated with the work before you sign them up for the job.
One of the biggest decisions during a bathroom renovation is tile selection. The proper choice of tile will determine your bathroom’s look, the ease of cleaning and maintenance, and your project budget Here are some of the key considerations when choosing the right tile for your bathroom.
With proper installation and sealing, any type of tile can be used in your bathroom: marble, granite, slate, sandstone, ceramic, porcelain, glass, metal, and even plastic. Tile varies not only in material, but also in size, colour and texture. The patterns and combinations are limited only by your imagination.
Before you get started, keep in mind that what you choose needs to be maintained properly. For example, if you choose very small tiles, realise that this will create extra grout lines, meaning more cleaning. If you choose whites or other light colours, this will mean more work keeping them clean looking. You may want to consider those tiles that are slip-resistant to help to keep you from slipping on the floor.
Bathroom design & style
The bathroom is a challenging area and any tile that you place in it needs to be able to meet some pretty stringent requirements. The tile has to be water-resistant, durable, as well as easy to clean and maintain. It should also be beautiful. You will find that these tiles can be used not just on the floors but on the walls of your home as well – you may even use border and feature tiles in the space.
What is your goal? Are you going for a traditional or funky retro look or an elegant retreat? The look and atmosphere you want in your bathroom will influence your choice of tile. For example, large glossy ceramic tiles wouldn’t suggest a cosy retreat, nor would mirrored tiles suit a traditional bathroom.
For style needs, though, there is much more available that can enhance the look of your space. You can choose various shapes to use in the space place. You can use a variety of materials, including glass, natural stone, and ceramic. You may want to use large tiles or very small mosaics. The options are endless.
Cleaning & maintenance
Traditional glass, porcelain, and glazed ceramic tile are uniquely suited for bathrooms because they are non-porous and resist moisture and mould. Clean often with a household cleaner suitable for tile, and your bathroom will look wonderful for many years.
Not all tile was originally designed for bathroom use. However, with proper regular sealing, any tile can be used in your bathroom. Use a cleaner that is compatible with the sealant. Non-traditional tile requires extra maintenance. If you are set on using exotic tile, consider it for a guest bathroom that will not see the traffic of the main family bathroom. Less use means less maintenance.
The driving force behind most renovations is budget. Tile ranges from inexpensive simple ceramic tiles to very expensive exotic stone tiles. Take careful measurements of your space, and determine how many tiles you need. Then, figure in an allowance for grout, adhesive, tools, and breakage. If your dream tile is out of your budget, you can wait for a sale, or look for an odd lot or discontinued line. Another option is to use a more common tile for most of the space and trim it out in the fancy tile. Again, your imagination and budget are your only limits.
What’s right for your space?
When choosing from all of these options, consider the space itself. When you choose larger tiles, you have fewer grout lights to fill in. This helps to make the space look larger. Perhaps your ceilings are very low. If you run the tiling in a vertical strip, perhaps using some feature tiles as well, this gives the appearance of height. It helps to change the perception of the room.
Selecting colours
The next consideration is the colouring. Neutral colours – like white, beige or cream – remain the common winner because it is easy to match with. However, you can use a range of options here depending what you prefer to see in this space. You may want to choose the bold colours found in glass mosaic tiles, placing these on just one wall in the bathroom. It will create a very appealing look. You can use bold colours in random locations throughout the space for a different type of appeal. Here’s some tips when selecting a colour for your tiles:
“Clean” looking colours: that is, those that don’t easily display dirt or other blemishes. Stark whites, blacks, and dark greys tend to show spills and stains, so it’s better to pick more neutral colours where possible to help cut down cleaning time.
Colours that create space: the right colours will help you create the illusion of having more space in a small room. Since the bathroom is generally one of the smallest rooms in the house, this is pretty important. In general, dark colours can close a space in, whilst light colours will create a more spacious feel. If you do want to use dark tiles, consider them as part of a feature or pattern, rather than the base.
Eye-catching colours: Opt for colours that are going to draw the eye to a major feature, like a beautiful freestanding bath, a shower stall, or a lovely mirror. This generally works well when the bathroom is filled with neutral colours, meaning that the coloured tiles being used around the feature are more striking.
Colours that create mood: Colour has an impact on the feel and mood of the bathroom, so consider what atmosphere you’re trying to create. Are you looking for a clean finish, a dramatic bathroom, or a relaxing retreat? Dramatic rooms will do well with bold colours, while classic neutral colours, like greys and whites are great for a clean-cut look. To create a feeling of calm, consider earthy tones, like greens, blues, yellows, and soft purples.
Guide to picking the right bathroom wall tiles
When remodeling your bathroom, you should give a lot of consideration to the type and pattern of wall tiles you want to use. Wall tiles can set the tone for the entire bathroom. Depending on what you choose, your bathroom can look simple, elegant or even fun. Here are some things to consider when picking out wall tiles.
Choose a Tile Material
There are many different wall-tile materials that you can choose from. Learn about the different types so that you can choose the one that fits your bathroom design, budget and lifestyle best.
Ceramic tiles are very popular because they are easy to clean, hold up well in high moisture environments and are inexpensive. They are available in hundreds of sizes, colours, and patterns.
Porcelain tiles stand up even better in high moisture environments than ceramic wall tiles, and they’re just as easy to keep clean. However, the extra durability comes with a steeper price. They are also available in hundreds of sizes, colours, and patterns.
Natural stone tiles are often used in designer bathrooms because they look so beautiful. The downside is that stone is porous and is prone to staining in high moisture environments. However, the application of a clear waterproof sealant can help to protect the stone.
Natural clay tiles have the same benefits and drawbacks of natural stone tiles. They look gorgeous but are prone to stains caused by moisture. However, just as with natural stone tiles, a clear waterproof sealant can protect clay tiles from moisture damage.
Glass tiles come in a wide variety of colours and designs, making them a great choice for colourful bathroom designs. Glass has a shiny, reflective quality not available in the other tile materials. Glass tiles hold up very well in moist environments and are easy to care for.
You can create a pattern by using either all of the same colour tile or tile in different colours. A design using only one colour and size of tile looks simple and elegant and focuses the attention on the bathroom fixtures. A patterned design using different-coloured or different-sized tiles draws attention to the walls and adds an additional layer of interest to the bathroom.
There are several ways you can create a wall tile design. Here are some ideas that are easy to do by yourself:
The easiest way to create a tile wall pattern is to purchase tiles that already have a pattern on them.
Plain tiles can be installed in simple pattens such as placing large tiles on one row, small tiles on the next row and repeating the pattern.
You can make a checkerboard pattern by alternating tile colours.
There are numerous designs that you can create with wall tiles, such as diamond patterns, but sophisticated designs require careful measurement and quite a bit of tile cutting. If you are not experienced at installing tile, hire a reputable tiler to help you out.