Categories
Bathroom & laundry

How to clean a washing machine

If your washing machine is not working like it used to, the problem could be as simple as needing a good cleaning. If you find stains, patches of colour or your clothing look dingy; it might be your washing machine telling you it needs some attention. Cleaning your washing machine is easy, and it can save you a repair call. 

How often should you clean a washing machine?

The answer to this question depends on how much you use it. The dirt and grime in your clothing have to go somewhere, and it can get caught in the filters, inlets and outlets, and pipes. Soap scrub builds up and can act as a trap for dirt. Cleaning your washer every six months will keep your clothing and your machine fresh and clean. 

Some signs that your washing machine is in desperate need of a deep clean is a musty smell in your supposedly clean clothing. If your machine smells like dirty socks, then you need to clean it. If the inlets and outlets are clogged, it can interfere with the machine’s functioning by blocking water flow. This can lead to more costly repairs later. If this happens, one of the key signs is that soap might not be rinsed all the way out. 

Source: Alice Bonicelli Interior Design

Materials and tools

Here are the tools that you will need:

  • Spray bottle
  • Microfiber cloth or sponge
  • Old toothbrush
  • Bottlebrush

When it comes to what to use to clean a washing machine, you have several options. You can buy a washing machine cleaner that is formulated specifically for this purpose. Many people choose to use more natural products, such as vinegar and baking soda. The best washing machine cleaner is one that removes the soap film. When you clean a washing machine with vinegar, you need to make sure to rinse it well so that your clothing does not smell like vinegar. 

How to clean a washing machine

Before we get into the cleaning process, you need to check to see if your washing machine has a self-clean cycle. You can use that if it has one, but if it does not, you can do the washing machine cleaning using this simple process. 

  1. Run a hot cycle. The first thing to do is run a regular cycle on hot, adding 60 mL of distilled white vinegar or cleaner instead of laundry soap. Add it to the detergent dispenser. This will not harm your machine, but it will prevent bacteria and mildew. 
  2. Scrub the inside. Add vinegar or cleaner to the spray bottle and spray the inside of the drum. Use the old toothbrush and sponge to scrub the drum. The old toothbrush can be used to clean the cracks, crevices, and gaskets. 
  3. Run one more empty load. Now, add another 60 mL of vinegar to the dispenser or sprinkle some baking soda directly in the drum. Run another cycle of hot water. 
  4. Check the inlets. Check the inlets and outlets for build-up. Spray them with some vinegar or cleaner. You might try using a bottle brush to clean as much as you can. 
  5. Wipe the outside. Spray the outside of the machine and the inside of the door. Wipe it down with the sponge. Use the toothbrush to clean around the hinges. 
  6. Clean the filter. Take out the filter, run it under hot water and gently clean it with the toothbrush. Be careful not to damage it. Replace it into the machine. 
  7. Dry the drum. Use the microfiber cloth to dry the drum or leave the door open to allow it to air dry. 

Contact local plumbers

Front loader vs. top loader

Cleaning a front loader and cleaning a top loader is slightly different. The above instructions are for a top loader. When cleaning a front-loading washing machine, it is a good idea to consult the manual for instructions before proceeding. You can start by running a cycle with a cleaner or vinegar as you did in the previous section’s steps. 

Dirty filters are a common contributing factor to a front-loading washer that is not cleaning properly. Also, remove and clean the soap dispensers and fabric softener dispensers with hot, soapy water. Rinse them with vinegar or allow them to dry in the sun to help prevent mould. 

How to avoid getting a scrub build-up

The best way to clean a washing machine is to take measures to prevent it from getting dirty in the first place. Eventually, you will need to clean it, but you can lengthen the time between washing machine cleanings by taking a few steps. 

  • Use less detergent in your loads
  • Avoid overloading your washing machine to allow water to drain freely
  • Use liquid detergent or dissolve the powder in water before running a cold water load
  • Store detergent in an airtight container and break up any clumps before adding the powder to the load
  • Occasionally run an empty load with just detergent and hot water
Source: Gleeson Tiling and Bathrooms

How to hire a plumber

Hopefully, your washing machine will be working correctly after a good cleaning, but if it is not, then it might be time to call a licenced plumber. You might discover that there is another problem as you are cleaning the machine. If you need to call a plumber, make sure that you hire someone who has the proper qualifications. 

Licencing and qualifications

Each state has its own licencing and qualifications for plumbers. They must also hold a national certificate in plumbing. Plumbers must complete an apprenticeship program, and they may receive advanced training. Ask about your plumber’s qualifications to work on your washing machine before you hire them.

Categories
Bathroom & laundry

Adding a vanity to your bathroom

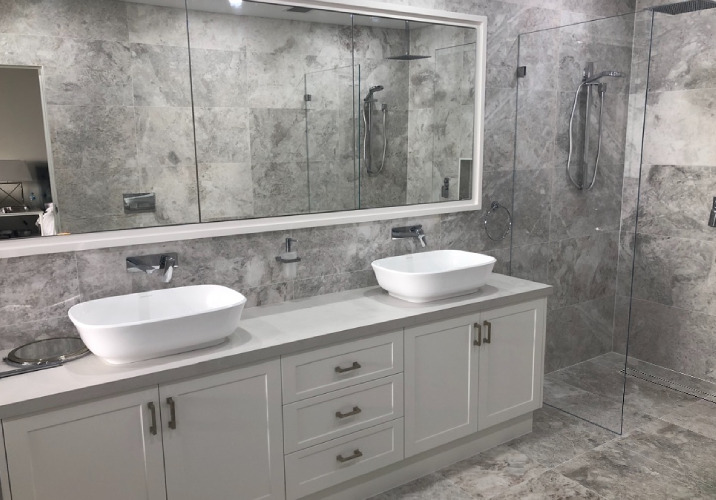
No matter how large or small your bathroom is, the vanity should be its centrepiece. An attractive, well-constructed vanity adds the conveniences of a sink basin, as well as cabinet storage and countertop space. Here are some tips for choosing the right vanity for your bathroom.

The basics

The bathroom vanity is simply the area around the sink – the sink fixture and the cabinetry around it. You’ll use it just about every day when you wash your hands, brush your teeth, shave or just get a drink of water. Since you’re going to see and use it all the time, it’s important to get the right design for your bathroom – not just for aesthetic purposes, but for practical ones too.

You’ve got an enormous range of options in choosing a bathroom vanity. You can go big or small, and you can choose from an array of different materials – wood, MDF, or laminates, for example. Go with a moisture-resistant material for the frame that surrounds the sink, since it will definitely encounter some wetness after installation. You have a much wider range of choices when it comes to the benchtop. You can get that made with just about any type of material and in any sort of colour. Choose what best matches the rest of your bathroom.

You’ll also want to choose between a single-sink layout and a double-sink layout. Choose the double-sink if you’re concerned about sharing a single sink during those busy mornings or the single-sink layout if you think it’s not going to be that busy!

Source: S.F.D Caringbah

Picking out the right vanity

Like Goldilocks and the porridge, you need to pick out the vanity that is just right for your bathroom. Size is a consideration. The vanity needs to fit into the bathroom, but not seem out of place. It should be big enough to store all of the things you need, but not so gigantic that it overwhelms the rest of the room. Once you’ve got the size sorted out, choose between a single-sink and a double-sink layout, and make sure you have all the storage space you’ll need.

From there, it’s time for the fun part – picking out the vanity’s design. You have to make sure that the design goes with the rest of the bathroom. An ornate, French-styled vanity goes well with a country-like bathroom, while an opulent marble vanity gives a good burst of class to any luxurious bathroom. Choose carefully, and be sure to keep maintenance in the back of your mind – wood vanities are extremely susceptible to rot and require constant monitoring to make sure they don’t decay. 

Contact local bathrooms experts

Features to look for 

Before you start shopping for a bathroom vanity, take a good look at the proportions of your bathroom. Will a rectangular vanity fit best, or should you opt for an oblong shape? Likewise, you’ll also want to prioritise your needs. If you need extra space to store toiletries, medications, cosmetics and hair products, you’ll need to find a vanity that has plenty of storage space and drawers. If you have a large family and your bathroom is a hub of activity in the morning, you might also want to consider getting a vanity with two sink taps.

It’s also a good idea to consider maintenance issues. You may love that benchtop made of exotic hardwoods, but don’t choose it unless you’re willing to do the regular maintenance it will take to keep it oiled and properly cleaned. There are a wide variety of laminate materials that are easier to clean and will look just as good.

Your vanity will more or less set the decorative style for the rest of your bathroom, so if you have a contemporary look, then opt for a streamlined vanity with simple touches. Likewise, if your bathroom is more decorative, you’ll want to choose a more ornate vanity that can be a showpiece for the room.

Source: Illawarra Bathrooms

Beauty in simplicity

Bathroom plumbing is now being routed through the walls rather than underground. You don’t have to hide the plumbing by mounting your toilets and vanities on the floor. Stylish wall-mounted units are now catching on. The older plumbing layout also meant that the space under the counter was fully used up by the sink and its associated pipes. Now, with the plumbing safely out of the way, you can instal actual drawers to the side of the sink instead of making do with drawer facades. These drawers offer ample space to store a number of useful items for convenience and ease of reach. Floor-mounted vanities were also bulky and created the effect of a cramped space. The wall-mounted models look light and trendy, without compromising on the storage capacity inside. They make the bathroom look more spacious, colourful and lively.

By doing a bit of homework and asking for advice from a professional, you’ll be able to find a vanity that is not only aesthetically pleasing but also fits your bathroom — and your budget.

Categories
Bathroom & laundry

Choosing a rain shower head

If you’re trying to conserve more water in your household – a rain shower head may be the solution you’re looking for. Rain shower heads are now more stylish, use less water, and as a result, are more energy efficient. Not to mention they turn a daily ritual into a luxury, adding a touch of resort living into your home. Rain type shower heads have continued to gain popularity in recent years as people become more conscious about water conservation.

How do rain shower heads work?

Rain shower heads conserve water by simply using less. They build pressure inside by having smaller holes and releasing less water.

Earlier shower heads had larger holes for the water to flow through, and therefore used more water. Earlier models were not as efficient, and consumers complained of a ”needle and pin” type of spray. Today’s models feature adjustable heads and can make the water spray finer. They can also add more flow with just a turn of the shower head. Engineers developed a technology called ”Laminar Flow” that forces bigger droplets of water to flow into each other, simulating rain.

Source: Building Boys

Rain Shower Head Styles and Sizes
Rain shower heads are available in several different styles and shapes. They can be rounded, square, or oval, but they are all designed to save water. They all spread the water out over a larger area, giving the sensation of a rain shower. There are ceiling mounted rain type shower heads that are fixed and are pre-adjusted. These come in different styles that are usually dictated by shower choice. They can come customised with stereo systems and LED displays as well. Wall mounted rain shower head units can be adjusted for flow rate and height for taller or shorter people. Handheld heads are also available for those who may need to sit down while taking a shower.

Contact local experts

Installing a rain shower head

Some rain shower heads are available in kits that can be installed by homeowners. These are typically more inexpensive and can be easily attached to the existing shower pipe. If you are considering a complete renovation of an existing bathroom or adding a new one, the options for rain shower heads are wider. Decide what type and where you want it installed before proceeding with the plumbing phase of the bathroom renovation.

If you live in an older house or flat, it may may be time for a shower head upgrade. A rain shower heads help you reduce water consumption and save money.

Categories
Bathroom & laundry

How resurfacing can transform your bathroom

Does your bathroom look like it needs a facelift? If it makes you sigh in defeat instead of pleasure when you look at it, probably so. One option would be to hire a professional to come in, gut it and put it back together. However, if your bathroom is structurally sound, a better and less expensive alternative is to resurface it. Resurfacing can hide and repair chips and stains in a bathtub or sink at a fraction of the cost of replacement.

When resurfacing is the right choice

Before you commit to a larger project, it is best to determine if bathroom resurfacing is enough. In this process, you will apply a new surface agent to the surfaces present. There are many ways you can do this. Some of the areas that you can easily resurface include the following:

  • Wall tiling
  • Cabinets
  • Baths and basins
  • Splashbacks
  • Vanity tops

You should not use this method on flooring, though. Because of the foot traffic these surfaces get, it will be hard to actually see lasting improvement overall. Keep in mind that if you do want to use this process on flooring, a professional should be hired for the job.

There are many instances in which bathroom resurfacing is a better option. Resurfacing your existing bath will only cost about 25% of the cost of installing a new bath. This process still remains one of the most cost-effective options for tiles as well, though you have to factor in labour costs.

Remember that this is also a process that is faster than renovations. In short, you can have the entire job done in a few hours rather than the weeks it will take to renovate the space.

Source: Ryan Linngar Photography

How hard can it be?

Resurfacing a bathtub or ancient bathroom tiles is a totally different experience than painting a wall or installing wallpaper. If you were to resurface a bathtub yourself, you will likely get an ugly, uneven, dishevelled mess and you would have to call a professional to fix your mistake. Rather than wasting your time and energy on this difficult project. You may want to contact an expert right away. Here is a look at why you should leave resurfacing to the professionals instead of doing it yourself. 

What gives bathroom resurfacing a bad name?

What is the difference between a tiled wall that has been painted over by an amateur and a resurfaced wall handled by a professional? When a professional does it, you won’t be able to tell that there is tile underneath. Professional resurfacing provides perfect or near-perfect results, whereas if you did the job yourself you would have a mess, a headache, and a bill for a professional. 

Price, of course, plays a major factor. While many people see DIY as a way to save money, you could actually be spending more money by tackling this by yourself by fixing your mistakes, and there will be mistakes. But aren’t professionals expensive? You could actually be saving yourself money by hiring a professional and having it done right the first time. Not to mention, resurfacing a bathroom is a lot cheaper than a full-fledged bathroom overhaul.

Contact local bathroom resurfacing experts

Not convinced?

If you’re not convinced yet, think about this: when you have your resurfacing done by an expert, the work will come with a warranty. If anything goes wrong within the warranty period, the bathroom resurfacing specialist will fix it for you. If you tackle the job yourself and something goes wrong, you have only yourself to blame. Although warranty periods differ, if you get the job done by the pros, you can expect your tub, sink or tiles to still be looking great for up to 15 years.

When renovation makes the most sense

There are other instances in which bathroom renovation is the best route to take. If you want to move fixtures around or you want to change the entire appearance of the room, this is a good option.

  • You may want to make drastic changes, such as converting your bathroom into a wet room. Renovation is necessary for this instance.
  • You may want to replace the current bathroom fittings, but you may also need to replace the sink or bath in order for the new fittings to work well and look good.
  • Resurfacing will not help when you want to have a brand new look that uses things like glass bathroom tiles or more modern splashbacks.
Source: Buildtech Homes

Hiring a resurfacing expert

Your bathroom resurfacing company should have demonstrated experience and full qualifications. Ask to see certificates for industry-related qualifications and all necessary insurance. Find out how long they have been providing bathroom resurfacing, and ask to see photos and testimonials from their previous clients. Make sure they use accredited bathroom resurfacing products, so you can be sure your resurfaced bathroom will be safe and durable.

Categories
Bathroom & laundry

Installing a new shower base

There are many reasons why you may need to install a new shower base in your home. Perhaps your old one has become cracked, stained, or you are doing a bathroom remodel. Shower pan installation is one of the more straightforward plumbing jobs you can do. A new shower base can be the lift that your bathroom needs to make it feel like new again. This article explores how to do it yourself. 

Benefits of updating your shower base

If your shower base is leaking, the benefits of installing a new one are apparent. If your old concrete shower base has become cracked or damaged by water, you may need to install a new one to protect your floors and your home’s structural components. Even if that is not the case, there are many other reasons why you may want to install a new concrete shower base and replace your old shower pan. Some older shower bases were made to be shallow. You can replace your older model with a deep shower base that will help do a better job of keeping your floor from getting wet. A fibreglass shower base is a durable choice, especially when properly installed on top of concrete.

Source: Architest

Is it easy to DIY a shower base installation?

A DIY installation is easy, but it does involve some concrete work and some minor plumbing work. A shower base replacement is an easy task most of the time, but if your old plumbing is in the wrong place, the job can quickly become complicated. If you do not follow the instructions properly or are inexperienced, it can result in an improper installation. This can cause major leaks and potentially cause structural damage to your home. It is best to make sure that you understand the entire process before attempting to do it yourself.

Materials and tools

If you are going to install a shower base yourself, there are quite a few materials and tools that you will need. This list assumes that all of the old plumbing fits the new shower base, and no extra plumbing work is required. A licenced plumber must handle anything beyond the minor plumbing work needed to be done in these instructions because of proper venting and local building requirements. Here are some of the things you need to have on hand before you start the job.

  • Drill with a mixing attachment 
  • Bucket
  • Trowel
  • Measuring jug
  • Spirit level
  • Sponge or cloth for wiping excess cement and adhesive
  • Bag of premixed sand and cement or subfloor levelling compound
  • Adhesive recommended by the manufacturer
  • Access to clean water
  • Shower drain flange 
  • Gasket and drain screen 
  • The new shower pan 
  • Hole saw
  • Caulk and Sealant

Contact local plumbers

How to install a shower base

  1. Make measurements: You need to make measurements to purchase a shower base that will fit into our space. Before you set out to the hardware store, you will need the area’s overall dimensions, and it is a good idea to know where the drain is located. You should select a shower base with a drain that matches the old one. Otherwise, you can be in for some extra plumbing work.
  2. Cut holes in the floor: The first thing you will need to do is cut a hole in the floor for the plumbing to come through. If you are fortunate, the old hole will line up and, and you can skip this step. If you need to do this, place the new shower base into position and check to see if the holes line up. In case they do not line up, use a pencil to mark the shower drain location. Cut a hole in the subfloor. Do not make the hole too big. 
  3. Cut recesses: You might need to cut recesses into the studs to make the new shower base fit. If you are not an experienced carpenter, you need to be extra careful so that you do not destroy the integrity of the wall. 
  4. Mix cement: Now, it is time to create a solid base for your new shower pan. If you are installing a shower base on concrete floor foundation material, you will not need to place additional concrete on top. You can use a subfloor levelling compound and adhesive to glue the shower pan in place. If you are installing on a wood floor, you need to mix cement according to the directions.
  5. Lay the concrete: Lay the concrete base according to the directions. Make sure it is as smooth as possible, and be sure to make it the recommended thickness. The cement base should be smooth and level. Allow the concrete to dry and cure for the time recommended in the directions. Ensure the concrete base is completely dry before installing the new shower base on top of it.
  6. Install the shower base: Installing the shower base requires an adhesive recommended by the shower base manufacturer. Apply the adhesive and install the shower base on top of it according to the directions. Make sure to line up the drain holes and use a spirit level to ensure that it is not installed at a slant.
  7. Insert nogs: Place the rubber gasket so that it is seated properly around the drain pipe. Reinsert the drain, fittings, and screen. It is a good idea to test the shower drain to make sure that it does not leak. Allow the adhesives to dry for the recommended time, and the job is now complete.
  8. Waterproofing a shower base: Once the adhesive has cured, and you are sure that there are no leaks, you can seal around the new shower base with caulking to provide a waterproof seal. 
Source: Dell’arte

How to hire a shower installer 

This article outlined the simple version of the installation process. Along the way, you can run into issues like plumbing that needs to be rerouted or structural work that needs to be repaired. If you do not get the foundation level and smooth, the new base will not function properly. As you can see, it is possible to do this job for yourself, but this is one instance where it might be wise to hire a professional from the beginning.

Licencing and qualifications

At the bare minimum, a plumber must meet state and local licencing requirements. You will want to find someone who is experienced and has a solid reputation for this type of job. You might also need the services of a tiler, electrician for shower lighting, or a carpenter. Shower base installation is usually performed as part of a bathroom renovation. Some contractors have all of the licencing to do the entire job, while others will need to hire a subcontractor. Make sure that everyone who will be working on your new shower and shower base has the proper qualifications to do the job right.

Categories
Bathroom & laundry

How to install a shower screen

Installing a shower screen is an easy way to give your bathroom a luxury upgrade. Several types of shower screens are available, including frameless, framed, semi-frameless, sliding doors, and pivot doors. Installing them is an easy job that can give your bathroom the uplifting change it needs.

How easy is it to DIY a shower screen installation?

Shower screen replacement is a relatively easy installation process. The most important consideration is that if your shower is recessed inside a wall, you must get one that perfectly fits the opening. Otherwise, you could be in for some construction. If your shower is tucked into a corner of your bathroom, or you already have a free-standing shower screen, the process is relatively easy. The process involves removing the old shower screen, putting the framework and screen panels in place, and waterproofing them. 

Shower screen options

With a quick search online, you can find many shower screen ideas and options. Fully-framed shower screens are a popular choice for bathrooms of all sizes. This type consists of glass panels that are supported by an aluminium frame. They are a budget-friendly choice and have a clean, modern look. 

Frameless shower screens are sleek and minimalist in their design. This choice features glass panels supported by minimal hardware. They are excellent for small spaces and give the bathroom a high-end, luxury look. You can also choose semi-frameless shower screens, which are between the framed and frameless types in terms of the frame’s visibility. 

Sliding door shower screens are an excellent space-saver and a practical solution for small spaces. The doors slide along tracks that are easy to install. Pivot door shower screens open just like a standard door. They are an excellent choice if you have the room. Bi-fold doors and quadrant shower screens are also available. As you can see, you have many choices when it comes to designing your bathroom the way you like it and options for all sizes and shapes of spaces. 

A new shower screen will help to modernise the space / Source: River City Constructions

Materials and tools

Before you get started on your DIY shower screen installation, you will need a few items first. 

  • Shower screen of your choice
  • Nylon wall plugs
  • Shower screen gap filler or bathroom silicone
  • Marker
  • Caulking gun
  • Drill
  • Hammer
  • Impact driver
  • Large spirit level
  • Measuring tape
  • Pop rivet gun
  • Screwdriver 
  • Trimming knife
  • Clear setting blocks
  • aluminium water stop
  • Sealant (Bostik or other known brands)
  • Gloves
  • Safety Glasses

If you purchased a pivot door type screen, you would also need shower screen door pivot hinges if they are not included in the kit. Before you head out to the hardware store, make sure that you know how to fit a shower screen to your existing shower base. The shower screen should fit just inside the lip of the shower base.

How to install a shower screen

Here are the basic steps for installing a shower screen that applies to any shower screen that you purchase. The main difference between installing a frameless or shower screen with a door is that you may need to install hinges or a sliding track according to the manufacturer’s directions. 

  1. Clear the area: The first step to installing a shower screen is to remove the old one and clear the area. You will want to start with clean, dry surfaces. Assemble all of your tools, and layout the hardware according to size and shape. Ensure that you have the correct numbers of hardware for each step according to the screen installation directions.
  2. Attach channels/brackets to the wall: The next thing you need to do is mark the brackets’ position and channels on the wall and floor. Use your spirit level to make sure everything is straight and square. Also, make sure that the bottom channel fits inside the shower screen base’s bottom lip. Next, you can use the mounting hardware to install the channels and brackets. Make sure to do this in the order recommended by the directions, and make sure they are straight and level. Otherwise, the grass may not fit inside correctly. 
  3. Position and attach the hinge: Next, you should attach the hinge to the frame or glass panel according to the directions. The type of attachment will depend on whether you chose a frameless, framed,semi-frameless, or shower door as your screen. 
  4. Install each panel one at a time. Once the hardware and hinges have been installed, it is now time to install each glass panel. It is recommended that you start with the ones next to the wall first and work your way out. Glide each panel slowly and carefully into the channel and secure it in place with the appropriate hardware. The next step is to install the glazing seals and secure them in place.
  5. Install the support bar. The final step of the construction process is to install the frameless shower screen support bar. 
  6. Seal with silicone. Once all of the framework and glass panels are installed, it is time to waterproof it by sealing it with silicone. When waterproofing a frameless shower screen, you should only run a bead of sealant along the outside of the shower door. Make sure that it is smooth and pressed smooth inside the seams. You can clean up any excess with a damp cloth before it dries.

Contact local bathroom experts

How to apply silicone on shower screen

1) Make sure you buy the correct type of silicone. Some silicones are designed specifically for bathrooms so make sure you check the packaging before you buy. You should also make sure that there is enough sealant available as most jobs will require more than what comes in one tube of silicone.

2) Prepare the area first by removing any soap scum, grime, or previously applied silicone from around where you’ll be applying the sealant. 

3) Before making any cuts with your knife or scissors it’s important to test fit each piece of trim around your shower screen frame several times because once cut, there’s no going back! Take into account any drains at this stage too as it’s easier to move them slightly if necessary than having them in a fixed position during installation later on down the line which might cause unwanted problems.

How to remove a shower screen 

Before installing your new screen, you need to remove the old shower screen. To do this, loosen the hinges on the door and remove the glass door panel. Next, you can slide the glass panels carefully from their channels. Once this is complete, you can loosen the screws and fasteners from the top, sides, and bottom of the old shower screen. Ensure the area is clean, and you are now ready to install your new one.

Source: Newman Homes and Renovations

How to hire a shower installer 

Frameless shower screen installation can be an easy process, but handling the big glass panels and getting the framework straight can be challenging for someone inexperienced. The process itself is not complicated, but getting everything flush and secure is the most difficult part. Also, handling the large glass panels can be challenging for those who are not familiar with the task, and there is always a chance that you could break them. Installing a shower screen yourself will probably take more time than if you have a professional handle the job. 

Licencing and qualifications

Before hiring a shower screen installer, it is important to check their licencing, qualifications. It would be best to ask for references or pictures of jobs they have done. In Australia, shower screen installation must be done according to building codes and regulations because it is a wet area of the house. 

The installer must follow waterproofing regulations, floor waste regulations, ventilation regulations, electrical regulations, and other local and state regulations that may apply. In most cases, any bathroom renovations must be carried out by someone who has the proper state licence to do it. These requirements differ by state, and you need to make sure that your professional is licenced to work in the state where you live.

Categories
Bathroom & laundry

What to look for in a washing machine

One of the biggest bonuses of having your own home is the luxury of having your own washing machine. After all, it will be one of the most used appliances in the whole house. So regular indeed that you’ll want to make sure the washer you choose can not only handle your needs but suit your style as well.

Washing machine features

Whatever type of washing machine you’ll have, they’ll generally have the same type of features. Basic machines have settings for temperature, levels, and wash cycles; electronic machines might boast more options, including precise settings for temperature, items, and washing. You might also find features like fabric softener dispensers, delayed starts, automatic spin balancing and stainless steel tubs in your washing machine.

So, you’ll have to decide if it’s worth spending extra money on a more advanced option. A more expensive machine will be quieter, and will probably save you some on water and energy – but, of course, it will cost more.

Choosing a washing machine

When you go to pick out a washing machine, you’re going to have to select between a top-loading washing machine and a front-loading washing machine. Additionally, there is the option to buy a washer/dryer, which combines both of these appliances in one machine. 

A front loader washing machine / Source: Gerain Group

Front-loaders

The pros 

  • They are energy efficient and use less water than other machines.
  • Front-loaders take up less storage space as the door opens outward.
  • They are gentler on clothing and other fabrics.

The cons 

  • They are more expensive than top loaders.
  • Once the wash cycle has started, front loaders can’t be opened as the water would spill onto the floor. Any changes or additions will have to wait.

Top-loaders

The pros

  • They’re generally the cheapest type of washing machine on the market.
  • They can be opened during the wash cycle, allowing you to add more clothes or fabric cleaner.
  • They remove more water during the spin cycle, meaning that you will have less drying to do. This will save energy if you’re using a tumble dryer or time if you hang your laundry.

The cons

  • They’re not always the most energy-efficient option, which can cost you money.
  • They take up more space than a front loader, as they open from the top, meaning you will need to keep the space above the machine free of obstructions.

Washer/dryers

The pros 

  • You only need one machine for two tasks, saving you money and space.
  • You can set a load of laundry to wash and dry, meaning you can get the whole job done at once.

The cons 

  • These machines can be considerably more expensive than dedicated washers and dryers.
  • The drying capacity is lower than the washing capacity, meaning you’ll either have to do a half load if you want the whole job done at once or load separately for washing and drying.

To install a washing machine under your sink in Australia, you’ll need a drain hose of the correct size and diameter. It’s best to consult a plumbing expert for installation to ensure that the correct hose is fitted correctly and safely and for your unique needs and setup.

Environmentally friendly options

Reusing your washing machine water

According to surveys, 40 per cent of your water use typically comes from using a washing machine. If so, it makes economic sense to find a useful means of diverting and treating this wastewater for reuse in the home. Here is how it would be done:

  • Step 1: Switch to an eco-friendly laundry detergent and obtain a water tank
  • Step 2: Consult with a plumber. This professional will divert the overflow to the grey water tank on your property.
  • Step 3: The water diverted to the tank is filtered and treated.
  • Step 4: The water is made sanitary and can now be reused for the toilet, house and garage cleaning and in designated areas of the garden.

Contact local plumbers

Waterless washing machines

This type of innovative machine uses very little water to clean clothing. That also means it uses much less energy. In one type, a cartridge is positioned at the back of the machine that holds 20kg of plastic chips. These are dispersed into the load when you need to wash. You will then add a cup of water containing the necessary detergent to the machine. The water will dissolve all of the dirt present and the chips absorb the water. There is no spin or rinse cycle involved in the process. Once it is done, the bottom opens and the chips are collected. This type of cleaning method is capable of removing nearly all stains from clothing, even ones that are considered difficult to clean. The chips last a for about 100 loads. That may be about six months on average. 

Another option to consider uses pressurised air as well as deodorants and negative ions to clean clothing. There are no uses of detergents with this product either.

How often do you need to clean the washing machine?

Washing machine maintenance technicians recommend that you clean your washing machine thoroughly every six months. You can remove all of the hard water, detergent, lint, and germ build-up with a thorough cleaning. You should clean your washing machine more often if you use it almost every day, and less often if you only use it once in a while.

You can avoid bacteria and mould growth if you leave the washing machine door open and allow the air to circulate inside after every wash. This will allow the excess moisture to evaporate and prevent odours and germs from developing.

You should also clean your washing machine if it suddenly develops any odours or if it stops cleaning your clothes as efficiently as it used to. Machines that are not cleaned regularly can develop limescale, which can lead to mould and bacterial growth.

A front loader washing machine / Source: Protek Design

Factory seconds washing machines

A factory seconds washing machine doesn’t qualify as new for many reasons, even though it practically is. A factory second is just a model that was used on the floor, as a demonstration model or for advertisements. Sometimes there are a few aesthetic flaws that disqualify it from being sold as new. Functionally, however, it is as good as a brand-new one, and at a greatly reduced price.

Repairing your washing machine

You may think that replacing your washing machine is the easiest and quickest fix, but this shouldn’t be your first thought. Since washing machines are costly, it may be in your best interest to repair it. In most cases, this is the cheaper option. Additionally, it can be a quick fix due to the fact that appliance repair companies carry a majority of common parts and are usually able to repair your washer within a few hours. Plus, repairing it is a more environmentally friendly option.

Categories
Bathroom & laundry

Designing the ideal laundry

Do you remember the good ‘ol days when you did laundry in the basement or in a tiny room in the back of the house? Those days are over. Now homes have fully equipped laundry rooms with plenty of amenities, storage, and convenience. If you want to renovate a room in your home into a laundry room, read on for our comprehensive guide below.

Ergonomics for the laundry

While ergonomic principles can be helpful in any room, they are especially handy in the laundry. Think about how much time you spend in the laundry sorting clothes, loading and unloading machines, and folding and ironing clothes. Here are some tips to help you make your laundry more ergonomic.

First, arrange the laundry around the most commonly used items, which are the dryer and washing machine. By placing them close together, you can limit how far you have to carry heavy wet clothes from the washer to the dryer. When deciding on their placement, choose a spot where you won’t have to bend over to use them. 

When designing your laundry, don’t forget to include a surface space, such as a benchtop. It should be installed at a comfortable height, so you will have a spot to sort and fold laundry without straining at an uncomfortable level. Consider installing your ironing board so it folds down. Having it in the laundry will eliminate the need to lug the ironing board around and find a spot to open it every time you need to quickly iron something.

Make sure to include bench-top space where possible / Source: Fast Flow Plumbing & Gas

Organisation

Using hampers properly

One of the first things you can do is use hampers. Most of the time, you may only have one hamper for dirty clothes. However, if this is the case, you likely have dirty clothes that need to be sorted before you can even begin with the washing. It may be better to purchase several hampers and spread them out if you have the room. 

Ironing and folding room organisation

Another common problem is having enough space to handle all of the ironing and folding you need to do. If you do this spread out over a couch because you do not have room to do it in the laundry room, it may be time to make a change. Dedicate a specific location in the room for ironing and folding. 

Using shelving

In most areas, you need shelving because of all of the chemicals and supplies you need to have on hand. You may be able to invest in a small cabinet to store these items. If not, install some overhead shelving so you can keep these items safely put away and out of the reach of children.

Managing the garbage

Finally, to completely ensure that the laundry area is properly maintained, install a waste bin. That way, you can throw away all of your cleaning supplies or lint from the clothing right away. You do not want to have to move this rubbish around your home instead.

Choosing appliances

Washing machine

  • Capacity: Choose the capacity and size of a washing machine depending on the amount of washing you do. A smaller machine costs less, but if you end up doing two loads per day, you are wasting electricity, water and your time. For bigger and more frequent washing loads, front-loading washing machines take up less water and are more gentle on your clothes.
  • Features: Today’s washing machines come with all kinds of frills, but only pay for what you really need. You can set the desired water temperature and wash cycles using electronic controls. Sensors automatically set the machine’s wash cycle depending on how dirty and big the wash load is. Delayed start mechanism, automatic load balancing, and containers for bleach and fabric softener are other good-to-have features.
  • Energy Efficiency: Look for the Energy Star rating on the machine to determine how eco-friendly it is. Washing machines with fast spin cycles reduce the drying time, and are more energy-efficient.

Contact local plumbers

Dryer

Dryers of six-kilogramme capacity are the most popular. To choose the right model for you, consider the features available. Electronic controls give you more flexibility in settings with the push of a button. Sensor systems can shut down the dryer as soon as the clothes are sufficiently dry. Condensers prevent the dryer from expelling moisture into your room, and is required in poorly-ventilated apartment homes. 

Iron

  • Steam and spray: Tough wrinkles are easily taken care of by a spray of steam. Check that the capacity of the water receptacle is sufficient for you. If you use tap water, invest in an anti-calc iron that does not allow mineral deposits to clog the steam holes.
  • Non-stick sole: A non-stick coating over an iron’s stainless steel or aluminium sole facilitates ironing, but it needs good care.
  • Cordless irons: Cordless irons offer convenience, but these are ideal only for a few clothes at a time. Higher wattage irons can retain the heat at a constant level.
  • Automatic shut-off: This safety feature is great if you are forgetful, or you multi-task with chores.
Maximise the space you have with clever storage options and appliances / Source: Alice Bonicelli Interior Design

Eco-friendly tips

Non-chemical washing powders

Natural washing powders are easy on the environment. These are made from non-toxic plant matter and minerals, and are free from chlorine bleach, phosphates, petrochemicals and other harmful substances. Even when cleaning your home, use non-chemical cleaning products. Microfibre rags and mops can be used to effectively clean your tiles, floors and countertops, even without the help of detergents.

Using a rainwater tank

Connect the incoming plumbing line of your washing machine, dishwasher and toilets to your rainwater tank. Besides saving on water fit for human consumption, you will also get grants from the government for such eco-friendly initiatives. Water given out by the washing machine cannot be used for drinking or cooking, but it is safe for watering your plants. 

Ideal laundry location

If you are building a new home, you can plan the location of your laundry such that it helps improve the insulation of the rest of your home, which in turn lowers the electricity bills. Since the laundry doesn’t require a controlled temperature, place it along the side of the home facing west or south, if you live in a hot or cold climate respectively.

FAQ

How can you mount a dryer on the wall? 

To mount a dryer on the wall, you’ll need a strong bracket to hold the weight of the dryer. Attach the bracket to a wall stud using screws, and then hook the dryer onto the bracket. Secure the dryer using additional screws or clamps. Follow all manufacturer instructions and safety guidelines before proceeding, and consult a professional if needed.

Categories
Bathroom & laundry

Storage ideas for your bathroom

In your bathroom, the amount of storage space you need is surprising. When renovating a bathroom or building a new one, be sure to address the storage space to ensure that you have enough in the future. This will make the bathroom much easier to navigate as well as more fun. The following are solutions for getting the most out of your bathroom storage.

Plan

Prior to the renovation, utilise the planning stage to design your storage. Consider the items you wish to keep in the bathroom. Although keeping towels and electrical items handy is convenient, make sure the correct ventilation exists so that moisture does not have detrimental effects. It is unsafe to allow electrical components to corrode and towels to form mildew.

Take measurements

Before purchasing bathroom storage, measure your bathroom adequately. Make a small blueprint of your bathroom taking the consideration where your tub sink and toilet is placed. Also, take into consideration how tall your walls are. Storage units don’t have to be floor units, they can be attached to the wall as well. Once you have done this, decide whether you want freestanding or portable storage. Portable storage can be moved around the bathroom when you find it it’s no longer useful in one area. However, built-in storage cannot be moved it becomes a permanent part of the bathroom structure.

Recessed nooks above baths and in showers are ideal for products / Source: Modern Living Constructions

Innovate

Be creative when placing your storage units. Do not only use vanities and medicine cabinets. Instead, utilise the space in your walls and recessed cabinets which will provide additional room without decreasing the floor space of your bathroom. Additionally, placing recessed nooks around the shower will really open up your bathroom.

Use fixtures

Use vanities with many drawers and shelving units with specialised trays that can be opened for quick access. These fixtures are perfect for applying cleansers at night and cosmetics in the morning. There are even modular units that can be customised to your exact requirements, so you remain organised.

Keep an open mindset

If you are lucky enough to have a large bathroom, utilise different forms of storage for visual interest and to create depth. For instance, combining a vanity, recessed cabinets, wall shelving and baskets will open up your bathroom.

Utilise temporary storage

For those who cannot renovate the bathroom, there are additional temporary storage options that can be implemented. Corner shelving units, regular shelving and hanging shelves are excellent temporary storage choices. Additionally, baskets, boxes and a variety of other containers provide exceptional storage options that can be used anywhere and are available in a variety of colours and styles.

Using storage to match your accessories

If you have a lot of plain accessories you might want to try decorative hooks. These can be installed directly into the wall or hung over the bathroom door on the bar.

Contact local bathroom experts

Corner shelves

Corner shelves come with and without doors and may be used to store things such as personal items and linen.

Linen cupboards

If you have enough room in your bathroom to add a 5-foot linen cupboard this might be ideal. Not only can you store most of the things your bathroom in a living covered, but it also makes the bathroom look more attractive.

Floating shelves

Floating shelves are not enclosed, therefore making the perfect opportunity to add character and style to your bathroom. These are the perfect vessel for towels or everyday washing products and can add a unique charm to the room.

Maximise cabinet, shelf and drawers space / Source: KTR Creations

Pull-out storage 

Pull-out storage has been long-used in kitchens – it also works really well in bathrooms. This type of storage is considered hidden and it definitely saves space – it can be built into almost any narrow space. Since most bathroom products are quite small, it provides a perfect and cosy spot for your essentials such as; bottles of nail polish, moisturiser and makeup.
Adequate storage is crucial to the success of any room. Whether you would prefer to have your items and belongings hidden away, or you want to make a statement, these bathroom storage ideas have something for everyone. Feeling inspired to make some storage adjustments? Oneflare can connect you to a professional bathroom renovator in your area to bring your vision to life. Receiving up to three quotes on your job request will also mean you’re able to keep within your budget or get a better idea on what the project may realistically cost.

Categories
Bathroom & laundry

How do modular bathrooms work?

If you’re in the process of adding an extension to your home or even building a new home, you have three main options when it comes to the bathroom. You can either gut your bathroom and start from scratch, have a custom-made bathroom designed, or install a modular bathroom. A modular bathroom is definitely something you may want to consider. It is the most economical solution because it cuts down on construction costs and is mostly maintenance-free. So you may be asking: what is a modular bathroom? Keep reading to find out and see how it may benefit you.  

What are modular bathrooms?

Modular bathrooms are becoming a popular option for bathroom renovations, and it is easy to see why. With modular bathrooms, most of the hard work has been done for you, in a factory or warehouse. Modular bathrooms are shipped in flat boxes and delivered to your home. If you are handy, you may want to install the modular bathroom yourself, but there is always the option to have a technician come out and do the handy work for you. 

Source: Protek Design

Modular bathrooms come in a diverse selection of styles, with a variety of features and designs that allow you to create a bathroom that best suits your family’s unique needs. You can still express your personal style and create some customisations. Some of these options include: 

  • Sizes and Shapes: There are a wide variety of shapes and sizes to choose from including smaller square-shaped suites to larger rectangular spaces. There are even modular bathrooms that allow easy access for disabled family members. 
  • Standard Features: Each modular bathroom comes complete with a toilet, shower, sink basin, and tap.
  • Optional Features: There are many optional features to choose from including a variety of lighting and fans, vanity styles, the option between a sliding or pivoting door, and much more.

Modular bathrooms are designed to make bathroom renovations quick and easy. Shipped in flat boxes that include everything you need to be comfortable in your bathroom, modular bathrooms are a no-hassle, no-stress alternative to the ordinarily time consuming and expensive bathroom makeover. In addition, modular bathrooms are stylish and easy to clean. It is easy to see why so many people are opting for a modular bathroom as opposed to hiring a contractor to rebuild a livable space.

Cost-effective without sacrificing quality

Modular bathrooms are a quality product, and because you don’t have to buy fittings and floor tiles from separate places, replacing any pieces is easy; no more chasing down which store you bought which fitting from, and no more trying to match colours. They’re amazingly versatile, as well; you can select the fittings, colours and size of the bathroom. You can choose the number of entrances your modular bathroom has, and you also have the option of placing the bathroom wherever you want.

Contact local bathroom experts

The installation process

The great thing about modular bathrooms is that they don’t require any preparation work before or tiling after the bathroom is installed. They are complete kits! You may want to hire a handyman if there are some sections that you do not feel comfortable installing, but it is not required. The kits come in flat packs that can fit through doorways or be carried upstairs. To assemble the module, you’ll just need common household tools and then caulk for the seams to make the bathroom watertight. As for plumbing, everything is included in the kit except the external plumbing, which just needs to be hooked up.

Types of outdoor modular bathrooms

Modular bathrooms are so versatile and come in such a variety of styles that there are even options for outdoor bathrooms! This is perfect if you have a pool or tool shed that you spend time in outdoors. Outdoor modular bathrooms are like indoor units, and some of the various configurations include change rooms with showers and toilets for swimming pool areas. Another use for an outdoor modular bathroom could be to simply have an extra bathroom without extending your home.