Categories
Bathroom & laundry

Adding a vanity to your bathroom

No matter how large or small your bathroom is, the vanity should be its centrepiece. An attractive, well-constructed vanity adds the conveniences of a sink basin, as well as cabinet storage and countertop space. Here are some tips for choosing the right vanity for your bathroom.

The basics

The bathroom vanity is simply the area around the sink – the sink fixture and the cabinetry around it. You’ll use it just about every day when you wash your hands, brush your teeth, shave or just get a drink of water. Since you’re going to see and use it all the time, it’s important to get the right design for your bathroom – not just for aesthetic purposes, but for practical ones too.

You’ve got an enormous range of options in choosing a bathroom vanity. You can go big or small, and you can choose from an array of different materials – wood, MDF, or laminates, for example. Go with a moisture-resistant material for the frame that surrounds the sink, since it will definitely encounter some wetness after installation. You have a much wider range of choices when it comes to the benchtop. You can get that made with just about any type of material and in any sort of colour. Choose what best matches the rest of your bathroom.

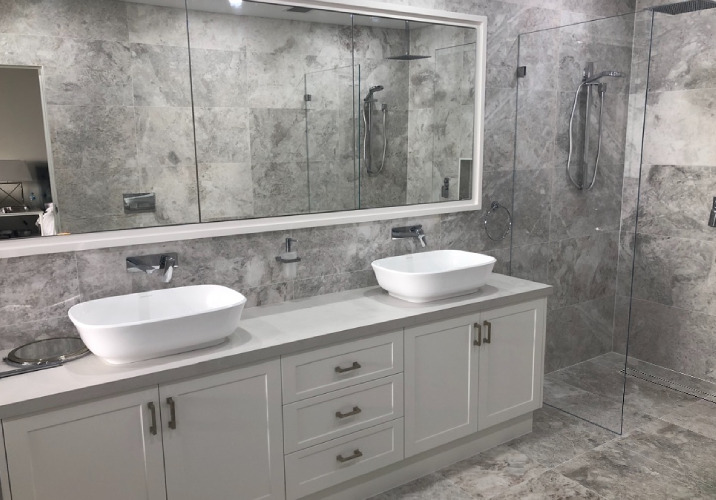
You’ll also want to choose between a single-sink layout and a double-sink layout. Choose the double-sink if you’re concerned about sharing a single sink during those busy mornings or the single-sink layout if you think it’s not going to be that busy!

Source: S.F.D Caringbah

Picking out the right vanity

Like Goldilocks and the porridge, you need to pick out the vanity that is just right for your bathroom. Size is a consideration. The vanity needs to fit into the bathroom, but not seem out of place. It should be big enough to store all of the things you need, but not so gigantic that it overwhelms the rest of the room. Once you’ve got the size sorted out, choose between a single-sink and a double-sink layout, and make sure you have all the storage space you’ll need.

From there, it’s time for the fun part – picking out the vanity’s design. You have to make sure that the design goes with the rest of the bathroom. An ornate, French-styled vanity goes well with a country-like bathroom, while an opulent marble vanity gives a good burst of class to any luxurious bathroom. Choose carefully, and be sure to keep maintenance in the back of your mind – wood vanities are extremely susceptible to rot and require constant monitoring to make sure they don’t decay. 

Contact local bathrooms experts

Features to look for 

Before you start shopping for a bathroom vanity, take a good look at the proportions of your bathroom. Will a rectangular vanity fit best, or should you opt for an oblong shape? Likewise, you’ll also want to prioritise your needs. If you need extra space to store toiletries, medications, cosmetics and hair products, you’ll need to find a vanity that has plenty of storage space and drawers. If you have a large family and your bathroom is a hub of activity in the morning, you might also want to consider getting a vanity with two sink taps.

It’s also a good idea to consider maintenance issues. You may love that benchtop made of exotic hardwoods, but don’t choose it unless you’re willing to do the regular maintenance it will take to keep it oiled and properly cleaned. There are a wide variety of laminate materials that are easier to clean and will look just as good.

Your vanity will more or less set the decorative style for the rest of your bathroom, so if you have a contemporary look, then opt for a streamlined vanity with simple touches. Likewise, if your bathroom is more decorative, you’ll want to choose a more ornate vanity that can be a showpiece for the room.
Source: Illawarra Bathrooms

Beauty in simplicity

Bathroom plumbing is now being routed through the walls rather than underground. You don’t have to hide the plumbing by mounting your toilets and vanities on the floor. Stylish wall-mounted units are now catching on. The older plumbing layout also meant that the space under the counter was fully used up by the sink and its associated pipes. Now, with the plumbing safely out of the way, you can instal actual drawers to the side of the sink instead of making do with drawer facades. These drawers offer ample space to store a number of useful items for convenience and ease of reach. Floor-mounted vanities were also bulky and created the effect of a cramped space. The wall-mounted models look light and trendy, without compromising on the storage capacity inside. They make the bathroom look more spacious, colourful and lively.

By doing a bit of homework and asking for advice from a professional, you’ll be able to find a vanity that is not only aesthetically pleasing but also fits your bathroom — and your budget.

Categories
Bathroom & laundry

Choosing a rain shower head

If you’re trying to conserve more water in your household – a rain shower head may be the solution you’re looking for. Rain shower heads are now more stylish, use less water, and as a result, are more energy efficient. Not to mention they turn a daily ritual into a luxury, adding a touch of resort living into your home. Rain type shower heads have continued to gain popularity in recent years as people become more conscious about water conservation.

How do rain shower heads work?

Rain shower heads conserve water by simply using less. They build pressure inside by having smaller holes and releasing less water.

Earlier shower heads had larger holes for the water to flow through, and therefore used more water. Earlier models were not as efficient, and consumers complained of a ”needle and pin” type of spray. Today’s models feature adjustable heads and can make the water spray finer. They can also add more flow with just a turn of the shower head. Engineers developed a technology called ”Laminar Flow” that forces bigger droplets of water to flow into each other, simulating rain.

Source: Building Boys

Rain Shower Head Styles and Sizes
Rain shower heads are available in several different styles and shapes. They can be rounded, square, or oval, but they are all designed to save water. They all spread the water out over a larger area, giving the sensation of a rain shower. There are ceiling mounted rain type shower heads that are fixed and are pre-adjusted. These come in different styles that are usually dictated by shower choice. They can come customised with stereo systems and LED displays as well. Wall mounted rain shower head units can be adjusted for flow rate and height for taller or shorter people. Handheld heads are also available for those who may need to sit down while taking a shower.

Contact local experts

Installing a rain shower head

Some rain shower heads are available in kits that can be installed by homeowners. These are typically more inexpensive and can be easily attached to the existing shower pipe. If you are considering a complete renovation of an existing bathroom or adding a new one, the options for rain shower heads are wider. Decide what type and where you want it installed before proceeding with the plumbing phase of the bathroom renovation.

If you live in an older house or flat, it may may be time for a shower head upgrade. A rain shower heads help you reduce water consumption and save money.

Categories
Construction Outdoor living

Top ways to improve your driveway

Driveways are one of the first things people see when they arrive on a property. Usually, they go unnoticed. However, they are usually are precursor of what’s to come or what to expect from the house. The saying, first impressions last longest, can very much apply to your driveways introduction to your home. Setting the standard high is very important to onlookers perception and setting the right tone.

So, with this in mind, we are going to give you a few tips and ideas on how to improve the overall look of your driveway.

Tip #1: Fixing general cracks

General surface cracks are really common in driveways over four to five years old. While small cracks aren’t going to ruin your driveway, if not addressed, can lead to a much bigger problem.

The type of cracks a driveway has is do with the materials. For example, if your driveway is made of concrete it will be prone to hairline cracks, for example asphalt. Hairline cracks, are pretty easily sealed over, usually with sealant. Fortunately, this repair job is super cheap and will only take about 20 minutes.

The cracks that you want to be aware of are called, alligator cracks. They get the name alligator cracks because they end up looking like the scales of an alligator. Visually, these look terrible and practically, they can expand and grow over time making your problems ten times worse. Fortunately, they only occur where the asphalt or concrete is weak on your driveway. This means fixing the cracks is really no big deal.

The solution

All you really have to do with these types of cracks are cut out and remove the affected area and re-seal it. Make sure the reseal is the same colour as the surface and that it’s levelled to prevent the replacement looking out of place.

Source: Bullfrog Constructions

Tip #2: Staining your driveway

Staining your driveway is one of the easiest ways to give your driveway a nice new look. This tip is for concrete driveways only. Applying a staining solution pretty much the same as staining a piece of wood.

All you need are the following four things:

  • Broom
  • Paint Roller & Paint Tray
  • Driveway Stain
  • Some Good Weather

We recommend using water-based stains over acid stains because means the better range of colours you can get. Concrete stain is a bit different to paint, as instead of just sitting on the driveway’s surface, the stain permeates into the concrete. This causes the stain to fuse with the concrete rather than just sit on top.

The solution

All you really have to do is sweep off your driveway and make sure there is no rubble, and as little dust as possible. Then, pour your concrete stain into your paint tray and apply the stain to a roller.

Make sure you work backwards from the bottom up to ensure that you are not walking over the work you have already done. Usually, the stain will dry within one day. However, make sure you read the instructions on your stain as all types are different.

Tip #3: Bring in the plant life

Simply putting in some plant life along the sides of your driveway can make a world of difference.

What we have found to make a big difference is placing fresh grass seed along the edges of a driveway. Once this fills in, it should come right up to the edges replacing an area that is typical pretty barren.

For some, the lack of grass on the surrounding edges of your driveway might not even be an issue. But for those that it is, and who are wondering why this is, here is the answer:

If you driveway does not have appropriate drainage channels, water will tend to run off to edges and onto the soil. This water will pool and, over time, erode the surrounding grass. While filling in the grass is not a long-term solution, it can act as a temporary fix.

If you intend to do a bit more heavy-duty garden work, such as planting some trees or thick bushes, be mindful of the root growth. As time goes on, tree and bush roots will burrow underneath your driveway. These can lead to general cracking in the future and eventually undermine the entire driveway.

Contact local landscapers

Tip #4: Lighting

Line the sides of your driveway with some LED lights.

Typically, this is something you want to do while your driveway is being constructed. That way, you can embed them into the concrete or asphalt. This will make the lights and the driveway look one and the same.

But have no fear! If your driveway is already built you can still add some awesome lighting features.

You can pick up some pretty cheap outdoor LED lights from amazon and best of all; they can run on solar power. All you need to do is place them in semi-concealed spot so as to ensure that they still get some sunlight and illuminate your driveway.

Source: S.F.D Caringbah

Tip #5: Pressure wash

This has got to be the cheapest and easiest of all our tips. Simply pressure washing your driveway can take as little as 15 minutes and can make a world of difference.

Over time, your driveway will come into contact with oils and all other manners of stains and dirt. If you don’t already own a pressure washer, head down to your local hardware store and rent one for the day. Washing your driveway will take little to no time at all. A high-quality pressure washer will be able to wash all manner of stains off the surface.

Categories
Pets

5 ways to prepare for a new dog

Life as a dog owner is tough work. Yes, there will be endless cuddles, kisses and games to be played, but the fun can only happen if you look after your dog properly. There are many cases where people will choose to get a dog for the novelty of it without thinking through the responsibility of raising a pooch.

There are several actions that need to be taken before you welcome home a new canine friend. If you can commit to the five following steps, then you should be on-track to provide a dog with a loving home and a happy life.

Choose a breed of dog that suits your lifestyle

A part of making sure that your family is ready to have a dog is to choose a breed of dog that is suited to your lifestyle. There are many different dog breeds, so you need to consider what your current lifestyle is like. What kinds of changes are you willing to make? What changes can you simply not budge on?

Also, consider any special considerations of your family members and your home. Does anyone have any allergies? Do you have a yard for a dog to spend time in or will you take them to the park to stretch their legs? Can you dedicate time to house-train a puppy, or would an older, low-energy dog be a better fit?

Different sized dogs will suit different homes as well. If you have a large yard and enjoy going for walks, a larger dog will be perfectly suited to your home and lifestyle. However, if you live in a small apartment with no yard, a smaller or low-energy dog may be your best option.

Source: Happy Hounds Dog Walking & Pet Sitting

Make your home dog-friendly

Many people think about getting a dog and rarely consider changing anything in the home. But, as well as making your home more comfortable for your new furry friend, a well-designed home can also make it safer for them.

Take a look around your home and look for any potential dangers or hazards. If you’re getting a puppy, your curious friend may look at any electrical cables and wires around the home and think they’re fun to chew on. Even medications and cleaning products can be fatal to your dog if they find them.

You may also want to consider adding pet-friendly features to your home. Built-in feeding bowls that blend into your kitchen, secret entrances just for your pet and beds that are hidden in plain sight will all help to create a special haven for your dog.

Remember, no matter what age your dog is and how much they’re trained, muddy paws and the occasional accident might happen. So, be prepared for any messes and choose dog-friendly furnishings that are durable yet easy on your budget.

Get pet insurance

We never want to think the worst will happen to our pets, but the fact is, accidents and illness can happen. Pet insurance is one way to have that extra peace of mind when owning a dog. This insurance covers essential medical costs in an emergency.

Depending on the type of cover you choose, your pet insurance can help cover the costs of regular healthcare such as teeth cleaning and worming, as well as major treatments when your pet is ill. Certain breeds of dog will also be susceptible to certain health problems, for example, the french bulldog breed which can lead to obstructive airway syndrome in certain individuals. Check on your breed of dog and research any potential health risks they may inherit.

From paralysis ticks to car accidents and serious illness, pet insurance means you can have the confidence to give your pet the best care they need.

Contact local pet groomers

Training your dog or puppy

Often considered but rarely implemented, obedience training should be on the top of your priority list for your new dog. Training will help your dog to be better behaved and will nurture a healthy human-animal relationship. Although some people see a dog as a friend, a part of being a responsible dog owner is making sure your dog is obedient and well-trained.

Training can either be completed by a specialist dog trainer in your local area, or you can train your dog yourself. A dog trainer, however, will have a lot of experience and the know-how to best train your dog in the shortest amount of time.

If you train your dog yourself, allow approximately 15-20 minutes of training time per day for formal training sessions. Each time you interact with your dog, they will be learning from you, so be sure to not let your dog get away with bad behaviour outside of training sessions. Remain calm and focus on teaching your dog commands such as “sit”, “come”, “down”, “stay” and “leave it”. Remember to give your dog plenty of time to learn and soon enough, you’ll improve your communication.

Source: Happy Hounds Dog Walking & Pet Sitting

Commit to daily walks

Just like humans, all dogs require exercise to lead a healthy life. Even with a yard, a dog will rarely exercise on their own; which is when you, as a responsible dog owner, come in.

Dogs need a daily walk for both physical and mental stimulation. They love going outdoors for a chance to engage and smell the environment, as well as to have the chance to socialise with other people and dogs.

A lack of daily walks can lead to destructive chewing and digging, investigative behaviours such as searching through rubbish bins, unruliness and hyperactivity. Daily walks will have positive effects such as keeping your dog agile and limber, help them to build confidence, reduce digestive problems and keep their weight under control.

A happy and healthy addition to the family

Adding a dog companion to your home and family can be hugely rewarding. Although it may seem like a simple process, there is still a lot to consider when getting prepared for your new family member. With the right breed for your circumstances, a well-fitted home and some training, you’ll be able to give your dog the best chance at a happy and healthy life.

Categories
Outdoor living

Top home improvement projects to tackle during summer

Summer is perfect for enjoying the outdoors on warm sunny days. it is also time to tackle those small home improvement projects that you have been putting off all year. These projects do not have to be time consuming or expensive, but they need to be completed so that you can get on with your summer fun. We’ve put together a list of the top home improvement projects that you should tackle during the warmer months!

Outdoor projects 

Outdoor projects are always easier to manage when the weather is warmer and the days are longer and lighter. These projects will help your outdoor spaces be a more enjoyable space to spend your time in.

Clean the swimming pool

Your swimming pool should be serviced and cleaned at the start of the summer months. Your upkeep during the summer season will be much easier as it will require just routine skimming, chemical treatments and vacuuming. Periodic removal of debris after summertime storms may be needed, but you will still have plenty of time for fun in the sun.

Clean out the gutters

Summer can be a risky time for fires, so it is a good idea to clean the gutters on your house of twigs and leaves. This will also keep rainwater from backing up and spilling over into unwanted areas. Call a gutter repair or cleaning service to get an estimate for the initial cleaning and inspection job. You can also do easy spot checks during the summer to keep the rain gutters clear.

Clean sidewalks and driveways

You can rent a pressure washer and blast the driveway to clean the accumulated oil and grime. The sidewalks around your home will really stand out after being washed with high-pressure. The local rental shop can recommend the proper detergent to use on these surfaces. Permanent stains on the driveway can be avoided by doing a yearly cleaning.

Source: Dayelsford Gardens & Lawns

Lawn, shrub and flower bed maintenance

Mowing the lawn and trimming hedgerows during the summer months can be made easier if a maintenance program is in place. In early spring, call a landscape professional to come out and perform needed yearly tasks such as fertilising, pruning and pest control. You will only have to do minor trimming and mowing during summer, leaving more time for you to enjoy your yard.    

Install a drip watering system

If you prefer to spend less time watering your lawn and garden by hand or moving sprinklers around, you may want to consider installing a drip irrigation system. Inexpensive do-it-yourself kits are available and are not difficult to lay in place. You will save money on water bills and have more time to enjoy your summer.

Contact local pool cleaners

Indoor projects

Renovations to the home are best done in the warmer months to avoid making contractors work in cold and wet conditions. Whether it’s a simple extension, addition or renovation to the kitchen or bathroom, it can give the feeling of a refreshed start – to start the year in the right way.

Fresh paint

Fresh paint can make your home look newer, brighter and more open. Summer is the perfect time to paint the interior and exterior of your home because the paint dries faster in dry weather. Summer hues are a good choice for paint colours because they will make your home appear brighter and happier all year. Good summer colour choices include white, yellow, mint and lavender. For more colour ideas, visit your local paint supply store or talk to a professional house painter.

Source: ESTEEM Constructions

Renovate your kitchen

If you have been thinking about renovating your kitchen, summer is the time to do it. The reason why is that you won’t be able to use your kitchen for cooking during the renovation process. During the summer, you can simply barbecue outside. Renovating your kitchen does not need to break the bank – you can make a few small but key changes to completely transform its look and feel.

Pest control

If you haven’t already noticed, warmer months usually tend to attract more bugs and pests around the home. Mosquitoes buzzing around your ear at night and an army of ants in your pantry are not the ideal way to relax during the summertime. Pests are on the rise as the weather warms and it’s important you have yourself and your family covered for the summer. Read more about ways to repel pests in the best way possible.

Categories
Bathroom & laundry

How resurfacing can transform your bathroom

Does your bathroom look like it needs a facelift? If it makes you sigh in defeat instead of pleasure when you look at it, probably so. One option would be to hire a professional to come in, gut it and put it back together. However, if your bathroom is structurally sound, a better and less expensive alternative is to resurface it. Resurfacing can hide and repair chips and stains in a bathtub or sink at a fraction of the cost of replacement.

When resurfacing is the right choice

Before you commit to a larger project, it is best to determine if bathroom resurfacing is enough. In this process, you will apply a new surface agent to the surfaces present. There are many ways you can do this. Some of the areas that you can easily resurface include the following:

  • Wall tiling
  • Cabinets
  • Baths and basins
  • Splashbacks
  • Vanity tops

You should not use this method on flooring, though. Because of the foot traffic these surfaces get, it will be hard to actually see lasting improvement overall. Keep in mind that if you do want to use this process on flooring, a professional should be hired for the job.

There are many instances in which bathroom resurfacing is a better option. Resurfacing your existing bath will only cost about 25% of the cost of installing a new bath. This process still remains one of the most cost-effective options for tiles as well, though you have to factor in labour costs.

Remember that this is also a process that is faster than renovations. In short, you can have the entire job done in a few hours rather than the weeks it will take to renovate the space.

Source: Ryan Linngar Photography

How hard can it be?

Resurfacing a bathtub or ancient bathroom tiles is a totally different experience than painting a wall or installing wallpaper. If you were to resurface a bathtub yourself, you will likely get an ugly, uneven, dishevelled mess and you would have to call a professional to fix your mistake. Rather than wasting your time and energy on this difficult project. You may want to contact an expert right away. Here is a look at why you should leave resurfacing to the professionals instead of doing it yourself. 

What gives bathroom resurfacing a bad name?

What is the difference between a tiled wall that has been painted over by an amateur and a resurfaced wall handled by a professional? When a professional does it, you won’t be able to tell that there is tile underneath. Professional resurfacing provides perfect or near-perfect results, whereas if you did the job yourself you would have a mess, a headache, and a bill for a professional. 

Price, of course, plays a major factor. While many people see DIY as a way to save money, you could actually be spending more money by tackling this by yourself by fixing your mistakes, and there will be mistakes. But aren’t professionals expensive? You could actually be saving yourself money by hiring a professional and having it done right the first time. Not to mention, resurfacing a bathroom is a lot cheaper than a full-fledged bathroom overhaul.

Contact local bathroom resurfacing experts

Not convinced?

If you’re not convinced yet, think about this: when you have your resurfacing done by an expert, the work will come with a warranty. If anything goes wrong within the warranty period, the bathroom resurfacing specialist will fix it for you. If you tackle the job yourself and something goes wrong, you have only yourself to blame. Although warranty periods differ, if you get the job done by the pros, you can expect your tub, sink or tiles to still be looking great for up to 15 years.

When renovation makes the most sense

There are other instances in which bathroom renovation is the best route to take. If you want to move fixtures around or you want to change the entire appearance of the room, this is a good option.

  • You may want to make drastic changes, such as converting your bathroom into a wet room. Renovation is necessary for this instance.
  • You may want to replace the current bathroom fittings, but you may also need to replace the sink or bath in order for the new fittings to work well and look good.
  • Resurfacing will not help when you want to have a brand new look that uses things like glass bathroom tiles or more modern splashbacks.
Source: Buildtech Homes

Hiring a resurfacing expert

Your bathroom resurfacing company should have demonstrated experience and full qualifications. Ask to see certificates for industry-related qualifications and all necessary insurance. Find out how long they have been providing bathroom resurfacing, and ask to see photos and testimonials from their previous clients. Make sure they use accredited bathroom resurfacing products, so you can be sure your resurfaced bathroom will be safe and durable.

Categories
Lighting & electrical

What to consider when it comes to ceiling speakers

Home theatre systems are becoming more popular and more affordable, with Australians paying more attention to the setup of their speakers than ever before. Before home surround sound systems, a TV’s built-in speakers were all people would use when watching TV. A decent stereo system would simply consist of a couple of speakers on the floor and perhaps a subwoofer for a bit of extra bass. Today, however, five speakers is the least you’ll see for any decent surround sound system. The question is, where do all these speakers go? With this thought in mind, let’s consider the benefits of choosing ceiling speakers, rather than regular speaker systems.

Freestanding speakers Vs. built-in speakers

If you are not planning on moving home any time soon, built-in speakers are the best option. Regular floor speakers take up space, no matter how they are set up. To avoid this as much as possible, most people push them into the corners of the room, but this simply leads to reduced sound quality. That means you’ll need to rearrange your furniture to get the best sound possible. In addition, having a host of speakers dotted around the room can make it look cluttered and messy.

Wireless speakers don’t come with these annoyances. However, they don’t completely eliminate the problems of floor or shelf speakers either. The only option you have when completely removing these issues is installing either wall or ceiling speakers.

Why the careful placement of ceiling speakers?

Some might be under the impression that you can just stick your speakers anywhere, and it will be just fine. However, if you want high-quality sound that can be heard equally throughout the room, correct placement is key. Remember, you will be making holes in order to fit your ceiling speakers, so planning in advance is important. Otherwise, your ceiling could end up with some unnecessary extra holes, and speaker cables might need to be cut and/or moved.

Source: Shutterstock

Correct placement of your ceiling speakers

Consider the main, most-popular seating area in the room, and plan around that point. Make sure that you always balance everything out. In other words, your front-left and front-right speakers should be an equal distance from the determined point. The same goes for the rear-left and right speakers. You centre channel speaker needs to be placed in a central position under the TV. The subwoofer should be placed as low to the ground as possible as well as in a central position towards the back of the room. While it is important to place your centre channel speaker and subwoofer in the correct positions, the real trick is getting those ceiling speakers right. Be advised that, once they are fitted, it is unlikely that you will be able to move them around other than slightly within their housings.

Inspect your ceiling first

Before going ahead and making holes, you must inspect your ceiling properly. Make sure that there are no objects, such as beams, in your way. Such objects will cause an obstruction, so you will have to work around them and place your speakers in the next best location.

Choosing speaker mounts

When choosing speaker mounts, there are several things that you need to consider. First of all, do you want to drill holes in the ceilings? If this is not a problem for you, ceiling mounts are ideal. If, however, you don’t want to drill holes, or you can’t because you are renting, speaker stands are usually best.

You also need to consider whether you are likely to rearrange the furniture in the room at any time. This is important because getting the most out of your speakers and their position will involve you sitting in the right place. If, for example, you change where you sit, you will need to adjust the position of all of the speakers to optimise the sound from the cinema system. It isn’t a problem If you are using floor stands, but it certainly is if you have mounted stands on the ceilings.

Let’s not forget that it is also possible to mix floor mounts with ceiling mounts. For example, you could use mounts for your front speakers and then speaker stands for the surround sound speakers. It really comes down to personal preference and whether you want to use one type of mount or another or a combination of both to achieve the best sound possible.

Contact local electricians

The benefits of wall speakers 

The only downside of ceiling speakers relates to the sound they deliver when compared to wall-mounted speakers. This is because:

  • The main speakers are directional. Wall-mounted speakers are easier on the ears because they mimic the areas that sound actually reaches our ears in real life. We are not used to hearing sounds coming from above us, so this can take time to adjust to. However, some new models have begun to address this issue to produce sounds that are more realistic.
  • The subwoofer is omni-directional, meaning that the bass pulses travel all around the room. Many people will say that ceiling subwoofers will reduce sound quality, although this can be overcome by simply having the subwoofer on the floor, with the other speakers on the ceiling.

A good home theatre system is not complete without a good set of speakers. If you aren’t happy with your current freestanding speakers, consider getting some ceiling or wall speakers installed. If you want to save space, ceiling speakers may well be your best option.

Categories
Heating & cooling

What does a dehumidifier do?

You absolutely need to be comfortable within your own home, and one way to ensure extreme discomfort is to have a home that is too humid. It feels lousy, and you’re also opening up your abode to some very harmful things. Humidity creates a moisture-laden home that could bring about a horribly unhealthy environment. It could lead to plenty of mould and other harmful allergens throughout the whole house. So, how do you combat this humidity? The easiest way is to invest in a good, strong dehumidifier. A good dehumidifier will take out all of the excess moisture in the air, making the whole home more comfortable and safer for anyone living there.

The benefits of a dehumidifier

They get rid of mould and musty odours

An excessively humid home can promote the growth of mildew and mould, which will end up emitting an unsavoury musty smell. Mould and mildew thrive in wet environments, and the smell is not easy to eradicate if you do not tackle the source of the dampness. A dehumidifier is beneficial in the sense that it removes the excess moisture from the air, which stops the growth of mould and mildew and eliminates the nasty musty smell. Mould and mildew can also be detrimental to your respiratory health, so using a dehumidifier can help prevent illness.

They promote the longevity of your home contents

Dehumidifiers help protect your home’s contents from the effects of excessive moisture. They also promote the longevity of items, such as clothing, books, food and shoes. These items will also never smell musty as a result. A dehumidifier will also prevent household pests, such as silverfish, from thriving, which helps protect your books and clothing.

Changing the water out of a dehumidifier / Shutterstock

They help enhance your health

A humid environment is not very conducive for those who are prone to airborne allergies and asthma. A dehumidifier would therefore come in very handy, as they promote temperature stability. Dehumidifiers also have the added benefit of including a filter that assists in eradicating air pollutants, such as dust, mould spores and pollen. This promotes a healthier indoor environment for you. Dust mites are also reduced within the home since they can only thrive in humid environments. This can help reduce allergic reactions and asthma attacks.

They are beneficial for drying clothes

Dehumidifiers are ideal when it rains and you are unable to hang your clothes outside to dry or if you prefer not to use a dryer. All you need to do to dry your clothes in record speed is secure them on a drying rack in close proximity to the dehumidifier. Another added advantage is that your wet clothes would not be adding to your home’s humidity. Dehumidifiers are also able to dry clothes overnight, and they are also more energy-efficient than dryers since they use less power. This means you’ll have lower electricity bills, which also makes dehumidifiers a cost-effective choice.

Types of portable dehumidifiers

Absorbent

For small areas that require the removal of moisture, an absorbent dehumidifier is an ideal option. For instance, the Hippos you observe in department stores, hardware stores and supermarkets are containers that hold absorbent material like silica gel. This material absorbs the moisture in the air and pushes the water down to a collection area. Once it is full, you simply dispose of the excess water. This is ideal in cupboards and closets. For smaller areas, utilise sachets or silica gel, which will help mitigate mould.

Refrigerant

By drawing warm, moist air from the room, a refrigerant dehumidifier runs the air through several coils that have been cooled and returns dry air to the environment. This process is extremely effective because the warm air meets the cold coils, resulting in condensation. This water then drips into a bucket, which must be periodically emptied. Another option is for the excess water to drain through a special tube. These dehumidifiers are available in a variety of sizes to fit any room and can be easily moved. Additionally, for extra-moist areas, several can be run simultaneously.

Desiccant

Similar to refrigerant dehumidifiers, this equipment sucks warm, moist air and also expels dry air. The difference is that as opposed to removing the moisture-utilizing cold coils, there is a bed of desiccants inside, which absorb the moisture. The excess water is then drained into a bucket, which must be emptied. Similarly, the other option is a special tube that drains directly outside. Additionally, these are available in a variety of sizes and can easily be moved and paired with other dehumidifiers.

Dehumidifiers can be small and compact / Source: Shutterstock

Finding the right dehumidifier for your house

The first thing you should do is examine the layout of your house so you can pick out just the right type of dehumidifier. Examine the space where you’re going to put in the dehumidifier. Take into account how big or how small the space is, how much average humidity is in the space, and how much you use the room. If you have a smaller room you’d like to make more comfortable, there’s no need to pick up a gigantic dehumidifier – and vice versa. Check-in on the specifications on every dehumidifier. Look at the capacity first. Your average dehumidifier for a one- or two-bedroom home should be able to take out 10 litres of water from the air every day, while ones designed for bigger houses need at least double that capacity. Next, look at how much noise the dehumidifier will produce. If you have it in an area where you’re constantly working, louder dehumidifiers might quickly become annoying. 

You also want to look for a home dehumidifier that is easily transportable. Try to avoid the super-heavy ones, and look for dehumidifiers that can be moved from one room to another. You should also definitely invest in a dehumidifier that has a device called a ”humidistat” This device automatically adjusts the levels, so you’re not constantly turning the dehumidifier up and down. 

Climate considerations

Where you live also plays a part in choosing the right type of dehumidifier. The wetter the area you live in, the more powerful your dehumidifier should be, as there’s that much more moisture that needs to be removed from the air. If your climate is a more temperate one, you might want to get a smaller, more portable dehumidifier that can easily be moved from one room to another. That’s all you should need. If you have any questions about the capacity of the dehumidifier, ask a local expert at a home-supply store. They should be able to give you all the information you need.

Categories
Heating & cooling

A guide to air conditioners

As the summer arrives, a lot of people flock to stores to buy new air conditioners. If you are in need of one, all you need to know about purchasing an air conditioner is mentioned in this guide. There are air conditioners on the market to suit every budget and need. Read ahead to select the one that is perfect for you.

Air conditioning options

Air conditioners are available in a range of styles. Mentioned below are the main types:

  • Portable air conditioners: Portable air conditioners can be moved from one room to the next as per your requirement after installation. Though ideal for people who move a lot, portable air conditioners are not the most efficient and can be quite noisy.
  • Window air conditioners: These are installed in a window opening in the wall and are suitable for cooling small areas in your home.
  • Split systems: Split systems have two main components. One is the wall unit that is installed indoors and the other is the condensing unit that is located outside the home. Split systems are efficient and are available as reverse-cycle units. This means they can be used as a heater during the winter and as an air conditioner during the summer.
  • Ducted air conditioners: These are also available as reverse-cycle systems and have an option of being zoned. This allows you to cool certain areas of your home and is presently the most expensive option.

Where to place it

If you do not have a current system in your home, the first step will be to consider the placement of the unit. The first component is the exterior portion. Place it outside of the home, in a place where it does not take away from the overall aesthetics of the home and is not too loud. You are likely going to want to speak to your neighbours about placement as well. Most systems can run fairly loudly, which means you will need to consider proper placement the first time you instal it or you could be dealing with complaints about the noise.

Source: Valuez

Conditioning Efficiency

Select an air conditioner that is very efficient and that gives you maximum cooling per unit of power consumed. A good way to confirm this is to check the label of the air conditioner to see how much power it consumes. A unit that has variable speed settings adjusts the output of the air conditioner according to the temperature of the room. This is efficient because the room stays more consistent in temperature and the cost in maintaining the temperature is also reduced.

How to save money using an air conditioner

Make sure you have the right air conditioner

The first – and most essential – way to save money on air conditioning is also the simplest. You just have to make sure that you have the right type of air conditioner for your home. That means you need to find one that is the ideal size for the rooms you need to be cooled. Take into consideration all of the essential factors of the rooms – how hot they get, which direction they face, what people will be residing in them, and so on. If you put a small air conditioner in a large room (and vice versa), you’re not going to be getting all the coolness you need. Also, check the energy star rating on the air conditioner, and only look for one with a big number of stars. 

Contact local air conditioner experts

Clean your air conditioner and install insulation

Once you pick out your air conditioner, you need to perform regular maintenance on it. Change and clean the filters, and make sure the whole unit is sparkling clean. Doing this will ensure that the air conditioner will perform at peak efficiency. Additionally, you need to take a look at the insulation you have in your house. The more insulation you have, the less you’ll have to have the air conditioner on. Make sure that all of your insulation has a high ”R” rating before you put it in – you’ll be able to cut down the temperature by several degrees if you get the right type installed in the house. 

Use natural methods to cool your house

There are also several simple things you can do to cool down that don’t even involve the air conditioner. Shut the doors and turn all the lights off – you’ll be surprised at how far that goes. You can also do things like instal a verandah to help deflect sunlight, put double-glazed windows in, plant trees and shrubbery to create shade, instal ceiling fans or paint your home in lighter colours. Do all of these little things, and you’ll see big savings on your bill. 

An outdoor unit / Source: Seeto & Sons Air Conditioning

Selecting a professional installer

You could instal components of the air conditioning system yourself. However, because this is a complex system and requires expertise, it is best to turn to a professional installer instead. The right professional makes a big difference. If you choose one that isn’t as skilled, you could end up with a system that is hard to use, does not work properly, or may not be as efficient as it should be.

Look for a professional who has proper licensing and certification. He or she should have experience as well. You will also want to ensure that this provider has insurance to protect you from mistakes. Once you do this, do not just hire the first person you see. Rather, request a quote for service instead. It is a good idea to select a professional who offers a fair price for the service, but who also has outstanding references (people you can actually speak with) as well. This can help you feel comfortable allowing this person to do the work for you

Categories
Walls & flooring

How to tile a wall

Kitchen and bathroom wall tiles are a durable, long-lasting, aesthetically appealing option for DIY projects. Once you learn how to tile and get to know some basic tiling tips and tricks, laying tile can be a fun, inexpensive DIY project that enhances your home’s appearance. Once you learn how to tile a bathroom or kitchen, there are many kitchen and bathroom wall tile ideas you can try that improve the feel, function and value of your home. Tiles come in so many styles and colours, meaning your design options are endless.

How long does it take to tile a room?

Several factors determine how long it takes to tile a room. The room size, type and style of tiles used, and the complexity of the design you want to create all play a role in determining how long tiling a room takes. Additionally, whether you have experience tiling or not will affect the time it will take to complete a project. It will take most people a couple of days to complete a tiling job due to the preparation and drying time required.

Tiles make a great splash back for kitchens / Source: Aahil Tiling and Stones

Materials and tools

There are several tools you will need when retiling a bathroom or kitchen wall, floor or counter. They include:

  • Bucket
  • Sponge
  • Spirit level
  • Tape measure
  • Pencil
  • Tile levelling support 
  • Tile cutter – almost every tiling job will require cutting some tiles to size and shape you need.
  • Adhesive mixer
  • Tile nippers – this is a hand tool used to cut off small pieces of tile so they fit in tight spaces.
  • Cross spacers – cross-shaped tile spacers are used to ensure the tiles are placed an equal distance apart. Tile spacers help keep grout line straight and give tile work a professional-looking finish. 
  • Notched trowel for wall and floor tiles – this lets you control small amounts and thickness of the adhesive attaching the tile to
  •  the wall or floor will be.
  • Small gauging trowel – Use for mixing small amounts of quick-setting drywall compound or mortar.
  • Grout float – This is used for spreading and pressing grout between the tiles.
  • Angle grinder and a diamond cutting blade – This is used to grind or cut angles into the tile to fit into odd-shaped spaces.
  • Drill and diamond-tipped drill bit
  • Tile wet saw

How many tiles do I need?

To calculate the number of tiles you for the job, measure the length and width of the area you will be tiling. Multiplying those numbers by each other give you the area’s square meterage. Add 15% to cover cuts, waste and broken tiles. Divide the area’s total square metres by the square metres covered by the tiles in a box of the tiles you choose. This will tell you how many tiles you need. 

How to tile a wall

  1. Prepare the surface: clean the surface thoroughly. Remove any adhesives or coatings and ensure the wall, floor, or countertop is smooth. 
  2. Make measurements and markings: measure the wall to be tiled. Place a tile at the top of the wall and put a mark directly underneath it. Then place another tile below the mark and draw a line on the wall where it ends. Repeat this process until you get to the bottom of the wall. If the space between the last row of tiles and the floor is too small for a full tile, measure the distance. That’s the size to which you will have to cut the last row of tiles.
  3. Prepare the tile glue: whether you are using a pre-mixed paste adhesive or a cement-based tile adhesive, follow the instructions for preparing it outlined on the package. This ensures the tile will remain firmly affixed to the wall. 
  4. Lay the first row: thoroughly cover the back of a tile with adhesive and push it into the wall’s top left-hand corner. Make sure it is straight and lines up with the mark and the grid pattern you made on the wall.
  5. Check it is level: using a spirit level is a fast, simple and easy way to ensure each of the tiles you install is straight and level. Simply hold the spirit level up against the bottom of the tile.
  6. Continue laying rows: once you are sure your first row of tiles is straight and level, put in tile spacers and match each new tile to the one above it. The tile spacers will keep an even space between each row of tiles. 
  7. Cut and lay the corner tiles: Draw the cut lines on top of the tile and then cut off the excess with the tile cutter. Do a dry fit with the tile. Using a notched trowel, thoroughly butter the tile’s bottom with a thin set of the adhesive and press it into place.

Contact local tiling experts

How to grout a tile wall

Put a little water and some grout powder in a clean bucket and mix it until it has toothpaste consistency. Use a grout float to the spread the grout on the tiles in a diagonal motion. Make sure all the joints are filled with grout. When the grout starts to set, use a damp sponge to clean the tiles’ excess grout. 

How to tile over electrical outlets

When installing tiles over electrical outlets, turn off the outlet’s power. Outline the electrical outlet’s exact size and shape on the tile with a pencil using a tape measure. Use a clamp to fasten the tile on to a piece of plywood. Using a drill with a diamond-coated bit, drill a hole on each of the 4 corners of the lines drawn on the tile. Using a saw, plunge cut from one hole to the next. Remove the cut section of tile. Use tile nippers to clean off and smoothen all rough areas. Add adhesive to the cut tile, put it in place over the electrical outlet and let it dry.

A tiled feature wall in a shower / Source: Mrg Tiling

Can you tile over tile?

You can put new tiles over old ones to save time, money and hassles when retiling. However, don’t do so if the existing tiles are loose, lifting, damaged, or uneven. Even if you have the best tiles for bathroom walls, the new tiles will have all of the same problems. Plus, they may not adhere properly to the old tiles, and the added height can prevent cupboards and doors from opening and closing correctly. 

How to hire a tiler

Tiling a wall or an entire room can take some time and requires a lot of attention to ensure it is straight and neat. It might be worth your time to hire a professional tiler to get the job done to make sure the finished product is of high quality.

Licencing and qualifications

When hiring a tiler, make sure to research that they are properly licenced and qualified. It’s also a good idea to ask friends and relatives for some local tilers’ names with whose work they are familiar and impressed.