Right now, people are trying to design their homes as eco-friendly as possible. Not only does it help reduce your impact on the planet, but it also can help save your household money in the long run. So, if you’re moving into a new home or you’ve decided to renovate, it’s the perfect time to consider going green. Here, we’ll take you through the main features you can add to make your home eco friendly.
Why build an eco-friendly, sustainable home?
It’s more cost effective and easier to build an eco-friendly home costs a than renovating an existing one. However, there are still many changes and updates you can do to make an existing home more sustainable. Benefits of an eco-friendly home include:
Lower utility bills.
Your lifestyle actually contributes to make the environment better, helping to minimise the production of greenhouse gasses and carbon dioxide in your home.
Better flow of air around your home
Low maintenance home
Features of an eco-friendly home
Bamboo flooring
Wood is one of the most popular flooring materials in modern homes. However, the problem with wood, at least as far as flooring goes, is that it isn’t a particularly renewable material. It takes years and years for new forests to grow, and deforestation is a key issue facing our planet today. On the other hand, bamboo grows pretty quickly and makes a great flooring material as well. Therefore, instead of going for traditional wood flooring, going for bamboo is a great move if you want to design your home in an eco-friendly fashion. You can also consider using bamboo for your cabinets and countertops.
Use recycled or sustainable materials
Most of us buy furniture in retail stores. However, companies that make that furniture usually don’t care too much about the effect their work has on the environment. Take a look at it this way – almost all readymade furniture is made of particle board which is one of the least durable board products out there. On the other hand, if you decide to turn to experts who make custom furniture, you can ask them to provide you with furniture made out of sustainable materials. On top of that, if you turn to local experts, you’ll also be reducing transportation waste. This option can be expensive, so as an alternative aim to look for local suppliers who sustainably source their material.
Where possible, use locally sourced and sustainabe furniture and materials / Source: Ryan Linnegar Photography
This methodology of sourcing sustainable or recycled products should be applied across your entire home – especially when it comes to building materials.
Plant life
No matter if you’re renovating or designing your new home, you’ll always be looking for ways to decorate it. While paintings and beautiful lampshades are something you can always go for, you might also want to think decorating with plants. Plants can filter air in your home, getting rid of any harmful chemicals from it. Moreover, these can help you reduce noise and stress. Of course, there are plenty of amazing potted plants that are guaranteed to add some style to your home.
For bonus sustainability points, consider planting a veggie or herb garden so you can grow your own food.
Led lights
Chances are you’ve already heard that LED lights are an absolute must when going eco-friendly. LED bulbs make a great option since they both last longer and use less energy than traditional bulbs. In fact, according to recent reports, by switching to LED lights, you could actually end up saving about 20% on your energy bill. Of course, with everyone going for LED lights, you can now find these in almost any shape or colour. This makes LEDs a perfect option for spaces like pool areas and kids’ rooms.
Use sunlight
Where possible, install solar panels to make use of the sun’s energy for your heating, cooling and lighting. Solar is a sustainable energy source, and will also save you money in the long run.
Another great way to make your home green is to let in as much sunlight as possible. This will both reduce your energy bill and reduce your carbon footprint. Also, if there are any small rooms in your home, sunlight is always going to help you make them look larger. One of the best ways to let sunlight in is to install a few extra double-glazed windows. If you opt for these, you’ll use your cooling and heating equipment less and thus reduce your energy bill even more.
Harness sunlight in your home as a sustainable source of energy, heat & light / Source: Source Architects Pty Ltd
Making your kitchen eco-friendly
There are plenty of ways to make their kitchens green. Firstly, as we’ve already mentioned, you can use materials such as bamboo for your kitchen cabinets and countertops. Here are a few other ideas for making your kitchen eco-friendly:
Start a compost to reduce your biodegradable kitchen waste and improve the sustainability of your home and zero-waste living
Install a rainwater tank
Use recycled glass for your splash-back – as opposed to the standard glass or quartz
Making your bathroom eco-friendly
The bathroom can be one of the most non-environmentally friendly rooms in a house because of high water use, chemical cleaners and other issues. Your bathroom, however, doesn’t have to be harmful to the environment with these environmentally friendly ideas.
Ditch the chemicals
Many bathroom cleaners contain bleach and other chemicals that are bad for the environment and your health. Opt for natural, organic cleaners instead. Even many regular supermarkets now have “green” cleaners that use orange oil, tea tree, lavender and baking soda to clean, disinfect and freshen your bathroom. You should also steer clear of pesticides by purchasing organic towels, wash cloths and bath robes.
Hire a green plumber
Hire a green plumber to make your bathroom use less water. A green plumber can inspect your plumbing and fix any leaks that are wasting water. In addition, a green plumber can install a grey water system that uses your sink, shower and laundry water to flush the toilet.
Water efficient fixtures
Your toilet, sink faucets and shower heads release a lot of water. You can reduce your water usage by installing low-flow toilets, sink faucets and shower heads. These low flow fixtures work just as good as their water wasting counterparts, they’re just kinder on your pocket book (because your water bill will be cheaper) and more friendly to the environment. You can probably instal the sink faucets and shower heads yourself if you’re handy, but you might want to hire a plumber to instal the toilet.
Solar water heating
Solar powered water heaters are a great way to reduce your energy consumption. If you live in an area that doesn’t get a lot of sun, you can instal a battery backup or gas powered backup to heat your water on overcast days.
While energy costs rise each year and scientists grow more concerned over the effects of greenhouse gases, Australians continue to search for sources of alternative energy. One source that has been here all along is gas. Liquid propane and natural gas are both clean-burning and relatively inexpensive. These fuels are efficient and can power several different appliances in the home.
Gas appliance types
Type-A appliances are gas appliances that have an approval badge from the Australia Gas Association, meaning they are safe to use in the home. Australians use several different kinds around the house including:
Gas cooktops
Gas refrigerators
Gas ovens
Gas water systems
Gas air conditioners
Gas heaters
Gas cook-tops
These are the most widely utilised gas appliances in Australia and have been used for many years. They are a favourite due to the ability to raise or lower surface heat quickly and adjust the flame with complete control.
These work by using ammonia as a coolant and heat from the gas to power the cycle. Previously used in caravans, this system is becoming more popular with Australian homeowners due to the efficiency of the process.
Gas ovens
Gas ovens were commonly used years ago. They’re cheaper to use compared to electric ovens, especially if you’ll be baking for a long while. This is because gas is more affordable compared to electricity. It also does not require so much energy to start up and run. Aside from that, you’ll get exact temperatures with gas ovens. This allows you to have full control when you are cooking or baking. Adjusting the temperature is also easy with gas ovens. It can be quick and ensures that the dish is properly cooked depending on your preference. They are also easy to clean and maintain. You just have to wipe the grills after using them.
There are two types of gas ovens: the fan-assisted and one without a fan. Gas ovens that are fan-assisted can cook food faster. However, there are times when the fire gets concentrated on the top. Youll need to rotate the food every now and then in order to cook it evenly and well. Those without fans, on the other hand, are great for roasting, baking cakes, and cooking casseroles. They do not dry out the food so much.
Gas water systems
A gas-powered water heating system is designed to heat water only when it’s needed. It operates by channelling cold water through a specially-designed heat exchanger that turns on the gas burner, which in turn heats the water. These systems are available in three sizes that are determined by the flow rate, which is the amount of water that filters through the system every minute. Typically, a two-bathroom house will use approximately 24 litres per minute, while a larger family will use more.
Contact local gas experts
Advantages
Because this type of hot water system works on demand, you’ll always have hot water in an instant, whenever you need it, and you won’t need a storage tank for unused water. Another advantage is that this type of system is extremely compact and can be mounted on a wall or placed inside a cupboard.
A gas-powered water heating system is less expensive to run than an electric system, mostly due to its ergonomic design. Youll be able to save money on your utility bills every month and best of all, you’ll only be paying for heated water that you use.
Safety
A gas-powered water heating system is extremely safe for family use. Because there’s no storage tank involved, you never have to worry about leaks or hot water overflowing. In addition, you don’t have to be concerned about children or pets getting their fingers burned on a tank’s boiling hot exterior.
Another advantage is that you can set the water temperature yourself by merely using the taps. For instance, you can use the hot taps in the laundry room when you want extra hot water, and you can likewise use the tap to make water temperatures cooler in the bathroom. By having this level of control, you’ll be better able to prevent accidental burns and scaldings from happening.
There are several ways that gas hot water systems prove more energy efficient.
They recover heat faster, requiring less energy.
They use a smaller storage tank, making them more efficient to run.
They produce fewer emissions and greenhouse gases.
Gas appliances cons to consider
Although gas appliances are more energy-efficient, they can also be dangerous if installed incorrectly. Licenses are required for contractors who install them. They tend to cost more to run than electric appliances, but they also last considerably longer. Gas is also not always available directly from the street in most areas in Australia like electricity is.
French provincial style originated from, as the name suggests, various provinces in France during the 1700’s. People in Bordeaux, Brittany, Normandy and Provence began to incorporate the opulence of chateaux and estates into their own homes, with the style now being known for its warmth and elegance.
Key components of the French provincial style include marble, wrought iron, carved or rustic timber, stone and lightly distressed materials, mirroring the materials found in French villages. French provincial style can be considered feminine, favouring muted, soft colours and textured fabrics. However, the style avoids gaudiness, opting for sophistication instead.
Soft, high-quality linen and textiles are a hallmark of the French provincial style. If you can, opt for authentic French linen, as it’s guaranteed to be a worthwhile investment. French provincial textiles will often give off a “romantic” feeling, but try to avoid excessive frills and ruffles.
Muted colours
French provincial style is synonymous with muted colours like ivory, taupe, sage and other natural tones, with black even being incorporated into many French provincial homes. This colour palette will instantly create a warm and soft environment that embodies the atmosphere of the French countryside.
Statement furniture
Although French provincial style places an emphasis on subtlety, the furniture pieces are always prominent and commanding. Perhaps one of the best areas of the home to express the French provincial style is the bedroom. After all, no other area of the home is better suited to luxury, opulence and comfort than the bedroom. For this, invest in a French provincial bed as the statement piece in the room.
Eye for detail
Although showcase furniture items are key in the French provincial style, nuanced ornate moulding is also considered highly. This means fireplaces, walls, skirting boards or cornices with decorative details are preferred over bold prints and artworks. Furniture and cabinetry also tend to feature striking elements, which help to create an authentic vintage look.
Attention to detail is also important beyond just the furniture, with the French believing that everything in the home should be beautiful. Expect to find fresh flowers and thoughtful touches added to side tables throughout the home.
Wallpaper
Wallpaper is something you can choose to skip if you like how your walls look currently, but can be used to great effect when added to a French provincial style home. A faded fleur-de-lis or damask pattern, stripes or even country scenes can all add a creative touch to your home, but remember that subtlety is key.
Like the colour scheme, shapes and lines are also soft in French provincial style. A distinctive feature of French provincial furniture are the curved legs, which provide a sense of elegance and femininity. French provincial chairs with curved, carved legs are particularly popular pieces.
Tasteful lighting
Lighting is an element that is sometimes overlooked when decorating a space. Wrought iron scones, brass lamps and those capped with glass or fabric lampshades will all bring a touch of the French countryside to your home. The most complementary of all lighting options, however, has to be the classic chandelier. Opt for a statement chandelier that will be the dazzling centre of your room when lit up. Also make sure to dot candles around the home for a constant sense of warmth.
Continuity
If adopting the French provincial style, ensure that each of your rooms tie together cohesively. Having just one room decorated in the style will look jarring and unsophisticated. Mix old and new items throughout the home to seamlessly blend the vintage style into the modern world.
Contact local interior designers
A touch of the rustic
Of course, the French provincial style is not all about pomp and circumstance. Integrating rustic elements allows you to honour the rural origin of the style while allowing for a more natural look. Try incorporating stone, metal (particularly wrought-iron), timber and distressed painted furnishings to add interest while complementing the overall style.
Be eclectic, not matchy-matchy
Your home should not look like it’s been taken out of a furniture catalogue. Naturally curate items over time, as opposed to buying all the items from a vintage replica furniture store at once. Mismatched yet complementary items add the sense authenticity and merry happen chance evoked by the French provincial style.
Exposed aggregate concrete, also known as pebblecrete, is concrete that has stones or pebbles set into its surface. When this type of concrete is used for a driveway, it creates a durable, non-skid surface. It can withstand lots of heavy snow, rain and ice, blazing hot direct sunlight and any other type of extreme weather. An exposed concrete driveway made with aggregates lasts for years, and it requires very little maintenance. Property owners who want an array of colour choices for their driveways would benefit from the options available with exposed aggregate concrete.
Benefits of an exposed aggregate concrete driveway?
Durable
An exposed aggregate driveway is durable enough to handle years of regular automobile traffic without showing tire marks or falling apart because of the vehicles’ weight.
Watertight
Exposed aggregate driveways have been a popular choice in Australia since the 1960s because they are watertight and rain, snow and ice cannot penetrate their surface.
Resistant to temperature changes
Another reason property owners in Australia choose an aggregate concrete driveway is its ability to withstand dramatic temperature changes and not fall apart.
Better grip
Many Australians who have steep driveways choose this type of pebbled concrete because its texture gives vehicles improved traction.
More visually appealing than regular concrete
The different types of textures, colours and effects this pebbled concrete can create are plentiful. They include a glossy quartz finish or coloured glass in chic neutrals, rose pink, emerald green and other bold hues and aesthetic options.
An exposed concrete driveway / Source: GCM Concrete
Is exposed aggregate concrete more expensive than standard concrete?
A square metre of standard concrete costs between $60 and $85 to install. The cost of a square metre of exposed aggregate concrete is between $100 and $150 to install. But the exposed aggregate concrete often ends up being better value for money in the long run. Its installation costs are higher; however, its maintenance costs are lower. Plus, pebblecrete is more versatile, durable, stylish, attractive, maintenance-free, stain resistant, watertight and highly decorative than standard concrete. As such, it adds more value to your property. It’s colourful, improves traction, has a unique texture, is more aesthetically pleasing and can last for as long as 40 years.
How is an exposed aggregate concrete driveway created?
Creating an aggregate concrete driveway is a relatively simple process. It would help if you had a few supplies, including:
Cement
Aggregate
Trowels
Wood or aluminium framing material
Good hose and water supply
Buckets for pebbles
Broom with medium firm bristles
Edging tool
Step-by-step guide
Prepare and frame the area into which the aggregate cement driveway is to be poured.
Mix and pour the concrete. Make sure the concrete is firm enough so the pebbles you add won’t sink.
Use the trowel to level and smoothen the concrete.
Seed the soft but firm concrete with multicoloured pebbles.
Press the pebbles into the concrete to the depth you want using the trowel to keep the surface flat
Give the concrete about 8 hours or so to firm up and set. When the concrete does not stick to your hand when you touch it, then it’s set and ready for the next step.
Use your water hose and the broom to gently remove the top layer of concrete and expose the pebbles in the aggregate. Keep the brushing light and the water to a minimum as not to dislodge the pebbles.
Apply a finish coating to seal the concrete and let the concrete aggregate cure for a month or so before you begin using the driveway. This ‘locks in’ the pebbles and makes the surface a lot stronger. This type of exposed concrete driveway not only looks great and can last for years, but it can also increase the value of your property.
Contact local concreting experts
Who would benefit from an exposed aggregate concrete driveway?
A pebblecrete driveway can benefit any homeowner who is looking for a walkway, driveway, another surface that’s durable, long-lasting and has unique designs. People choose exposed aggregate concrete because it is highly customizable, can create subtle or bold effects that are distinct and come in many textures and colours. It is a versatile aesthetic option that’s bound together with concrete that can be tinted, so it matches any property. Chunks of polished glass can be put in the aggregate to add in luminescence and make an elegant design statement. Plus, aggregate reduces concrete’s susceptibility to spalling and makes it more robust and able to withstand dramatic temperature changes. A pebbled concrete driveway can also help to improve traction in humid and wet conditions.
Exposed aggregate concrete can also be used for pathways / Source: Kas Concrete
How to hire a concreter
When you want to install an exposed concrete driveway, make sure the person you hire has the proper qualifications and meets all of Australia’s licensing requirements. Not just any mason has the training, qualifications, expertise and experience to install the concrete driveway finishes like aggregate concrete. Talk to friends and neighbours who have had attractive concrete driveway finishes with the aggregate pebbles in it done and ask them for references. Many of the local concreter trade organizations and associations may also be able to refer some adequately licensed and qualified concreters in your area with expertise and experience doing pebbled concrete driveway finishes.
Sunflowers are one of the most beautiful plants that you can grow at home. As long as they have enough light, they can shoot straight up in the air with bright yellow flowers that point towards the sun. Before running out and buying some seeds or plants, give some thought to how you’ll grow this flower and make sure that you have the right lawn or garden.
How to grow sunflowers
Sunflower soil
The first thing to know about growing sunflowers is the soil that you need. You’ll have the most success if you have a low to mildly acidic soil. It should have a pH of 6.0 to 7.5. Most home improvement and landscaping stores have kits that let you test the acidity of the soil.
If you find that your soil is more or less acidic, consider growing sunflowers in pots. Using pots gives you more control over the soil and allows you to make sure that you have the right soil. You can always move the pots to provide the plants with more sunlight too.
When to plant sunflowers
The sunflower season in Australia typically starts in early January and ends around the middle to the end of March. People come from all around the world to see the fields in bloom.
Planting sunflowers in pots gives your more control over the soil / Source: Shutterstock
How to plant seeds
When you choose seeds rather than plants, you want to plant each seed between .38 and 6.3 centimetres deep in the soil. This distance puts the seeds close enough to the surface that they get the light that they need but deep enough that they absorb the necessary nutrients from the ground. Though you can plant them deeper in the soil, this is the optimum depth.
While a field of sunflowers in bloom can turn heads and create an impressive display, planting the flowers too close together will keep them from growing. The plants fight with each other to get the nutrients they need. As they grow, they will not get the sunlight that they need either.
You’ll want to plant the seeds around 15 centimetres apart from each other to give them enough space. If you’re going to plant a field, use up to three plants per row.
Companion planting
Companion plants let you create a better sunflower garden or landscape. Most lettuces are a good choice because they don’t need the same nutrients and won’t get in the way of the flowers. Lettuce also makes a great ingredient in many dishes. Other companion plants that you can choose include squash, kale, onions and cucumbers.
How long do sunflowers take to grow?
You may want to know how long it takes sunflowers to grow because you want to know how quickly you can enjoy the blooms. These plants take an average of 80 to 120 days to grow from seed. Plants take between 60 and 80 days to bloom.
Looking after sunflowers
Water and sunlight requirements
Sunflowers are an excellent choice for Australian gardens because the plants do not need a lot of water. During the germination process, the seeds need roughly 2.5 centimetres of water every week. Even if you forget to water them daily, they should still thrive.
Once you have sunflower plants, you’ll want to use around 15 centimetres of water per week. When watering the plants, use a nozzle that gives you more control and aim it in the direction of the plants. Add enough water that the top few centimetres of the soil are moist. As the soil absorbs the water, it will reach the roots of the plants.
As sunflowers grow, the flowers start pointing towards the sun. The plants need a minimum of six hours of sunlight every day up to eight hours. If you use pots, you can move the plants into a spot where they’ll get more sunlight.
Contact local gardeners
Pests to look out for and protect against
Certain types of pests can attack the sunflowers in your yard. Many of these are insects that will eat the leaves and flowers as well as the roots and stalks. Beetles and maggots are incredibly common. It would help if you also watched out for caterpillars and some types of moths.
If you worry that you can’t leave the sunflowers alone in your yard, using a pesticide can help. Organic pesticides work well and will not damage any nearby plants.
Staking sunflowers
The biggest problem with growing sunflowers in Australia is that the stalks aren’t strong enough to support the weight of the blooms, which is why you need to use stakes. Choose stakes that are roughly half the height you expect the finished plants to grow to give them enough added strength. Giant sunflowers are much larger and need stakes that are both taller and wider. You can use gardening twine to secure the flowers to the stakes.
Sunflowers are a bright and eye catching addition to a garden / Source: Shutterstock
Harvesting and pruning
You typically want to prune a sunflower plant twice a year. Pruning this often ensures that the flowers have the space that they need and won’t grow into each other. The best time to prune the plants is in late January or early February. You need to remove the leaves growing on the stalks and any smaller flowers sprouting on the sides.
Harvesting the finished plants allows you to create bouquets for your home and others. As long as you have good pruning shears, you can easily remove the blooms on the top of the stalk.
If you want to harvest the seeds for next year, remove the flowers from the stalks. You’ll then want to put the flowers in a dry spot with the seeds facing up and let it dry for several weeks. Once the seeds turn dark brown, use scissors or shears to remove them. You can then keep the seeds safe until the following season.
How to hire a gardener
Licensing and qualifications
You want to look for someone with strong qualifications. The C&G Advanced National Certificate in Horticulture and the Horticulture Certificate from the Royal Horticulture Society are just a few of the certificates that Australian gardeners may have. You can look up a gardener by his or her name or the license number that the person has to make sure that they have the qualifications that you need. Hiring a gardener can cost $50 to $100 based on what you need. They can handle everything from planting your sunflowers to harvesting them at the end of the season. Check on the licensing and qualifications that local gardeners have today to get help with your sunflowers.
• After builders cleaning is a specialised deep-cleaning service that removes construction dust, debris, and trade defects left behind after building work. • This cleaning service is essential for homeowners post-renovation, tenants moving back in, landlords preparing properties for lease, and real estate agents staging homes.
Did you know Australian homeowners spend between $5,000 and $15,000 on average for home renovations? But once the dust settles—literally—many overlook one critical step: professional after builders cleaning.
Renovations can leave behind hazardous debris, including fine construction dust and microscopic particles that can’t be easily removed with standard cleaning. That’s why a thorough post-renovation clean is less a finishing touch than an essential step in making your new-and-improved dwelling truly ready to live in.
This guide explains what after builders cleaning entails, who benefits from these services, and how to approach this essential step that transforms construction sites into liveable spaces.
What is after builders cleaning?
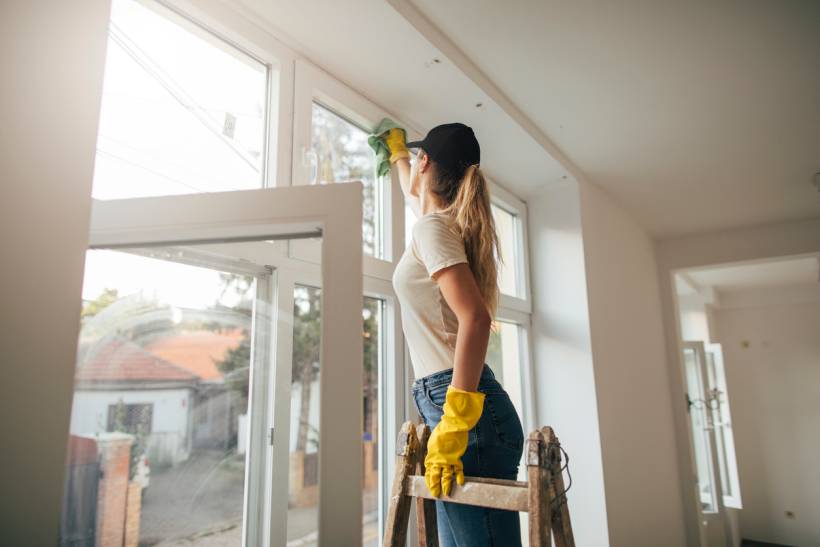
A cleaner getting into the hinges to clean the windows. | Source: iStock
After builders cleaning is a comprehensive service performed after construction or renovation, focusing on removing construction debris, dust, and trade defects. This differs from general house cleaning because it addresses unique challenges left by building work.
Contrary to popular opinion, after builders cleaning is not the same as standard house cleaning. This approach often leads to paying more for inferior results. This is because regular cleaners don’t have the proper training, equipment, or expertise to deal with post-construction messes like after builder cleaners do. Below are some of the things an after builders cleaning tackles:
Heavy construction dust that penetrates every corner and crevice
Paint splatters and concrete residue on windows and surfaces
Grout haze and adhesive remnants
Fine particles that regular vacuum cleaners can’t capture
Trade defects that need specialised removal techniques
Who needs an after builders cleaner?
Moving into a new house. | Source: iStock
After builders cleaning serves several key groups who need to transform construction sites into liveable or sellable spaces:
Homeowners post-renovation
Whether you’ve renovated a bathroom or undergone a whole-house makeover, you’ll need professional cleaning to make your space truly move-in ready. This is especially crucial after major projects like kitchen renovations, home extensions, or wall knock-downs that brings upon significant dust and debris.
Many after builder cleaners frequently address common homeowner questions, such as, ‘Do you clean a new house after handover by builder?’ The answer is typically yes, as even new constructions require professional cleaning to remove all traces of construction dust and ensure the space is move-in ready.
Tenants moving back in
If you’ve been staying elsewhere during renovations, after builders cleaning ensures your home is safe and comfortable for your return. This is particularly important for families with children or anyone with respiratory sensitivities.
Landlords and property managers
Investment property owners rely on after builders cleaning to prepare renovated properties for new tenants. A thorough clean not only meets rental standards but also maximises rental potential and creates positive first impressions on potential tenants and serious buyers.
Real estate agents and property developers
When staging properties for sale or preparing display homes, after builders cleaning is essential for showcasing quality workmanship and helping potential buyers imagine themselves in the space.
Commercial property owners
Office fit-outs, retail renovations, and commercial construction projects all require professional cleaning before businesses can operate safely and present a professional image to customers.
What services are included in an after builders clean?
How much accumulated dust could look like post-construction. | Source: iStock
A comprehensive after builders clean covers multiple specialised tasks that go well beyond standard cleaning:
Core services include:
Complete dust removal from all surfaces, including hard-to-reach areas like ceiling fans, light fittings, and air vents
Floor and wall cleaning using appropriate techniques for different materials (timber, tile, carpet, painted surfaces)
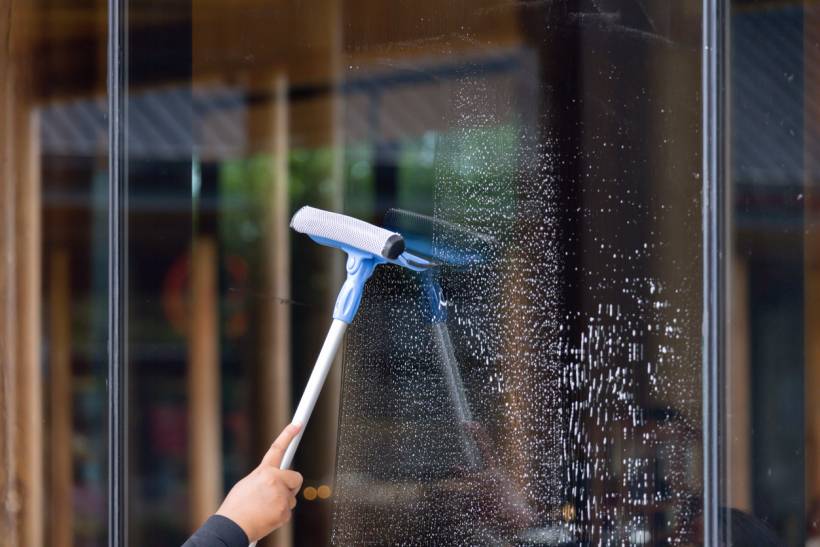
Window and glass cleaning, including removal of paint splatters, concrete residue, and protective film adhesive
Polishing and detailing of fixtures, fittings, and newly installed surfaces
Grout cleaning and haze removal from tiled areas
Kitchen appliance cleaning, both inside and out, ensuring they’re spotless and functional
Bathroom sanitisation with special attention to grout lines, fixtures, and tilework
Skirting board and door frame cleaning to remove dust and construction marks
Optional add-ons:
Steam cleaning of carpets and upholstery
External window cleaning and pressure washing
Oven and range hood deep cleaning
Carpet protection treatments
Ongoing maintenance cleaning schedules
Dust removal
Construction dust contains fine particles that penetrate surfaces and air systems, requiring HEPA-filtered vacuums and special techniques for their complete removal.
Professional cleaners understand that construction dust behaves unpredictably—it can float back into the air with movement or airflow, cling to surfaces and equipment through electrostatic charge, and penetrate porous materials.
That’s why they use systematic methods—starting high and dry, progressing top to bottom and clean to dirty—and rely on HEPA‑filtered vacuums and damp‑mopping, which capture and remove dust standard tools often miss, as opposed to regular vacuums that often stir up fine dust rather than remove it.
Professional cleaners handle debris removal as part of their service, though major renovation waste disposal may require separate arrangements.
What are the phases of after builders cleaning?
Professional after builders cleaning follows a structured two-phase approach, though some companies offer a third phase for optimal results:
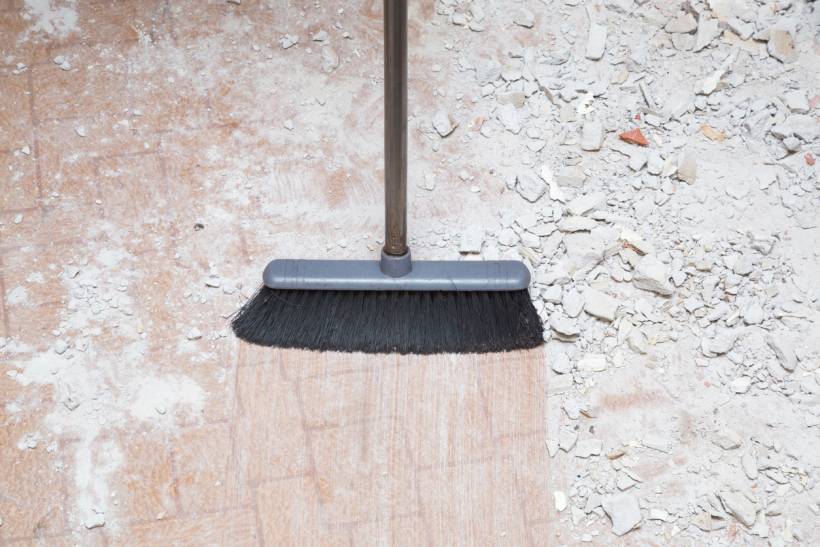
Phase 1: Initial clean (rough clean)
Sweeping a floor covered with post-construction debris. | Source: iStock
The initial clean, the rough cleaning, is normally performed midway through construction or immediately after major building work, focusing on large debris removal, dust extraction, and clearing construction waste. This phase includes:
Removing construction materials, tools, and large debris
Sweeping and heavy-duty vacuuming of floors and surfaces
Basic dust control in areas where drywall or sanding occurred
Clearing walkways and preparing spaces for final trades
The initial clean also gives builders an opportunity to identify defects in workmanship that can be rectified before project completion. Understanding builder costs and responsibilities helps clarify whether this initial cleaning phase is included in your construction contract or requires a separate arrangement.
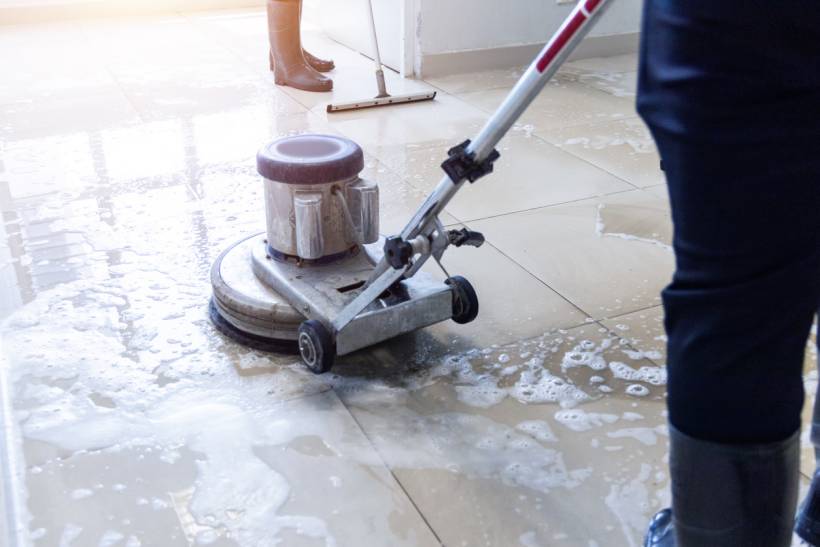
The final clean occurs after all construction work has finished and involves the most thorough cleaning stage, focusing on deep cleaning all surfaces and removing construction defects. This comprehensive phase includes:
Precision cleaning of fixtures, appliances, and fittings
Detailed attention to baseboards, window sills, and architectural features
Removal of paint splatters, grout haze, and adhesive residues
Polishing of all finished surfaces
Complete sanitisation of kitchens and bathrooms
This final detail clean is what sets real builders clean apart from regular house cleaning and gives your home that showroom-quality finish.
Contact local cleaners
8 reasons why you should invest in after builders cleaning services
Professional cleaners working at a new home. | Source: iStock
Investing in professional after builders cleaning offers significant benefits that extend far beyond basic cleanliness:
1. Deeper sanitisation
Construction work introduces contaminants that standard cleaning cannot address. According to WorkSafe Australia, construction dust can contain respirable crystalline silica (RCS) particles that can remain suspended in the air longer than typical dust. When inhaled, they can penetrate deep into the lungs.
Professional cleaners use industrial equipment and specialised products to eliminate fine dust particles, chemical residues, and potential allergens that could affect your family’s health.
2. New surface protection
Your renovation represents a significant investment. Professional cleaners understand how to clean different materials without causing damage, protecting your new surfaces while removing construction residues that could cause long-term problems if left untreated.
3. Improved air quality
Construction dust circulates through air systems long after work completion, potentially causing respiratory issues. Safe Work Australia’s workplace exposure standards require that no person be exposed to respirable crystalline silica dust above 0.05mg/m³ as an 8-hour time-weighted average.
Professional cleaning includes air vent cleaning and dust extraction that significantly improves indoor air quality.
4. Time and energy savings
After builders cleaning is intensive work that can take 25–30 hours for a single-storey home. Smart homeowners who plan their renovation budget include professional cleaning costs upfront, saving themselves significant time and effort while ensuring superior results.
5. Professional results and peace of mind
Professional cleaners identify construction defects that untrained eyes might miss, complementing building inspections, ensuring your space is ready for enjoyment or sale. This expertise, combined with insurance coverage, provides peace of mind that the job will be done right.
6. Increased property value and appeal
A professionally cleaned post-construction space maximises your home renovation investment and makes a significant difference in how buyers or tenants perceive your property.
Clean, sparkling surfaces showcase the quality of your renovation work and help potential occupants envision themselves in the space, potentially increasing offers and reducing time on the market. This is helpful for homeowners who plan to sell or have their home rented out in the future.
7. Compliance with safety standards
Construction sites can leave behind hazardous materials like sharp debris, chemical residues, and fine particles that pose safety risks. Professional cleaners are trained to identify and safely dispose of these materials according to Australian safety regulations, ensuring your space meets occupancy standards.
8. Professional cleaners ensure your home is safe for move-in
Most construction contracts don’t include comprehensive post-build cleaning, leaving property owners responsible for the final cleanup.
While no uniform legal requirement exists at the federal level for after builder cleaners, qualifications like the CPP30321 Certificate III in Cleaning Operations are widely recognised and valued in this profession. It covers critical competencies in chemical handling, safety practices, equipment use, and service delivery, showcasing a cleaner’s professionalism, especially in detailed post-build scenarios.
5 tips on choosing a reliable after builders cleaner
Wiping off dust on lamps. | Source: iStock
Selecting the right cleaning service ensures quality results and protects your investment:
1. Verify experience and specialisation. Look for companies that specifically advertise after builders cleaning, not just general cleaning services. One green flag is that when you ask about ‘what is a builder’s clean,’ they can answer by defining what it does, what it’s for, and how it’s different from general cleaning. Ask about their experience with construction cleaning and request examples of similar projects.
2. Check licensing and insurance. Ensure the company holds appropriate licences and comprehensive insurance coverage. This step protects you from liability if accidents occur on your property.
3. Review customer feedback. Read online reviews and ask for recent customer references. Pay attention to comments about punctuality, thoroughness, and professionalism.
4. Understand service scope and pricing. Get detailed quotes that clearly outline what’s included and excluded in their package. Be wary of quotes that appear too good to be true, as they might suggest cost-cutting or the use of inexperienced staff.
5. Confirm equipment and products. Ask about the cleaning equipment and products they use. Look for companies that use HEPA-filtered vacuums, eco-friendly products where possible, and have insurance for their equipment.
Some helpful questions to ask
Before hiring an after builders cleaning service, ask these essential questions to ensure you’re making the right choice:
Do you bring your own equipment and supplies, or do I need to provide anything?
What specific services are included in your quoted price, and what costs extra?
How do you structure your pricing—is it hourly, per square metre, or a flat rate?
How long do you estimate the cleaning will take for my specific project?
Do you offer any guarantees on your work, and what happens if I’m not satisfied?
Can you provide recent references from similar construction cleaning projects?
What safety procedures do you follow when dealing with construction dust and chemicals, and do you comply with Safe Work Australia guidelines?
Should I clear away tools and materials before you arrive, and how should I prepare the space?
From construction to move-in ready
Completing a renovation or new build is exciting, but the reality of construction dust and debris can quickly dampen that excitement. The difference between a space that’s structurally finished and one that’s actually ready to live in often comes down to proper cleaning.
Professional cleaning ensures that your investment is protected and properly showcased, giving you the clean, fresh start in your newly improved space that you deserve. To find trusted after builders cleaners in your area, explore qualified cleaning professionals who can deliver the quality results your project deserves.
FAQs on after builders cleaning
How can I prepare for new home cleaning?
Clear away any remaining tools, materials, and large debris before the cleaners arrive. Protect valuables, remove fragile items, and communicate any specific areas of concern.
Is after builders cleaning different for new constructions vs. renovations?
While the core cleaning process is similar, post-renovation cleaning often involves more contained messes like drywall dust, while new constructions have site-wide debris. Specific services may vary.
What are some common areas that require extra attention during an after builders clean?
Areas like ductwork, appliances, cabinets, and windows often need extra attention to remove embedded construction grime and dust. Specialty after build cleaning may be required for fireplaces or intricate surfaces.
How long does an after builders cleaning usually take?
It takes about 1-3 days to complete a builders clean for a single-storey home if external windows are included. The actual time depends on the size of your property, the extent of construction work, and how clean your tradespeople were during the project.
Note that properties with complex architectural styles, such as Victorian or Colonial designs, often require additional time due to intricate details that require careful attention.
Can I stay in the house while it’s being cleaned?
It’s generally not recommended to stay in the house after builders clean, especially during the initial phases. The cleaning process involves strong chemicals, intensive dust removal, and potential safety hazards. If you must stay, ensure good ventilation and avoid areas being actively cleaned.
Is it different from end-of-lease cleaning?
Yes, significantly. While both are thorough cleaning services, after builders cleaning specifically addresses construction debris, dust, and trade defects using specialised equipment and techniques.
On the other hand, end-of-lease cleaning focuses on general deep cleaning to meet rental property standards and doesn’t typically involve removing construction residues.
Do I need to remove furniture beforehand?
If furniture was covered and protected during construction, it may only need surface cleaning. However, if furniture was exposed to construction dust, it should be professionally cleaned or temporarily removed to allow thorough cleaning of the space. You can discuss this concern with your cleaning service during the initial assessment.
As the world seems to be getting noisier and noisier, most of us are becoming even more determined to keep as much noise as possible out of our living spaces. With increased traffic outside, as well as high-tech stereos and entertainment centres in our homes – not to mention the smaller yards separating houses, it seems as if were more vulnerable than ever to the noises of our neighbours as well as the sounds produced by the rest of the outside world.
Soundproofing with plasterboard
There are three types of plasterboard that are commonly used for soundproofing:
Barrierboard: This Australian-made plasterboard comes from a composite material that reduces outside noise levels by as much as 75 percent. Barrierboard is comprised of two sheets, with a layer of insulation in between. This rigid, 32mm board wont sag or bend, and can be applied directly onto standard walls without having to make construction changes to areas such as doorways.
BoralSoundSTOP: Especially engineered for areas with acoustic walls and ceilings installations. Its used in conjunction with the Quiet Living, CinemaZone and PartiWALL systems produced by Boral. One advantage of the Quiet Living system is that is uses the same width as a standard interior wall, so its compatible with standard window frames, door jambs and other features. Likewise, Borals CinemaZone system is specially designed to protect your home theatre room from outside noises while enhancing and controlling the noise levels from the theatre speakers. Note: Boral SoundSTOP is so effective that loud outside voices can only be heard as a quiet murmur indoors. If more sound blocking is needed, you can add another layer to the wall.
GyprockSoundchek: This 10mm plasterboard is made with a thick, sound-reflective gypsum core thats layered with heavy-strength liner boards. It comes in two levels: STC 45, which can make conversations inaudible, and STC 50, which reduces sounds produced by music.
Enhancing your soundproofing
To enhance your plasterboard soundproofing, you can combine it with either wall or roof insulation to add another layer of protection. You can also apply it to solid doors that have been surrounded with protective door seals. If you have an entertainment centre or home theatre, you’ll want to also install soft carpeting and furnishings that are quiet and don’t creak. Additionally, take steps to ensure that light switches and power points aren’t placed back to back, as sound can leak through the gaps that were created for these installations.
Along with plasterboard, ensuring your home is properly insulated will help reduce noise / Source: Active Vac and Insulation
Soundproof doors
A soundproof door is heavily insulated to block out noise and vibrations from the outside. This reduction in noise is achieved with strong acoustic seals and quality insulation. Acoustic doors are made in accordance with standards of sound resistance and should be certified after testing. They are available in a wide range of materials like laminated steel, galvanised steel and also sheet metals.
Different types
Once you have considered your soundproof requirements, you can choose doors in different sizes and types.
The main doors available include the following:
Double or single sliding doors
Swinging doors, single or double.
Smoke or fire doors.
Magnamatic or electronic automatic doors.
Lightweight or heavy doors.
Soundproof windows
Noise from the street can get in easily through single glazed windows. The glass is thin, but there are also small holes and gaps around the window frame and joints that allow sound to transmit into your home. The sound can also travel through vibration as the noise hits the glass and vibrates through your house. Ensuring that your windows are well-sealed is one step to take, but getting them double glazed provides extra soundproofing.
Double glazed windows
Double glazed windows are completely sealed and do not allow the air to vibrate sound into your home. There are two layers of glass with a small gap between them, which helps to kill the vibration. Additionally, the extra pane of glass means that any outside noise has two panes to travel through before it can break into the peacefulness of your home. Double glazed windows can prevent the transmission of noise by up to 70 percent. New home builds will likely have double glazed windows, however older homes will need to retrofit these.
Contact local glaziers
Other soundproofing tips
In addition to plasterboard, soundproof doors and windows, here’s some other tips to minimise noise where it’s needed; for example a home theatre.
Ensuring adequate insulation throughout the ceiling and walls
Plush furnishing and carpet, as well as heavy window coverings that can absorb sound
Whether you have natural grass, sod or artificial turf, there may come a time when you need to do some maintenance to whip your lawn into shape again. For example, if your lawn has brown spots or is looking worn, it’s probably time to take action. Here we’ll explore whether you should be replacing or repairing your lawn in order to bring it back to it’s full glory.
The best time to work on your lawn
The best time to repair or replace your lawn is between late autumn and spring. During this season, your lawn is starting to hibernate in preparation for the peak growing season.
If you need to repair your lawn, the best time is between late autumn and spring / Source: Old School Landscaping
Signs your lawn needs to be repaired
Signs that your lawn needs to be repaired include:
Bare spots in your lawn
Large areas of lawn that don’t look healthy
Areas of lawn that are burned
There are a lot of weeds in your lawn
Areas of the lawn look old or worn
Pieces of turf are missing or damaged
The best ways to repair your lawn
There are different maintenance techniques that you can use to revive your lawn. Here are some useful lawn maintenance techniques:
1. Aeration
Weeds thrive in arid, dense soil and plants starve from deprived oxygen and nutrients. Aerating your soil is the best way to achieve rapid repair. It breaks through thatched layers, enables roots to breathe and increases water and nutrient penetration.Aeration makes the soil more able to absorb water, and being doing this regularly you’ll likely reduce the amount of water needed to keep your lawn looking healthy all year round.
To aerate your lawn, use an aerating tool to loosen compacted soil during autumn or early winter. After aerating put fertiliser, sand or compost over the grass to give added nutrients to the soil. Be sure to trim your lawn down before aerating in order to get as deep in the soil and root system as possible.
2. Dethatching
Dethatching is a process where you remove a layer of grass stems, roots, clippings and other debris that have accumulated in your lawn. Although having thatch is important, a build-up of debris can suffocate your lawn, causing it to look worn and dull. Too much of thatch can also prevent water and essential nutrients from seeping into the roots of the grass. An easy way to dethatch your lawn is to go over it thoroughly with a rake to remove the debris.
3. Seeding
Spread new grass seeds over your lawn if you have a lot of brown or burned spots. Spread more seeds than you need to make your lawn look thick and lush.
Signs your lawn needs to be replaced
If your lawn is in really bad condition, maintenance techniques won’t be enough to save it. Signs you need to completely replace your lawn include:
The entire lawn is dead
Large areas of the lawn are dead and have not responded to maintenance attempts
The turf is damaged or worn
Sometimes a lawn will need to be completely replaced / Source: All Lawns and Garden
How to replace your lawn
To replace your lawn, you first need to remove your existing lawn. Use a hoe to uproot the entire lawn, including the roots, and rake away all the debris. Then spread rich topsoil as a base for your new lawn. After you have done these steps, you can spread new grass seeds or lay new sod. Be sure to give your lawn plenty of water.
If you are planning to lay artificial turf, you should still remove the old lawn and debris, but you don’t need to lay a rich topsoil, since artificial turf is not alive.
Tips for maintaining your lawn
Feed your lawn
Nourishment is the key to maintaining a lawn that looks good. For a healthy looking lawn, ensure that it has adequate fertiliser. Fertilisers should be added in spring to promote good growth in the summer. Fertilisers can be bought at gardening stores, or in the gardening section of hardware department stores. When buying fertiliser, make sure you buy one specifically made for lawns. Lawn fertilisers may be organic, synthetic or a combination of the two.
Prior to applying fertiliser, make sure that your lawn is free of weeds and is well aerated. To simplify your job, there are a number of fertilisers that come with added weedkillers. Apply fertiliser in even coats. Doubling up the fertiliser may burn the grass. Once you have added the fertiliser, remember to water it in.
Remove weeds
Removing weeds is essential to promoting healthy lawn growth. Weeds grow very quickly and easily and can hamper the growth of your lawn if given the chance to grow. Weeds should be pulled out as soon as they come in. There are special tools that you can use to weed while standing.
Contact local gardeners
Ensure adequate water supply
Lawns need to be watered regularly for healthy growth. Lawns are best watered in the morning before the sun comes out. Make it a practice to water your lawn at the roots. This will promote growth at the deeper root level as well.
Learn how to mow
Make sure you mow your lawn the correct way. Never mow it shorter than 7.5 centimetres. Any shorter, and portions of your lawn may actually die off.
Keep your lawn slightly acidic
Plan to periodically — annually is best — test your lawn’s pH with a soil testing kit. You want it be slightly acidic at about 6 or 6.5. Any higher, and your lawn is too alkaline, lower and it’s too acidic. You can fix acidic lawns by spreading dolomite or garden lime. An alkaline lawn can be repaired by spreading sulphate of ammonia over the lawn. With any of these products, make sure to carefully follow the instructions and water them into the lawn well.
They say the body is a temple, but since most of our modern life is spent working it can be difficult to maintain a healthy, balanced lifestyle. As many of us are now making the shift to working from home, we also have the opportunity to be more flexible with how we approach this balance.
Here are some ideas to help you stay motivated and healthy when working from home.
1. Alignment of values
It’s been well documented that to be fulfilled by their work, people must have an understanding of the company’s strategies, mission, values, and ethics, and align them to their ideals. The product, its purpose, social and environmental impacts should all be considered. If you’re consistently unhappy with your organisation, they may not align with your personal morals.
2. Keep learning
In order to stay motivated with your career, it’s vital that you continue to learn. If your work is starting to feel stale consider enrolling in a short course or take a look for any upcoming seminars or workshops. Sometimes a fresh perspective and meeting like-minded colleagues can make all the difference.
3. Have courageous conversations
Learning to say ‘no’ on occasion can be challenging but is imperative to protecting your health. It’s important to have courageous conversations with others when something needs to be said, but the message is complicated and sensitive. The immediate discomfort will pass, but is preferable to the accumulation of long-term effects of ignored problems being swept under the rug.
4. Take breaks
Taking scheduled breaks, where possible stepping outside for some fresh air, will help break up your day. You should also consider scheduling in regular mini-breaks and getaways will help to de-stress – having something to look forward to on the horizon is almost as fun as the holiday itself.
5. Contributing and adding value
As conscientious employees, people want to contribute to the team (especially when they’re not physically present) and add value to the company. Try volunteering to assist on special projects – within healthy limits. A cohesive, healthy team will celebrate individual and group wins.
6. Ask for help
Sometimes work can get on top of everyone. Pulling together during more challenging times is a sign of a good workplace. Don’t be afraid to call for help when and if you need it. If the company culture is the right one for you, the team will be receptive and supportive.
7. Be understanding
Try to understand people and their real motivations when they act negatively or in an unexpected way. A little empathy can go a long way to diffusing tough situations, and protect you from internalising the negativity of the situation. It’s also important to remember that when communicating via email/chat, the tone of the conversation is very different to in-person, and therefore people can be easily misinterpreted.
8. Ergonomics
Ensure your home office set up is as ergonomic as possible. A healthy posture will help with not only physical wellbeing but can also help you feel alert, focused and confident. Consider furnishing your home office with an up-and-down, standing desk that will promote better health than sitting all day. Stash the spare yoga mat and exercise bag and stretch daily. Wear nice, but comfy clothing and supportive footwear.
Finding a positive outlet for emotions is another excellent way to protect an employee at work or when dealing with work stress from home. What works for some won’t work for others. For example, some might blow off stress by going for a run, while others simply need to step out for some fresh air and sunlight.
10. Know your limitations
When working, a good employee will want to do everything right. They’ll want to be seen as authoritative and will want to be able to do it all. Knowing one’s limitations will help them to avoid mistakes, illness, and breakdowns.
11. Mindfulness
One should practice mindfulness and breathing. Being present, being aware of stresses on the body and focusing one’s attention on the current task is essential. Try a 5-minute lunchtime meditation to calm your mind and help focus.
12. Healthy meal options
Keeping up a healthy amount of vitamins and nutrients is essential for overall well being. Choose healthy lunch options like fresh salads or sandwiches, and snack on high energy foods like fruits and nuts. Try mixing it up with some vegetarian options – it’ll push you to be more creative with your meals, trying things you may not have otherwise thought out.
13. Plan the week’s diet
Even if you’re working from home, being prepared can help make life easier. Prepping weekly menus will keep you from resorting to the convenient, less healthy options because you’re hungry and unprepared.
14. Drink more water
Buy a large drink bottle for the office, and make sure it is filled up daily with fresh water. If you’re not great at remembering to hydrate while working, try setting reminders at intervals throughout the day to coach yourself toward better habits.
Wrap up
In the end, one’s success and happiness are majorly up to them; finding what they need from what they want. Aligning their values with a company’s and choosing a workplace that gives back to their workforce, the external community, and to the planet is increasingly more critical. Having robust, best-practice strategies, like the ones above, promote wellness and can fix or mitigate many potential health risks people face from outside and within. Being kind to others and remembering that the workplace is made up of humans working together, even when using remotely, will make work and life more balanced and better for everyone.
The first step in any new home construction or redesign is finding a professional designer who will help make your dreams a reality. This is not something for the amateurs; you need to go pro if you want to get the most practical, beautiful home out there for you and your family. That means you’ll need to either employ a building designer or an architect. However, this process can be tricky – and it’s not one you can afford to mess up. We’ve put together a guide here that will help you choose which type of designer is best and how to find the right one.
Qualifications
Architects and building designers are both qualified to design buildings, but there are some legal differences between the two. An architect is required to have the following:
Successful completion of required university courses specific to the architectural field
Acceptance and up-to-date membership (with all current fees paid) in the state board of architecture
Necessary insurance licenses and registration/certification documents
Building designers aren’t required to have any of these things, but they do need to be licensed from an appropriate state building board, such as a Building Services Authority, and they have to be fully insured with the requisite policies. These legal requirements are nationwide and were implemented for the protection of consumers.
Although it’s not required, a large number of building designers also join distinguished professional organizations, such as the Building Designers Association or the Royal Australian Institute of Architects. In order to join, designers have to prove their competency, and membership is an added cachet that can help inspire consumer confidence.
Architects and building designers can create detailed renders of your building plans / Source: Artin Design
Who is more competent?
Builders and architects should be judged by their individual competencies and merits. As with architects, many building designers have established a stellar reputation through years of accomplishment and enthusiastic client referrals. Likewise, some building designers or architects may be more comfortable designing commercial buildings rather than residential homes. Otherwise, you should consider the two designations as being completely equal and go from there.
Finding the right building designer or architect
When contacting a building professional, you’ll first want to get their references and credentials. Your builder should be fully insured and licensed to work in the state where your building site is. Look for membership in reputable professional organizations; these are always a plus. Check referrals and ask for photos of similar jobs. If the building designer or architect is new in the profession, ask for copies of preliminary studies and design drawings.
After establishing credentials, discuss your design specifications to determine if this particular professional can accomplish the results you’re looking for.
Contact local building designers
The price of a designer
Odds are that you’ll never find two building designers with the same type of fee structures – they’re usually very dissimilar. They might offer a fixed or an hourly fee, first off, and the cost will be dependent on the varying levels of service they offer. Basic services might only include a consultation, site visit and design and would only include the most bare-bones drawings. More advanced services generally include consultant use and the design of the landscape and interior, along with the electrical layout. Eventually, you’ll likely be charged a percentage of the total price of the project. A rough estimate might come out to 7.5% of the total for full service or around 5% of the total for basic service. Don’t forget to get an upfront look at the fees before you sign any contract.